
Category: Craft

Experiment
This week marks the second anniversary of starting this blog. There have been 105 posts so far and in that time, my babies have continued to grow and change. I, too, have continued to grow and change. When I started this blog I wasn’t sure why I even started it, except to try something outside my comfort zone. Something that would push me to think about things a little differently – to create a personal rhythm to my week. Something to create structure where there was none, except that which relates to the growing of children. This blog was an experiment. It pushed me to try to answer these questions:
“Is there anything that I am doing this week that inspires me?”
“What am I thinking about now that will be difficult to remember later?”
“What can we do to keep exploring?””
There have been weeks when all our family could manage was to stick to the routine and get by. But then there were the weeks when I found a little extra creative energy to photograph a food dish that I was preparing for my family and wanted to share with you. There have been the weeks where it felt extremely important to mark the changes or joys happening that very minute. Or, those weeks that I thought about a project I was curious about and actually did it. Probably the most satisfying element of the blog has been when it has re-connected me to people in my community. Over the last few years the blog has held me accountable to my creative self and I have loved that.


Gus and I just took our first trip away from the babes. This felt big. This felt huge. It required so much planning and as we were leaving I wondered if the trip was actually worth all the work. I was worried about what kind of disaster would occur while we were gone. And I couldn’t stop thinking about the kids for the first few days… but eventually we relaxed. The grandparents that stepped in for us did so with gusto and everyone did so well. The whole thing was such a great experience and we are so thankful for the support. We had such a good time remembering that this whole party started with just the two of us ten years ago.
Lately, I have found my attention drifting towards a new creative project. I haven’t been posting here as frequently and I have been wondering whether the blog’s useful life is over. In some ways, it has served its purpose. It helped to re-awaken a curiosity in me and learn the value of taking time for myself to try things. This blog was started to track my progress on the path to reacquaint myself with who I am as an individual and who I want to be in the next chapter. Our trip reminded me that I have a bit more work to do on this path of discovery and separation.
In the future, it is likely that my passion projects will be shown on a different space entirely, so stay tuned for that; but whether it is on this blog or somewhere else, I am committed to continuing this work of experimenting, exploring and discovering. I hope you’re with me!
Inspire Me
Spring is all about new beginnings. And I find myself in awe of how many friends are setting out on new roads. As excited as I am for these friends and their new adventures, I am also aware of feelings of being somewhat left behind. So, in an effort to positively move forward, I have been working hard on finding new sources of inspiration. I have been sewing like crazy and getting into other fun projects, (but many of those will have to wait to be shared)!

Taking a class can be wonderful inspiration. It could be a class about something you have always wanted to learn or something that just seems fun, or even a bit random. I have taken sewing classes that have taken my skills to new levels, as well as a random wool felting class resulting in some cute (and odd) little animals. Sometimes the best thing about taking a class isn’t the subject as much as what it inspires inside, who we meet, or simply the satisfaction of creating something with our own hands.

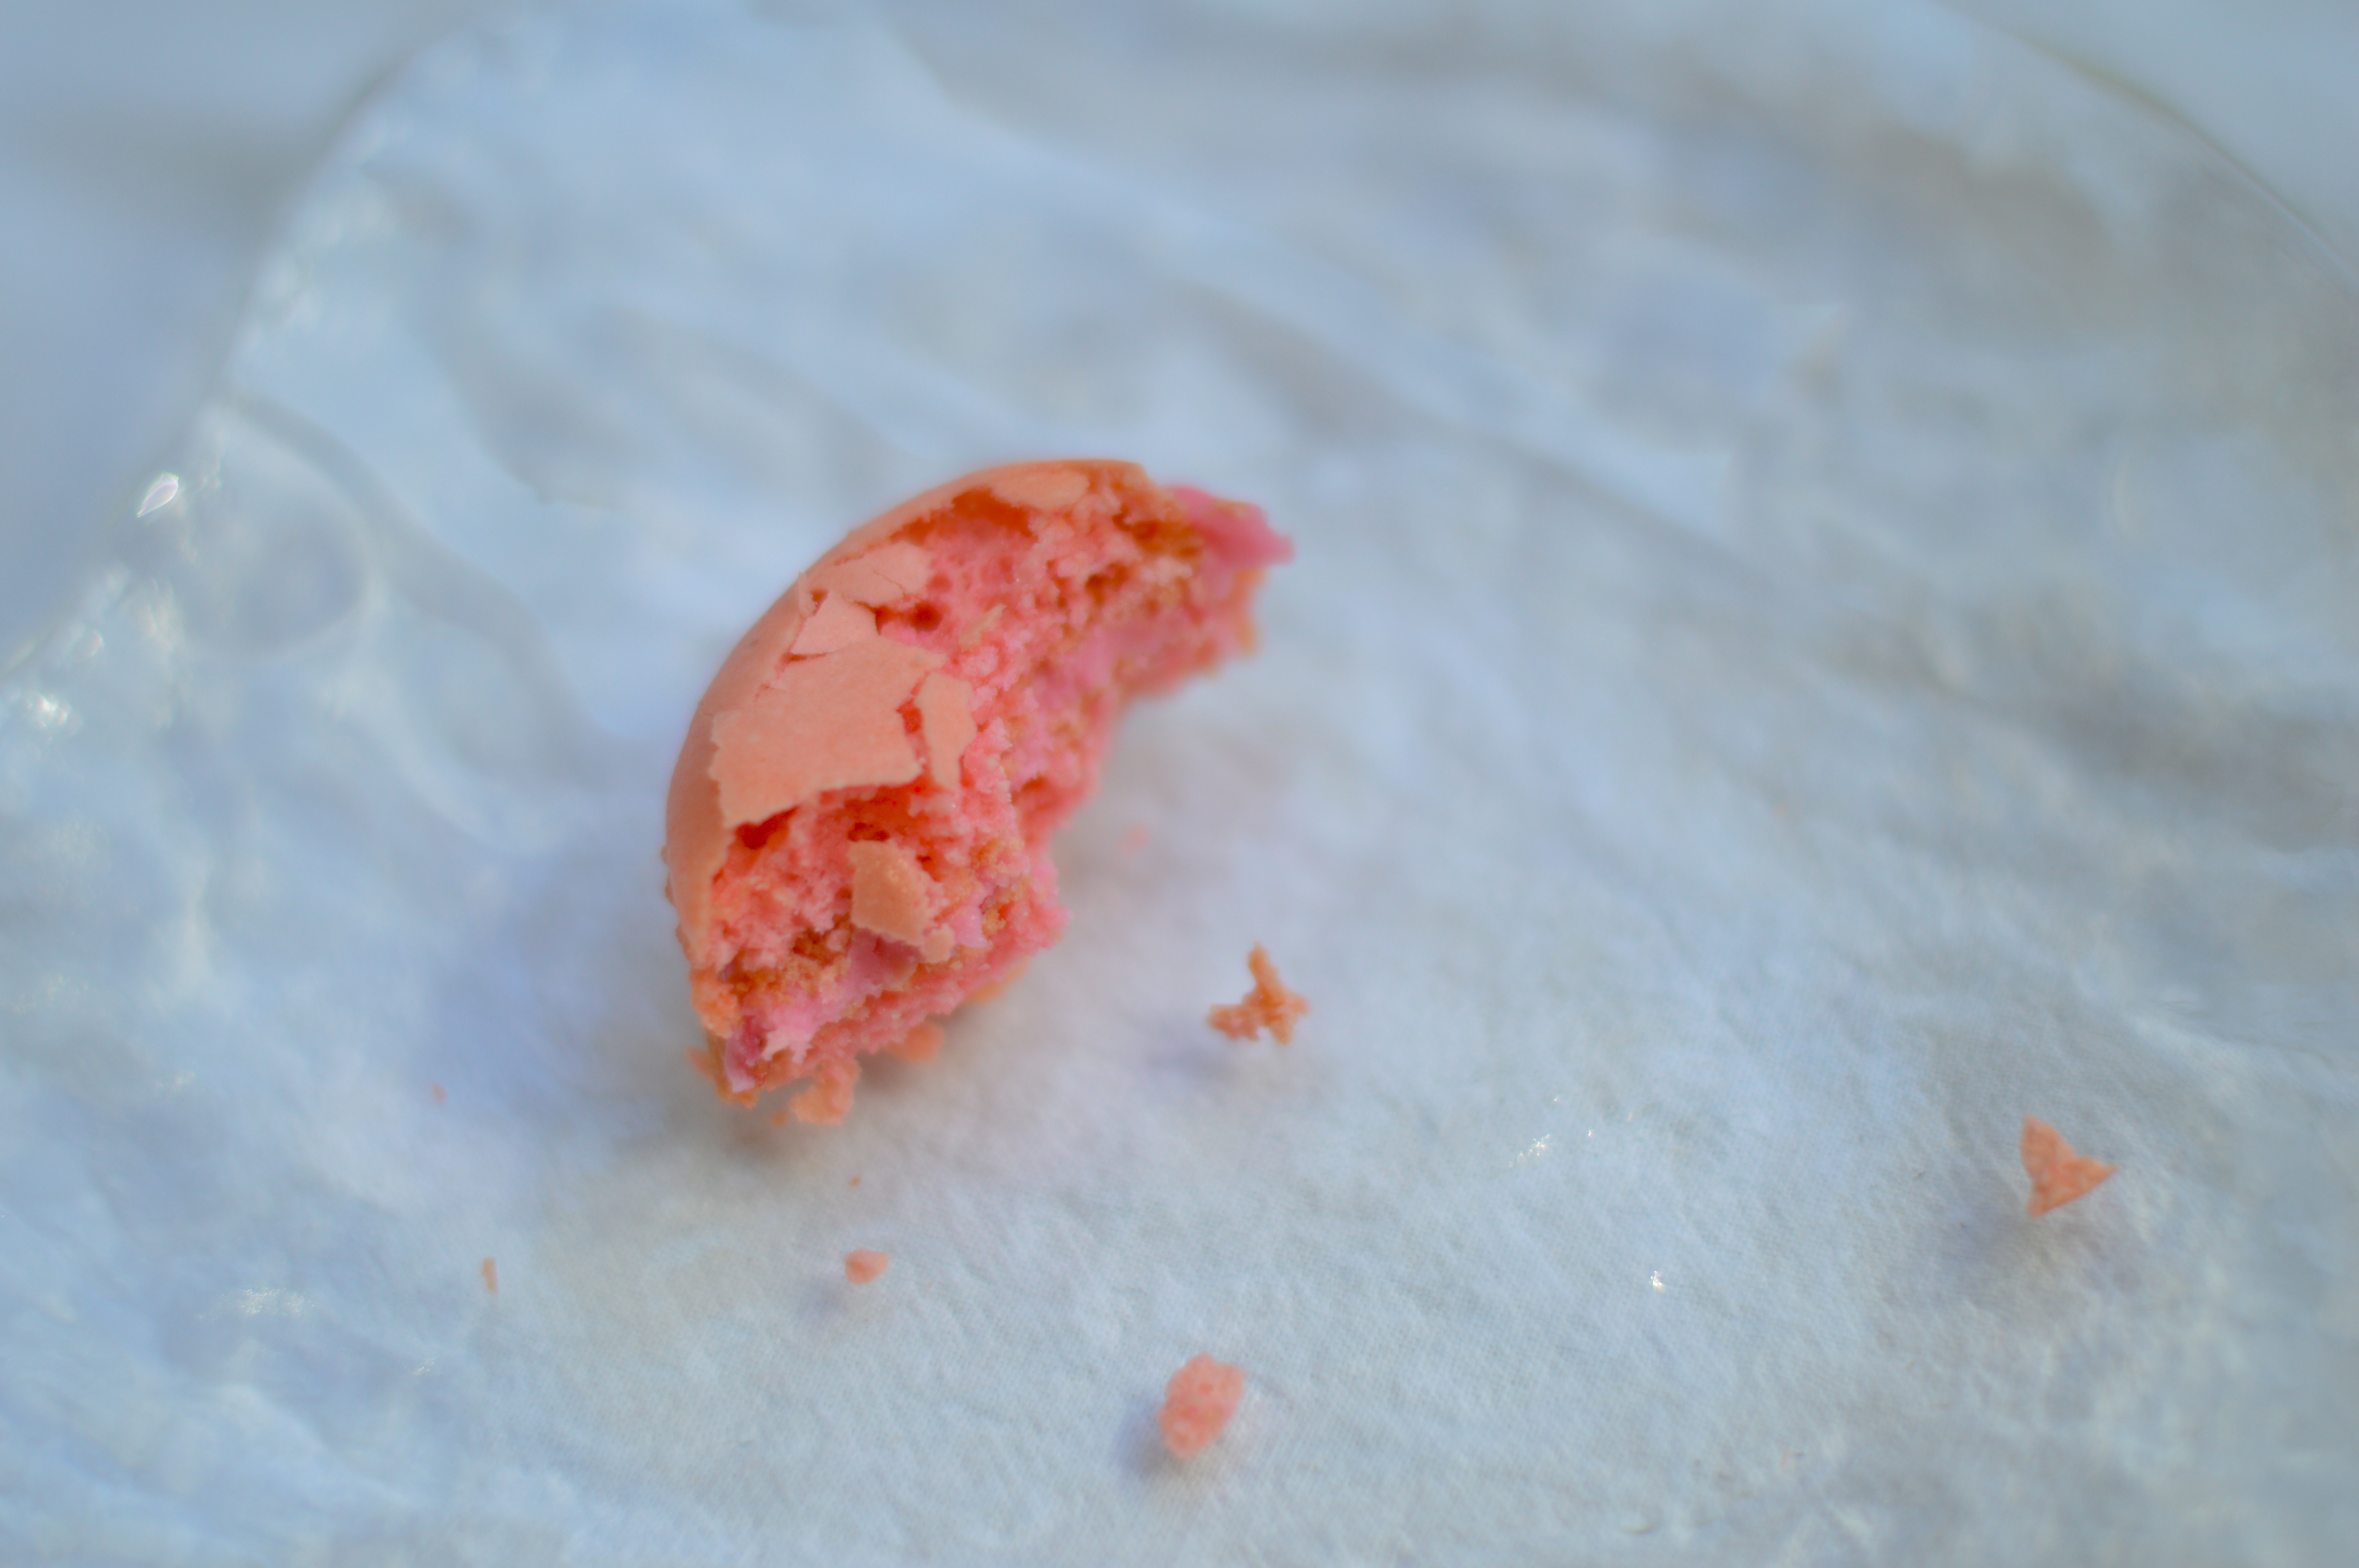
A few weeks ago a friend, M, and I took a class on how to bake french macarons. This is not something that I had a particular longing to know how to do… (I know how to buy them really well already). But, they do hold a certain fascination, don’t they? They reek of european sophistication and are currently very trendy. The crisp outer layer, the creamy center, the beautiful pastel colors… These three-layer cookies do make a happy little package, don’t you think?

And although I wouldn’t typically classify myself as a baker, I was reminded that it is so much fun to learn something new. There is something wonderfully beneficial in seeing someone demonstrate the intricacies of a recipe or process. By learning someone’s tips and tricks it removes the mystery and helps us to become a little more brave ourselves. Since our class a few weeks ago, at least nine batches of macarons have been made between the two of us. Can you say obsess much? We are currently looking for qualified taste-testers… Please contact me if you would like to be considered.


Author’s Note: I am excited to say that I will be taking my first Pantry at Delancey class this weekend. I have looked forward to trying out the The Pantry for a long time. It is a food photography workshop, so you can be the judge in future posts as to whether it was worth my time, but I’m sure it will be full of inspiration.
Happy Spring!
Signs of Spring

So spring doesn’t officially begin for 13 more days (not that I am counting), but signs of winter’s end are all around. I spotted our first camelia blooming, the daffodils are poking their little yellow heads out, and I now hear the birds chirping when I wake up in the morning.
I remember when Sam first went to preschool, he came home with a simple bird feeder that they made in class. The teacher reminded the students (and parents) that it can be difficult for birds to find food at this point in winter, so we can help by putting food out. The garden is still a bit bleak, with the grass just beginning to sprout, but by placing a bird feeder in our tree we can see wildlife happening right outside our kitchen window.
This is a quick and easy activity to do with the kids and it is so satisfying to see the birds (and squirrels) show up so regularly! We used peanut butter, a pine cone that we found outside, and a birdseed mix from our local hardware store. You can use any mix of peanut butter, vegetable shortening, or suet (a high-quality animal fat) and there are lots of choices of birdseeds. One tip we have learned is that wire is necessary to hang the pine cone. In years past, we have very hopefully hung our pine cones with string or yarn and were quickly thwarted by motivated squirrels that will bite through the string and steal the whole bird feeder! So far, the wire has worked like a charm.

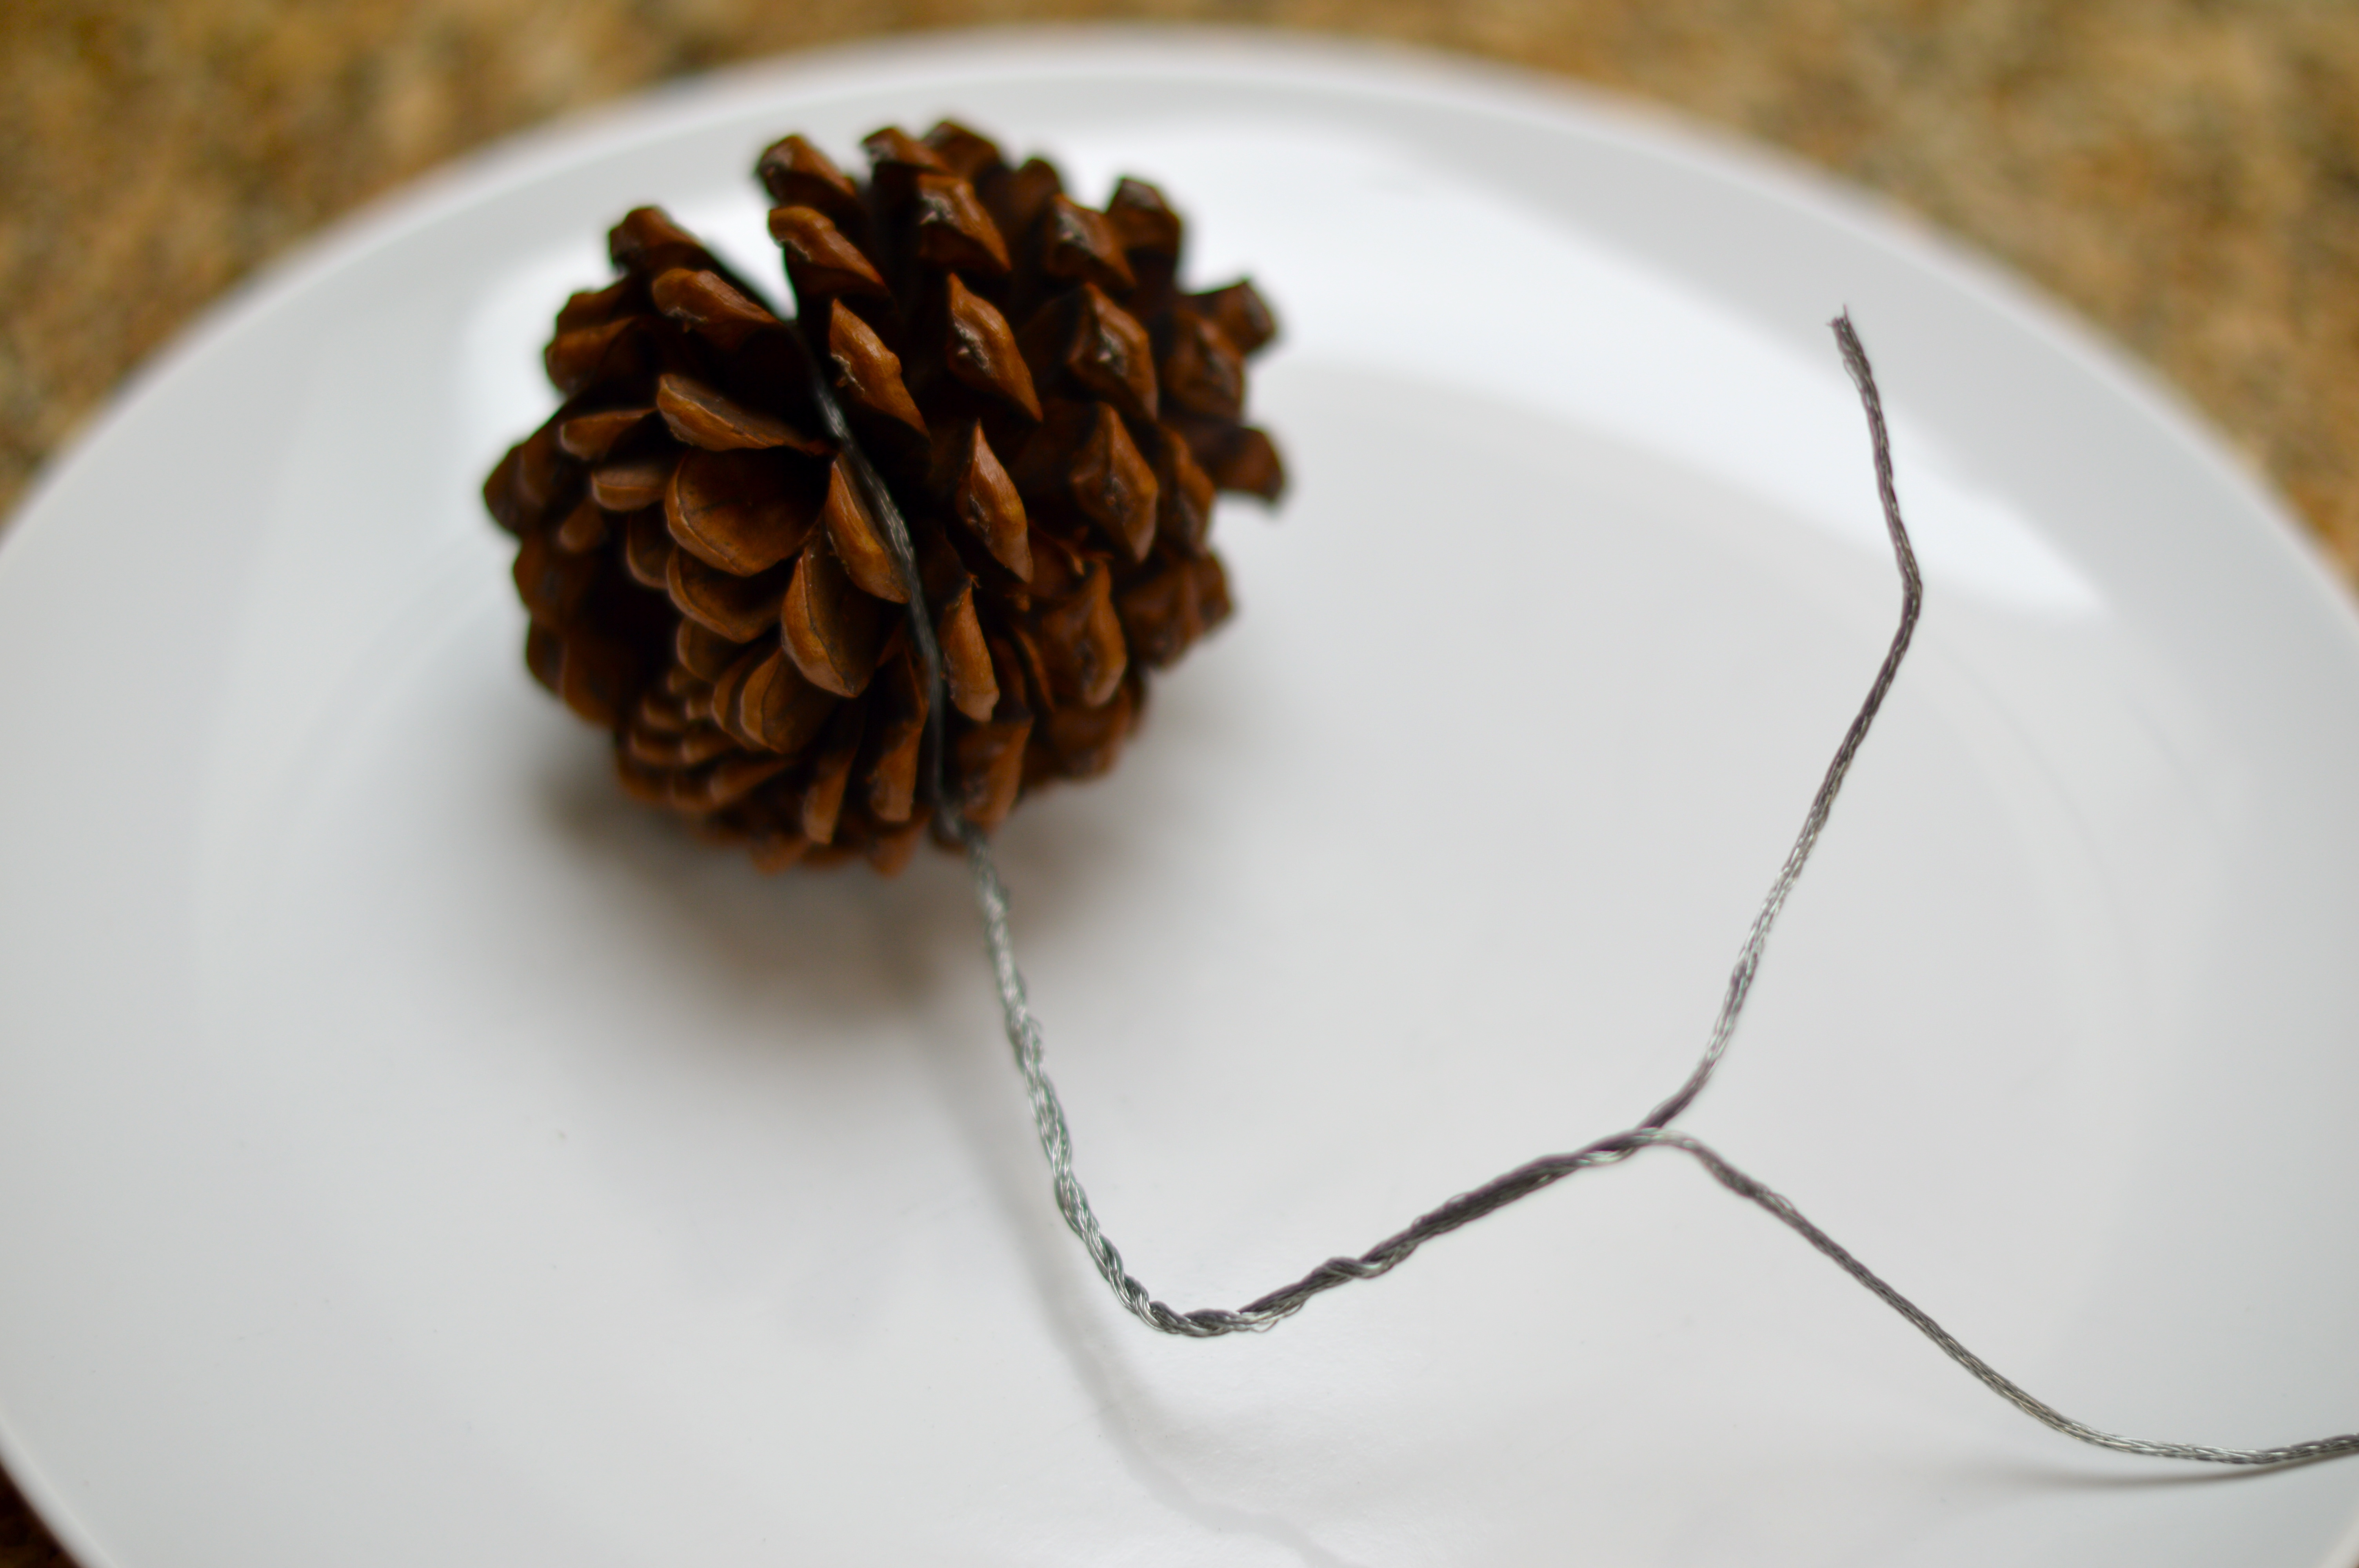


Pine Cone Bird Feeder
1 large pine cone
12 inch length of flexible wire (we used some picture hanging wire)
1 cup peanut butter
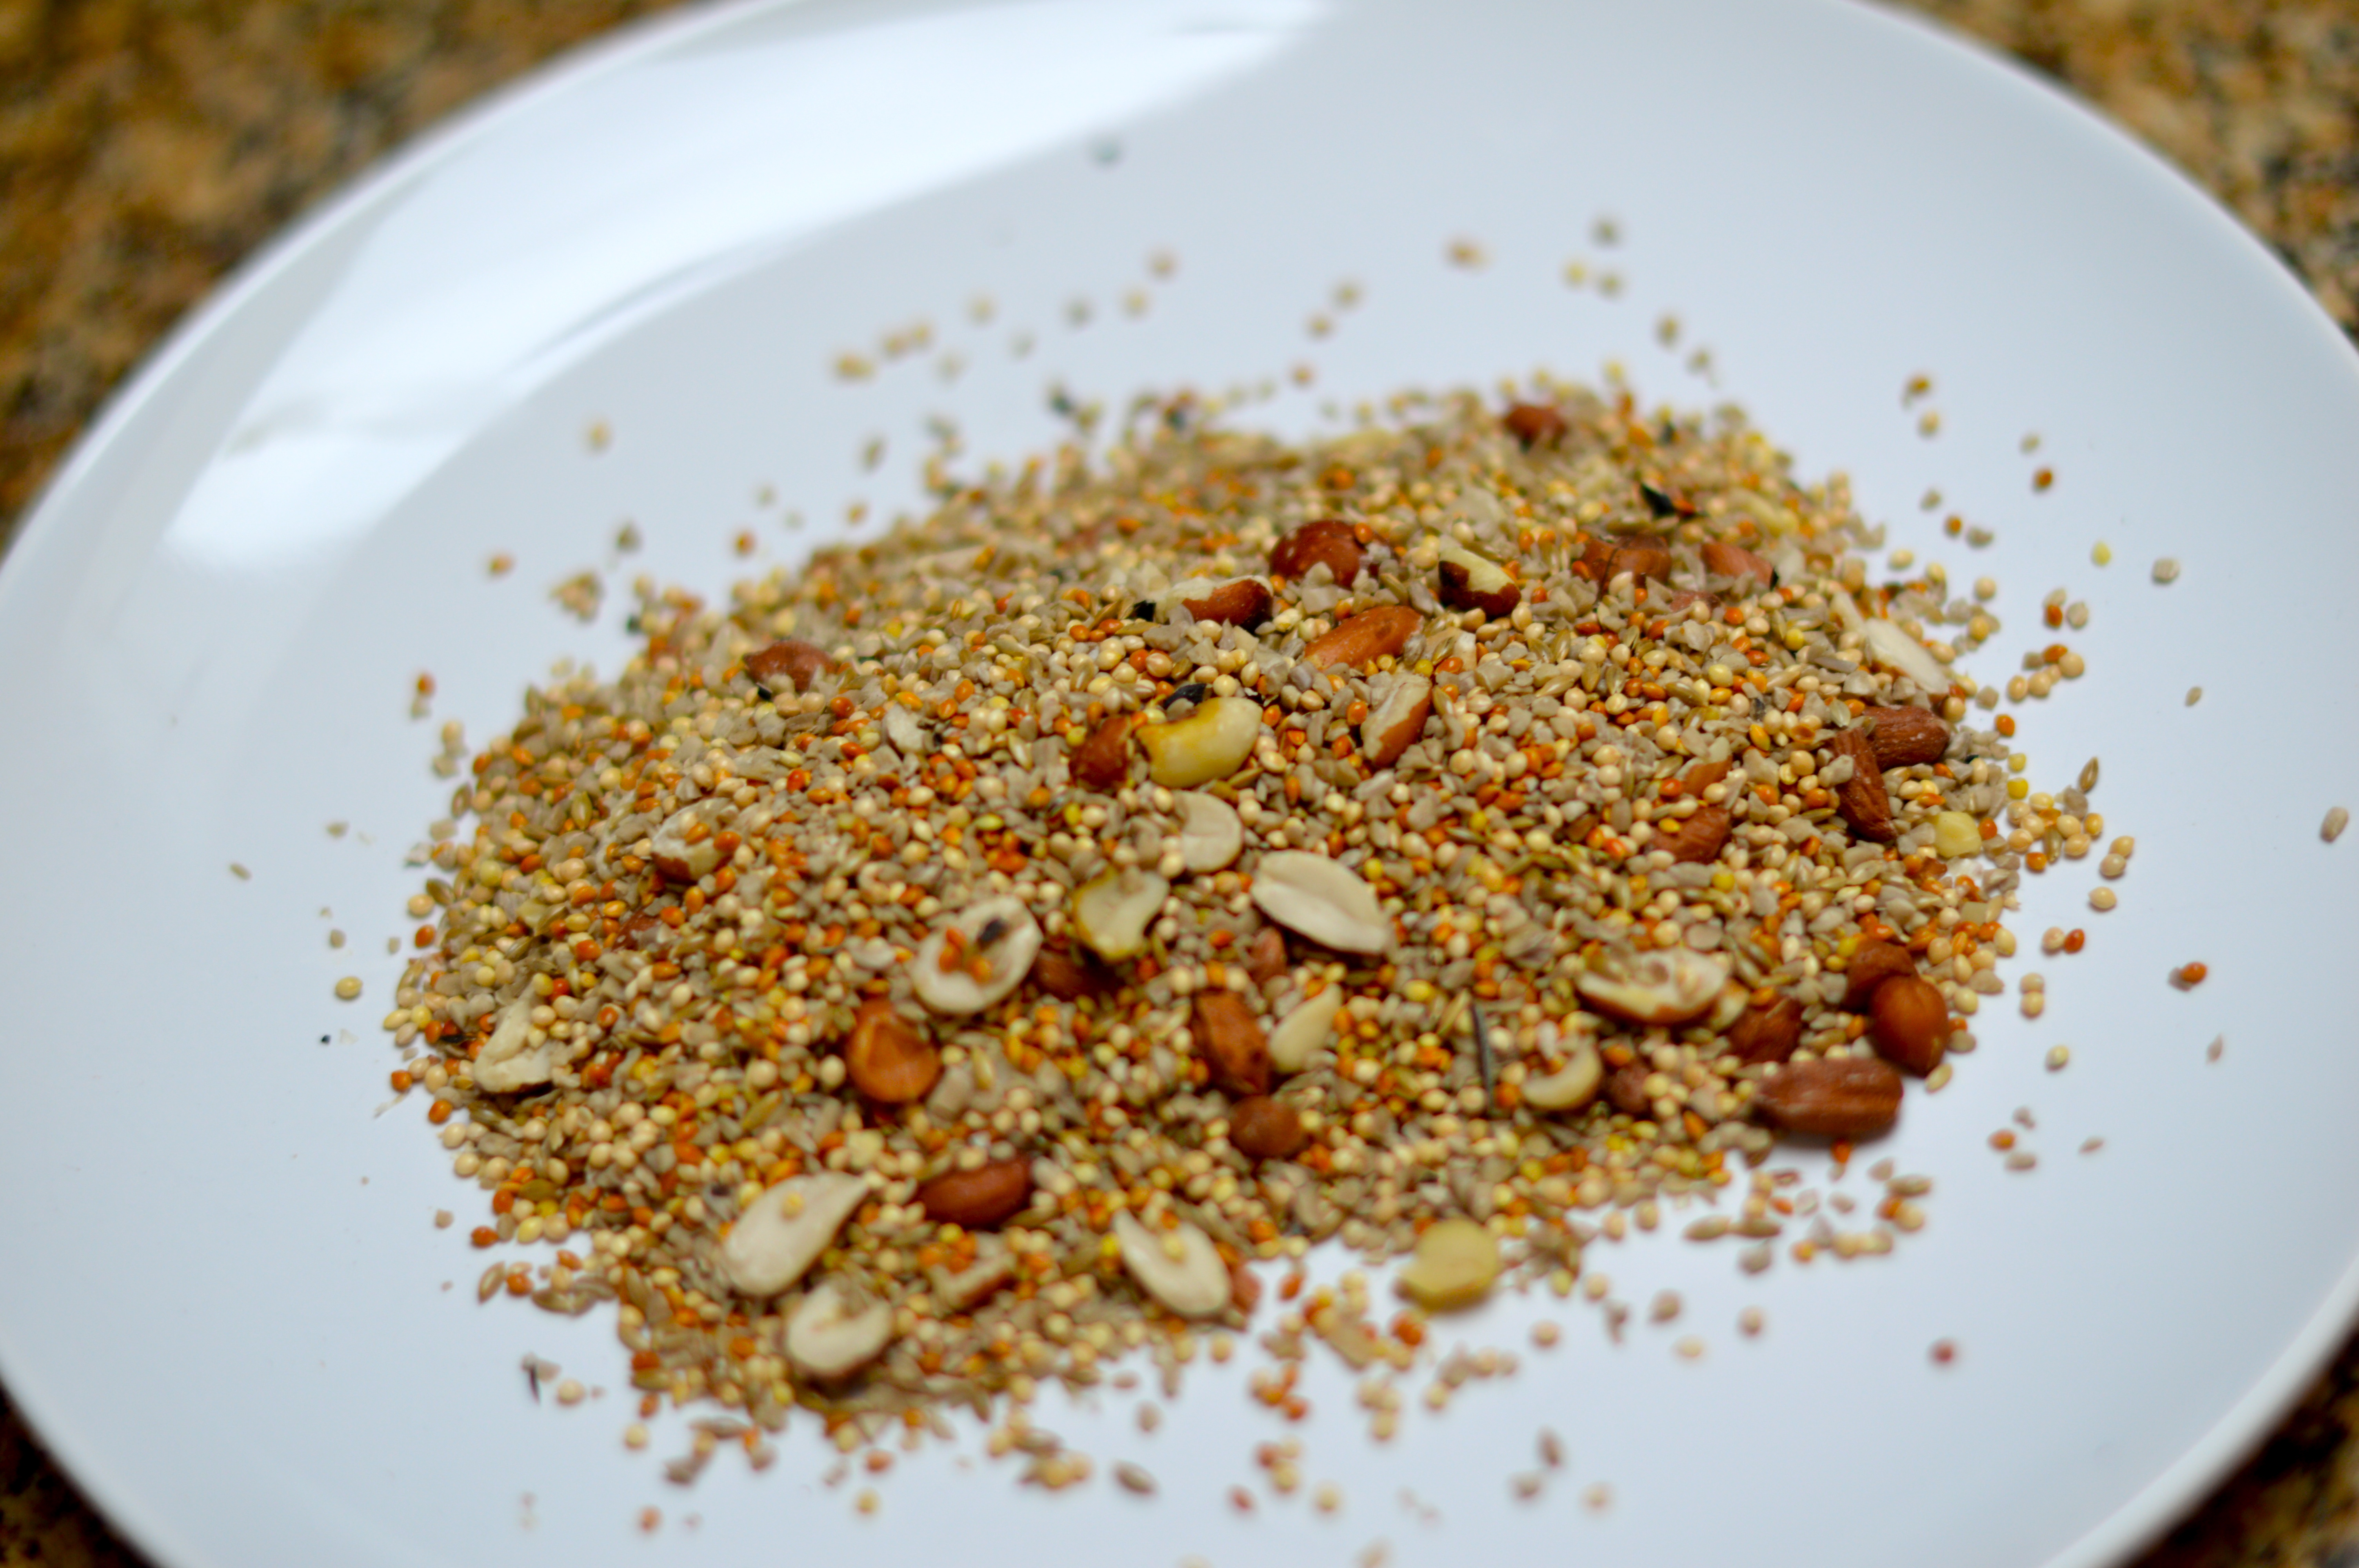
1 cup birdseed mix
Wrap the wire around the pine cone, leaving a length at the end to twist around a tree branch. Spread peanut butter onto the pine cone, getting it into all the little crevices. Then roll peanut butter-covered pine cone in seeds on a dish. Hang from tree and watch the birds show up. Remember to choose a tree branch that you can see from a window in your house. It took the birds a day or two to discover our bird feeder, but it has been a week now and all the seeds and peanut butter are gone. Time to make another one!
Enjoy!

A Trip to the Pool with Michael Miller ~ Part 2
Here’s Part Two of my guest posts with Michael Miller Fabrics!
Click here, or scroll down!

Tuesday, March 4, 2014
Lesley Poole & the Littles Part 2!
Hi again, Lesley Poole here. What is it about March that makes me think of heading to the pool? I’ve got swimming and summer on my mind. Maybe it’s all the “cruise season” catalogs arriving in my mailbox, or quite possibly I am just feeling a little deprived of Vitamin D at this point in our Seattle winter.


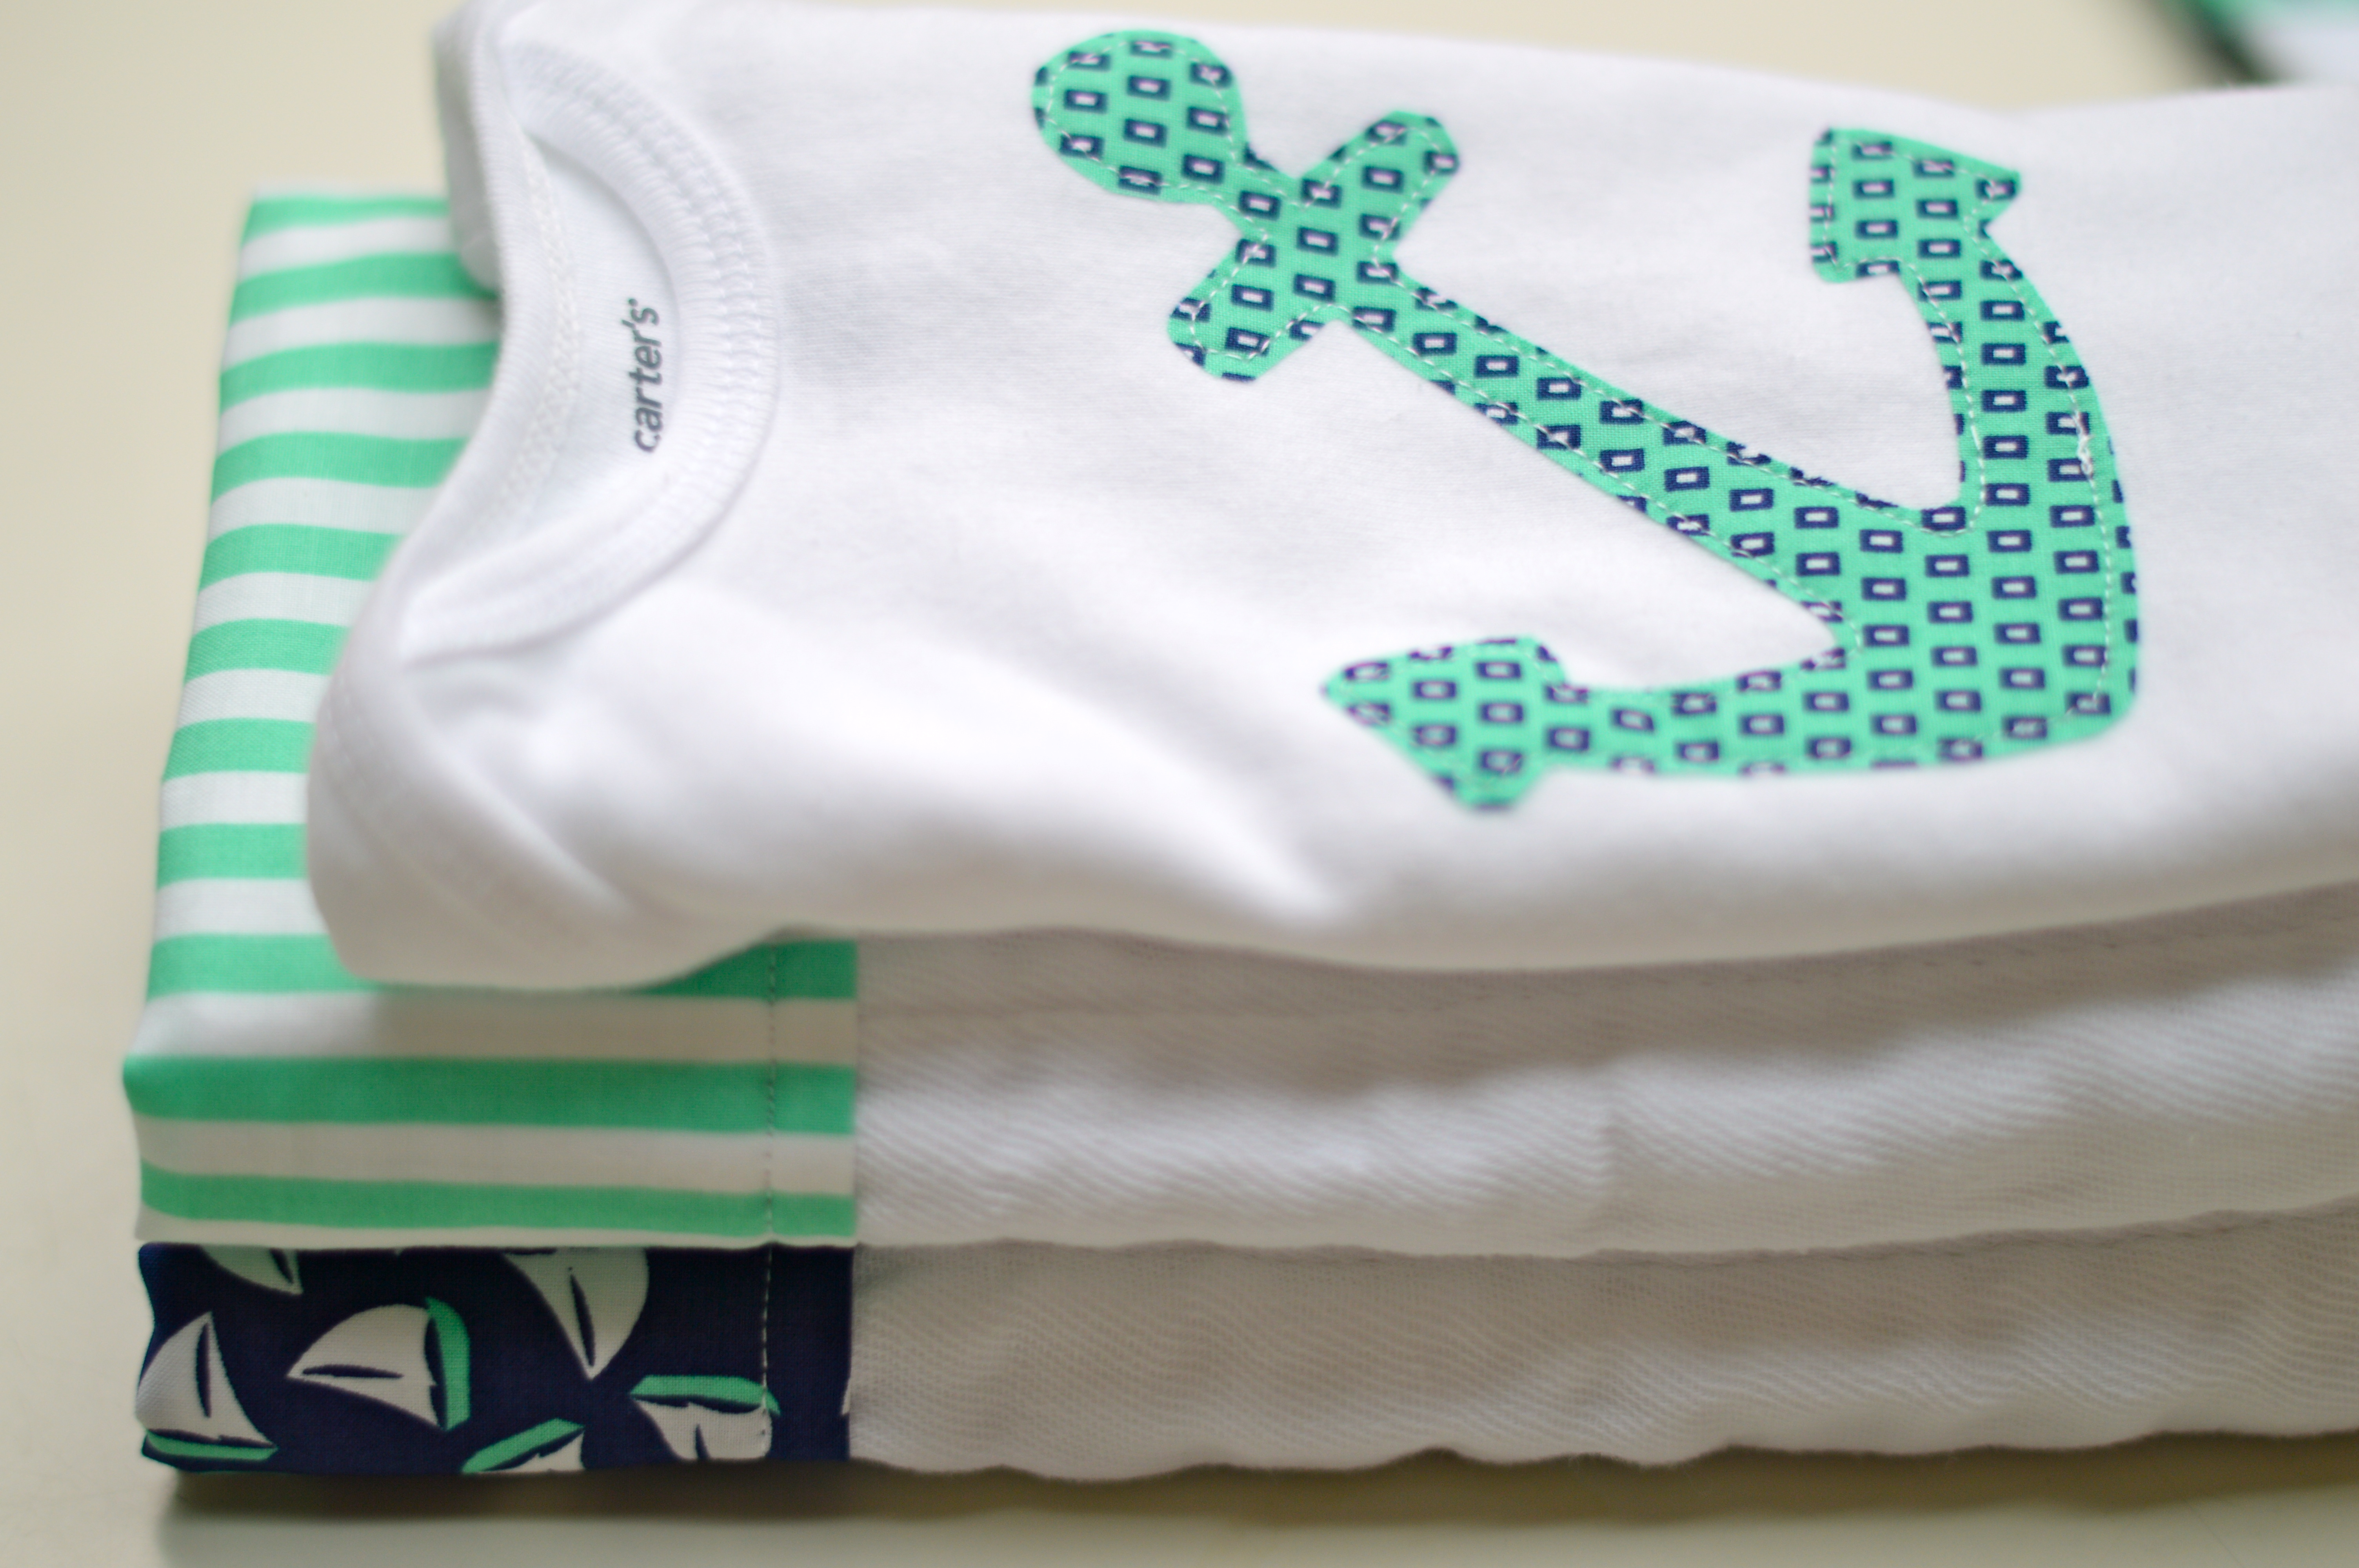
The Littles collection simply says “family vacation” to me. There is an element of classic kid fun in bright colors and whimsical, nautically inspired patterns. And with all these anchors, whales, and sailboats, who can help but dream of warmer weather? Whether you are heading on vacation or just to the local pool, these vibrant prints will definitely add some sunshine to the day.
 |
| *pictured above ~ Little Lifesavers |
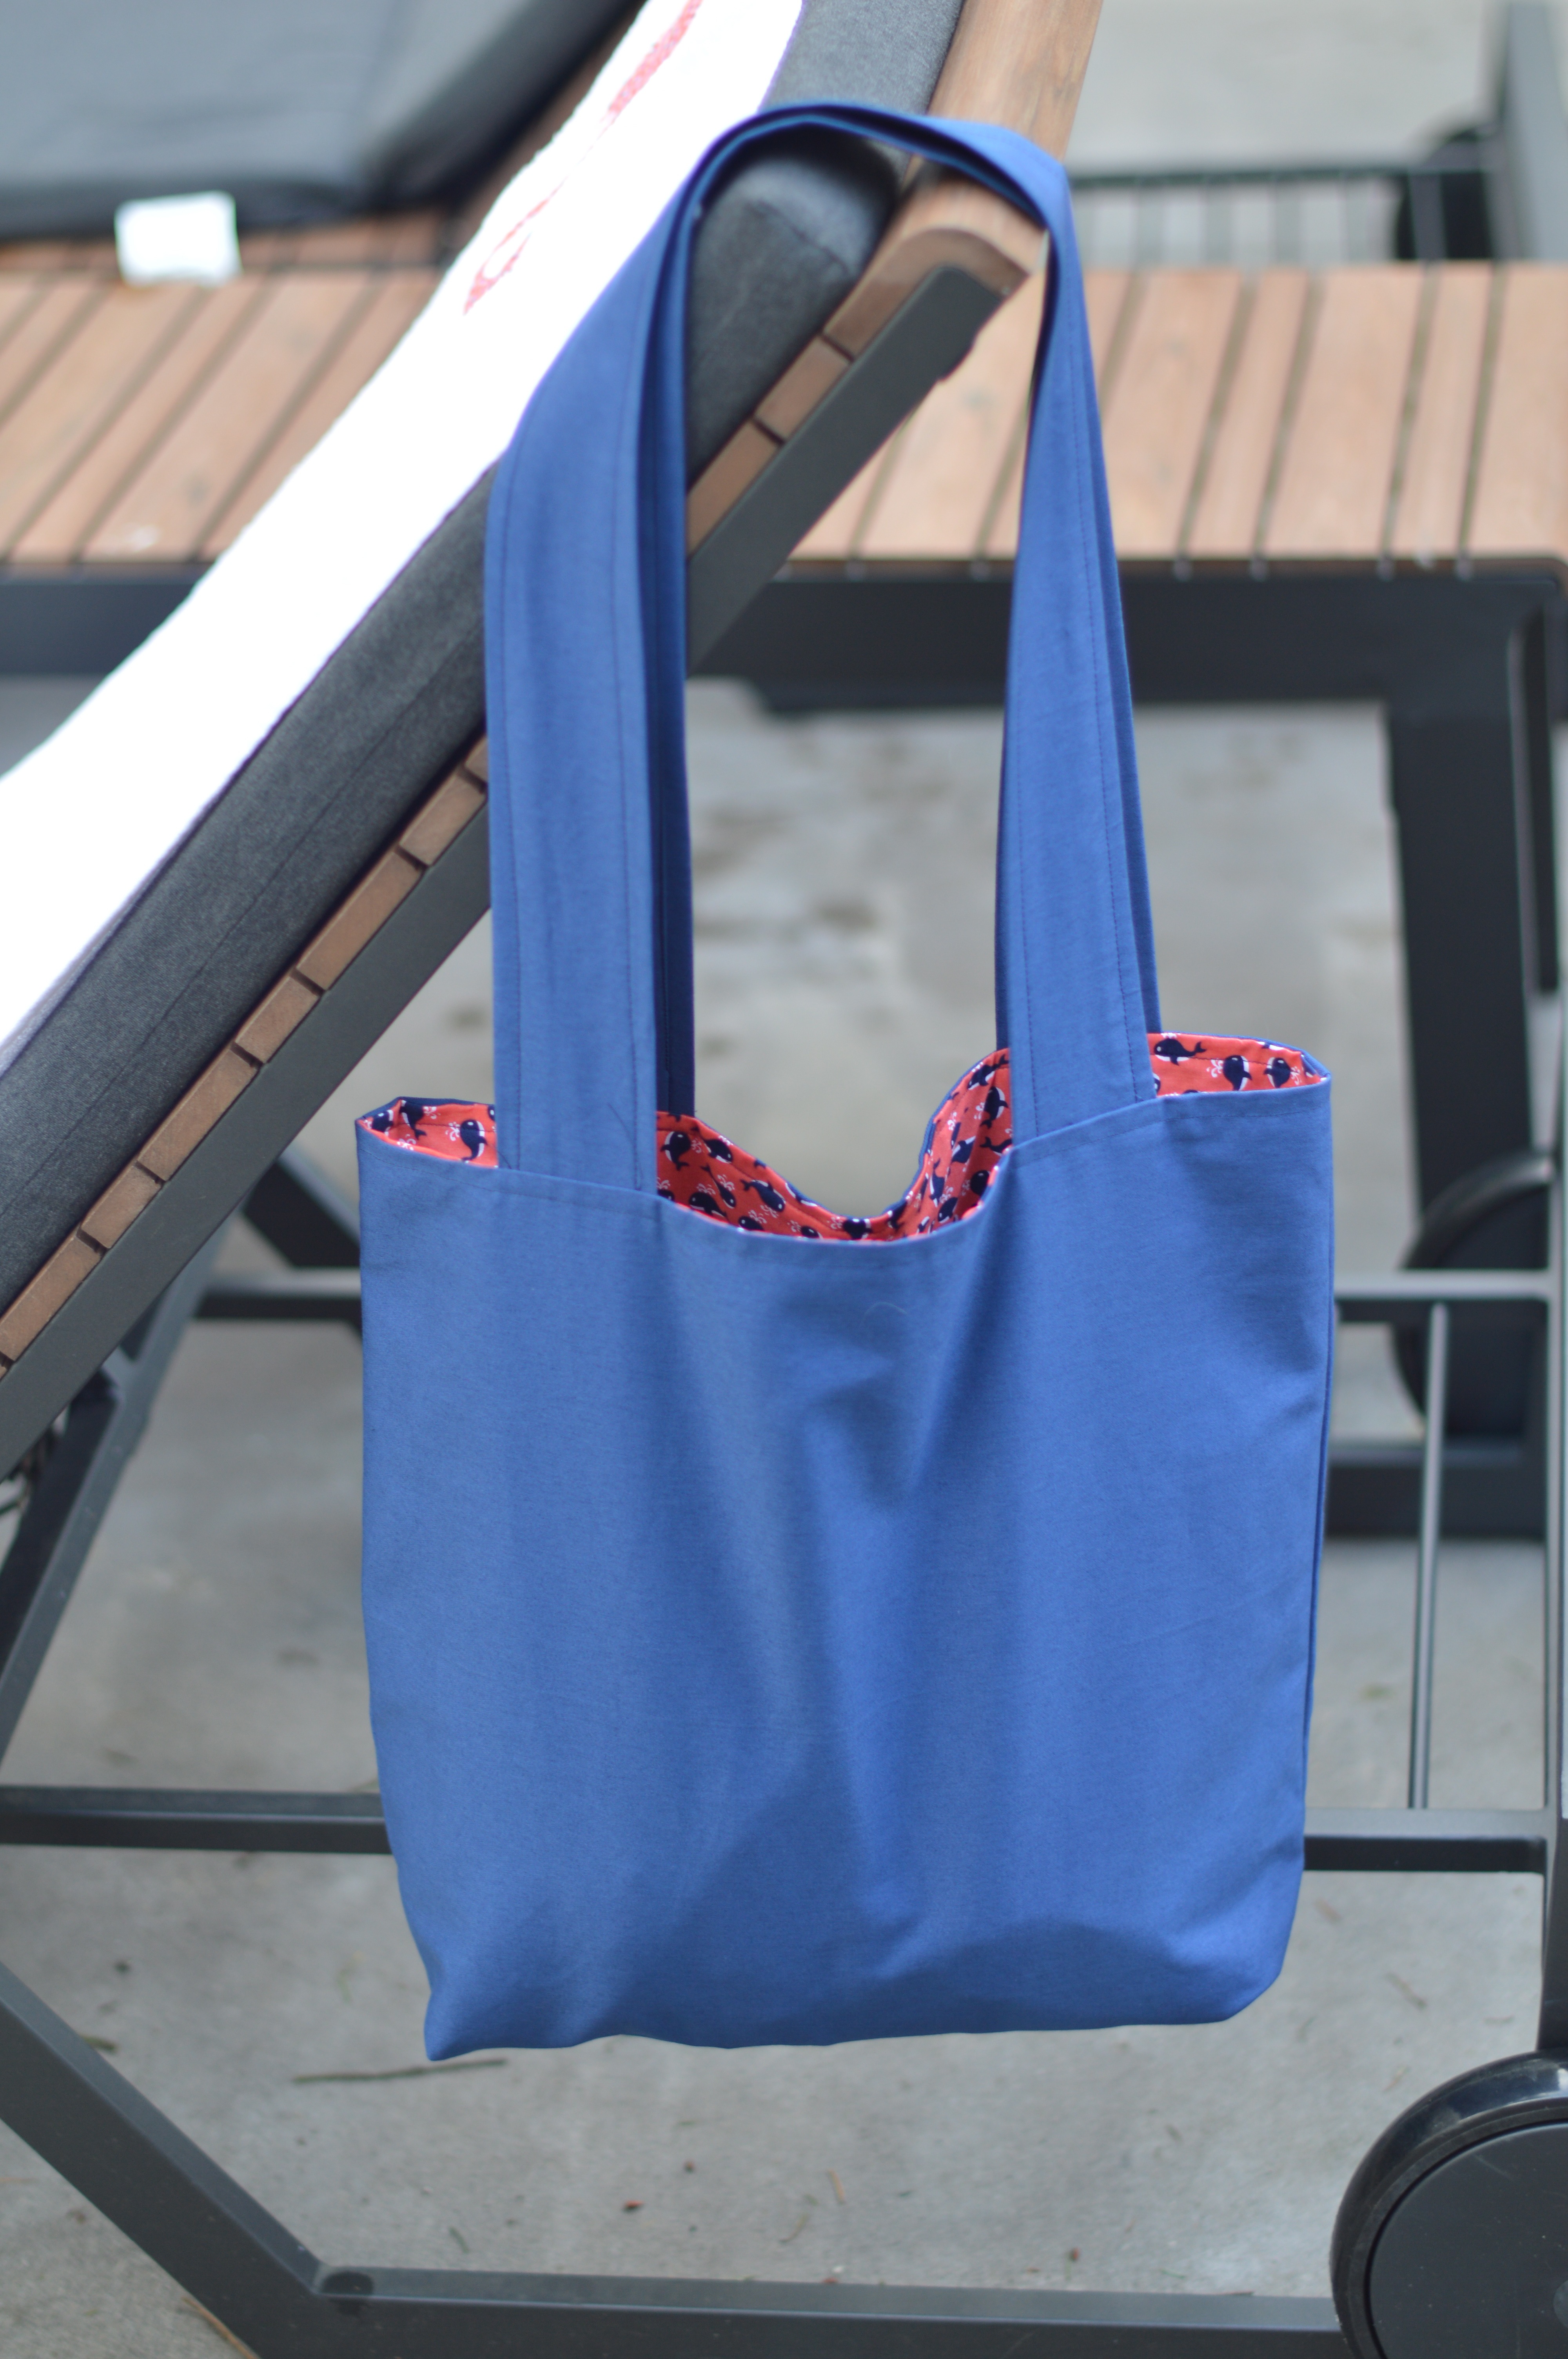
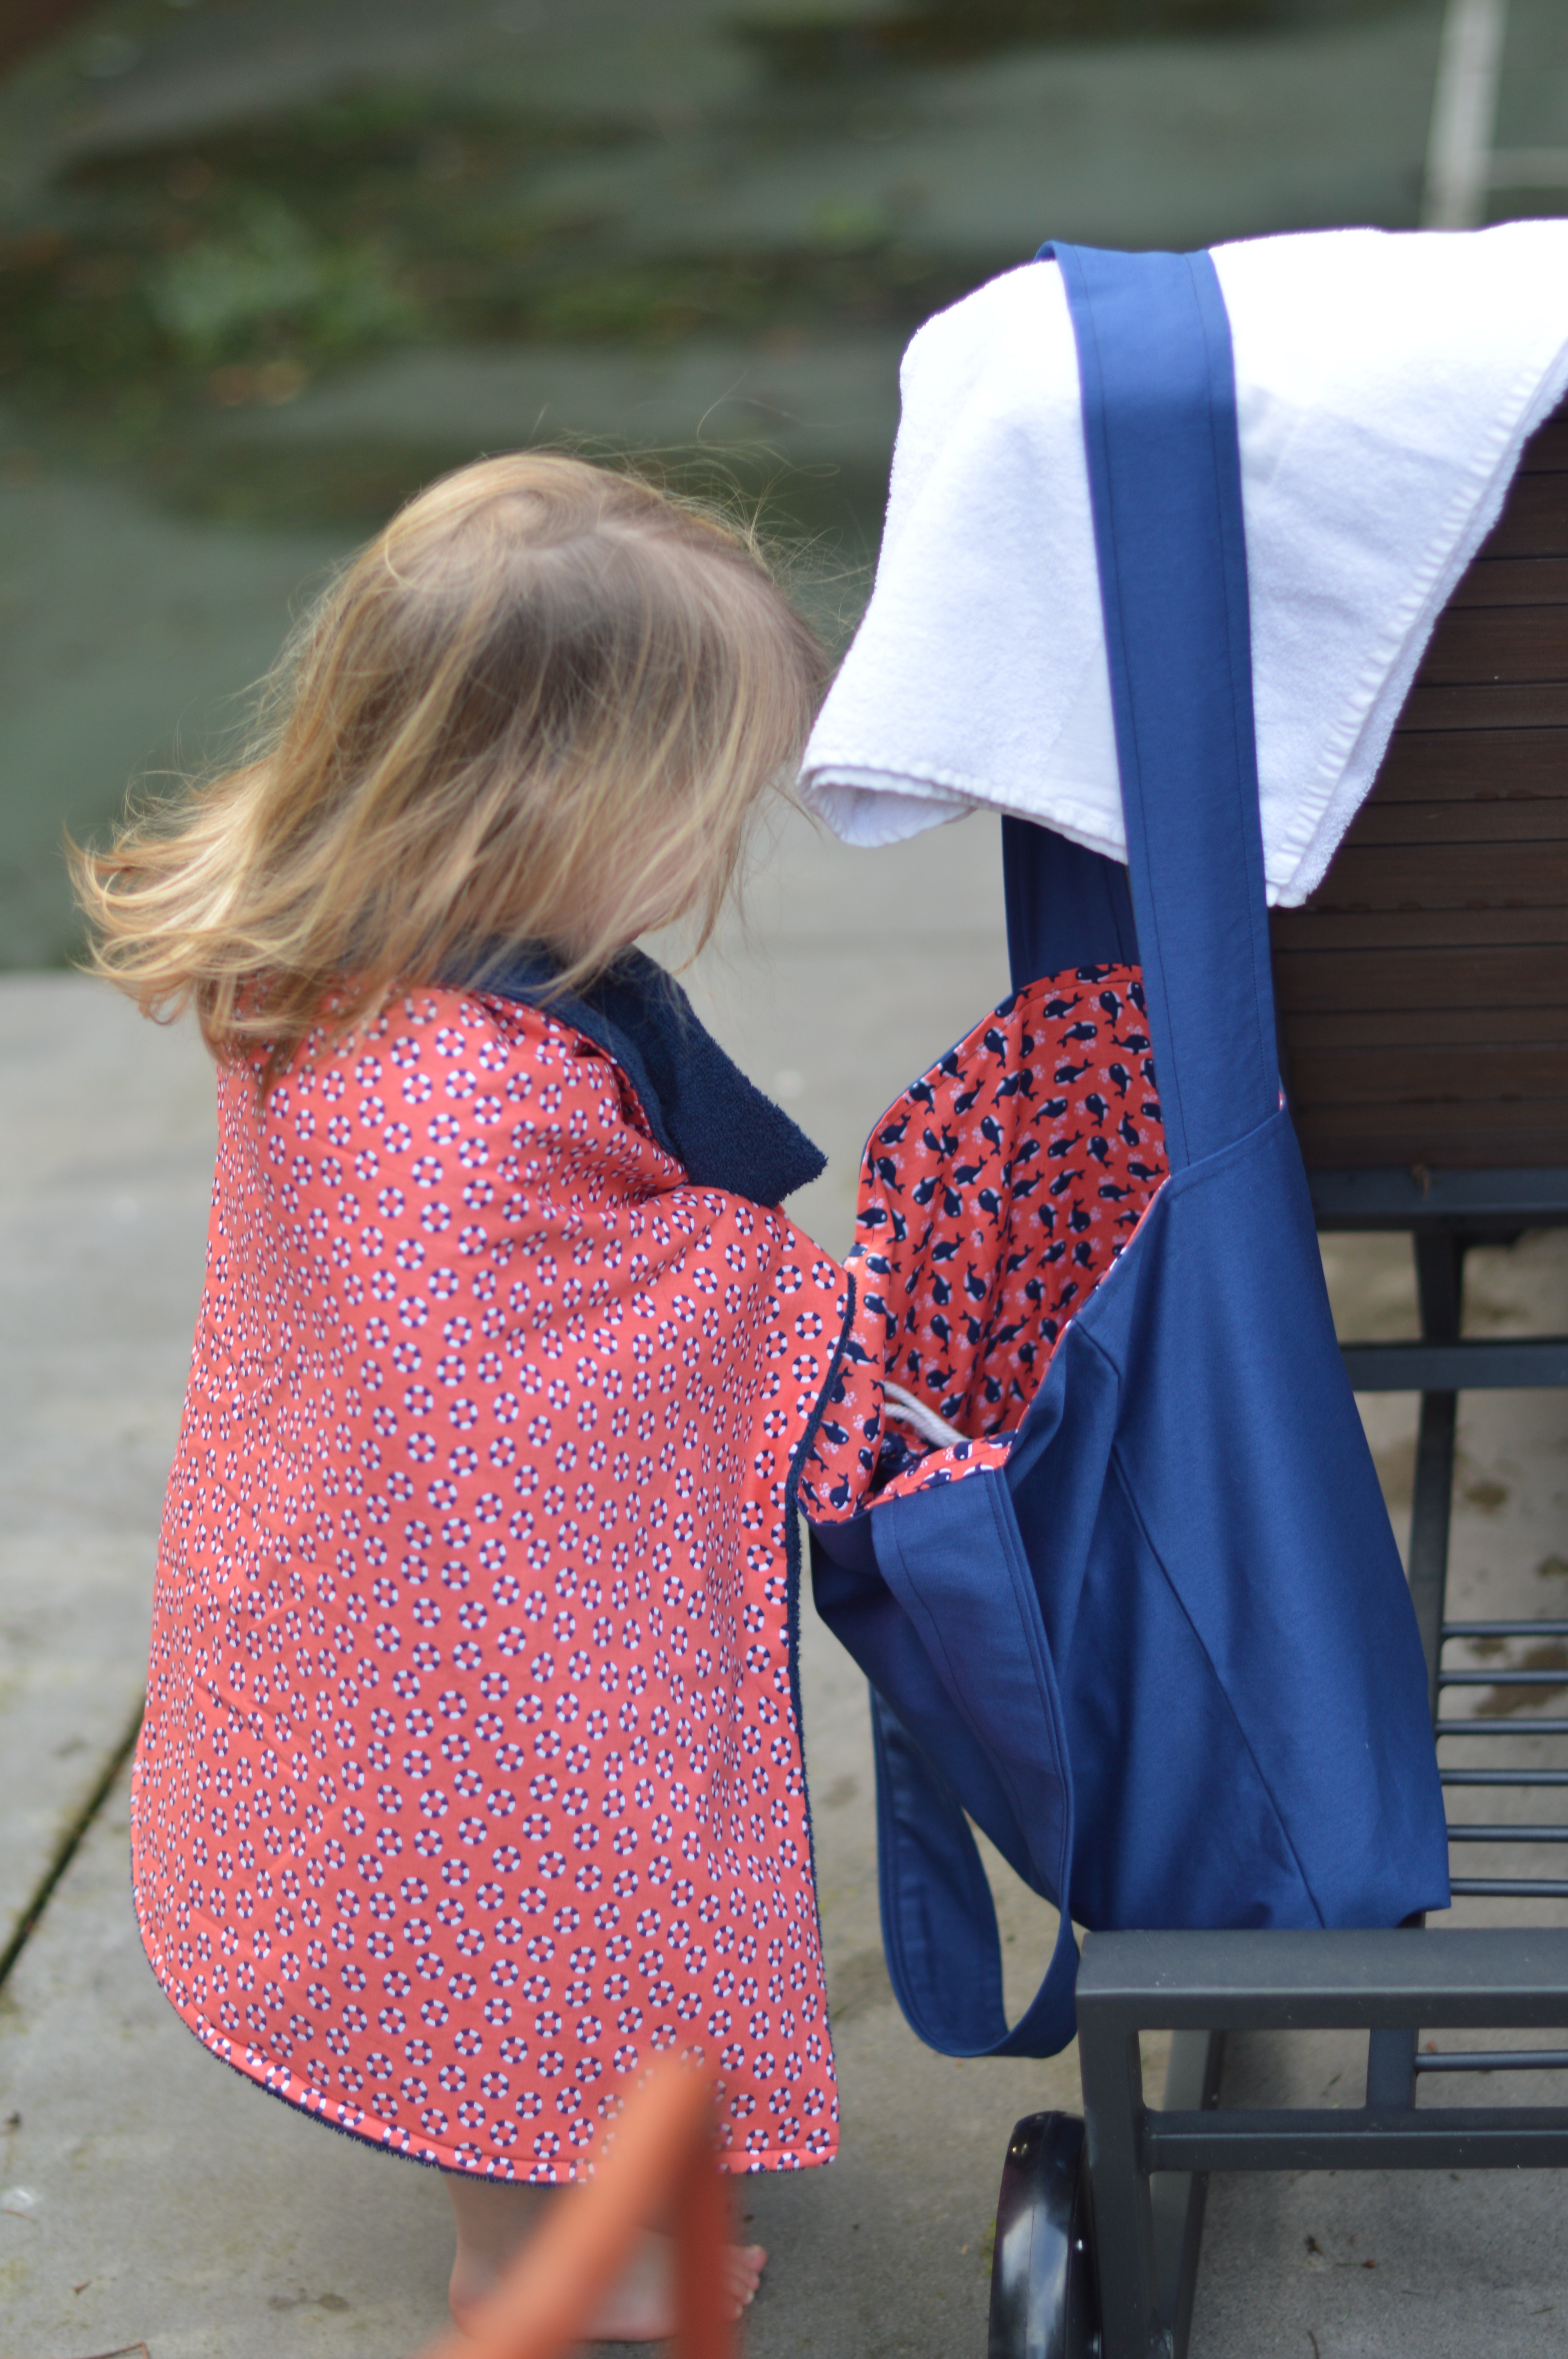
I don’t know about you, but when our “Poole Party of 5” heads to the water we always bring loads of stuff – towels, goggles, and pool toys to name only a few! It seemed only natural to sew up a tote bag that could carry it all! This simple, lined tote is the perfect accessory for taking poolside. I used Michael Miller’s Cotton Sateen in navy and lined it with “little whales” in coral. The bright coral is such a nice pop of color inside this classic bag and I love seeing those cute little whales peeking out.
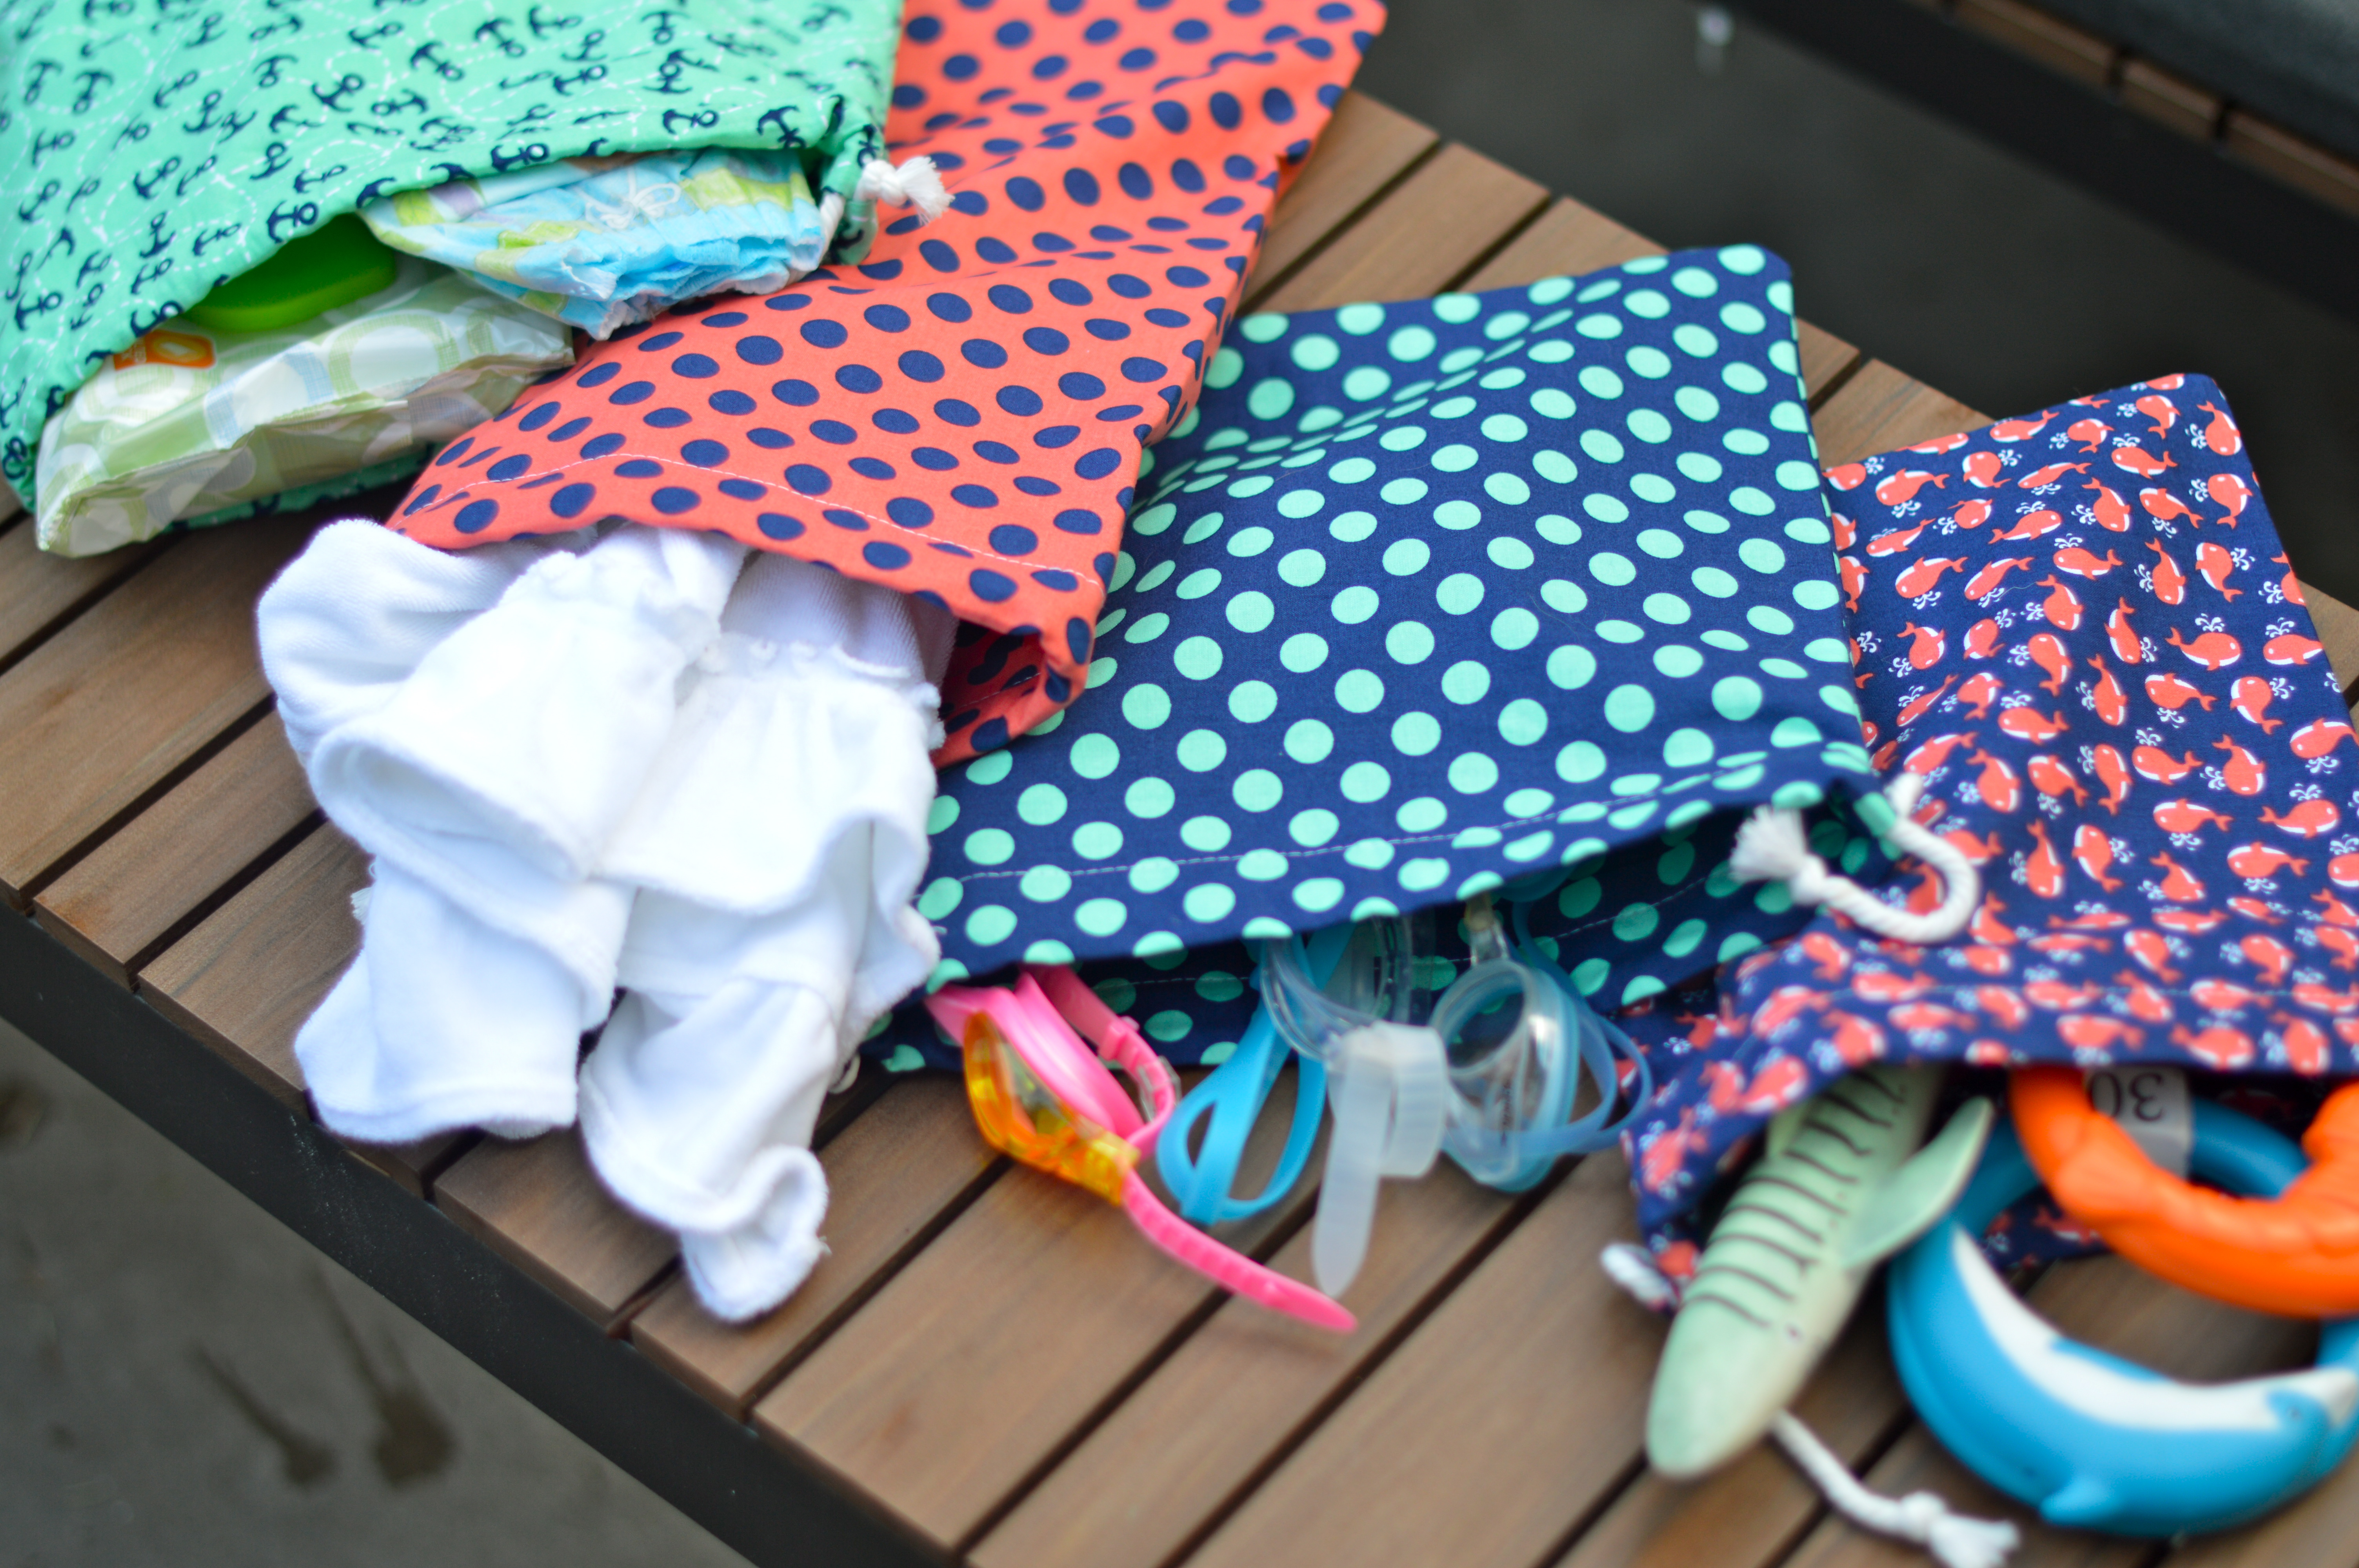
The next thing to sew was a set of mix-and-match drawstring sacks to keep all our treasures organized. With three kids, it seems everyone has items that are absolute necessities for each and every trip out the door. “Little anchors”, “little whales”, and “ ta dot” were the fabric choices here. (Note: The patterns for both the tote and accessory sacks came from a couple of make*do*mend sewing workshops I attended. Even if you already know how to sew, taking a class can be a great way to learn some new tips and tricks.)

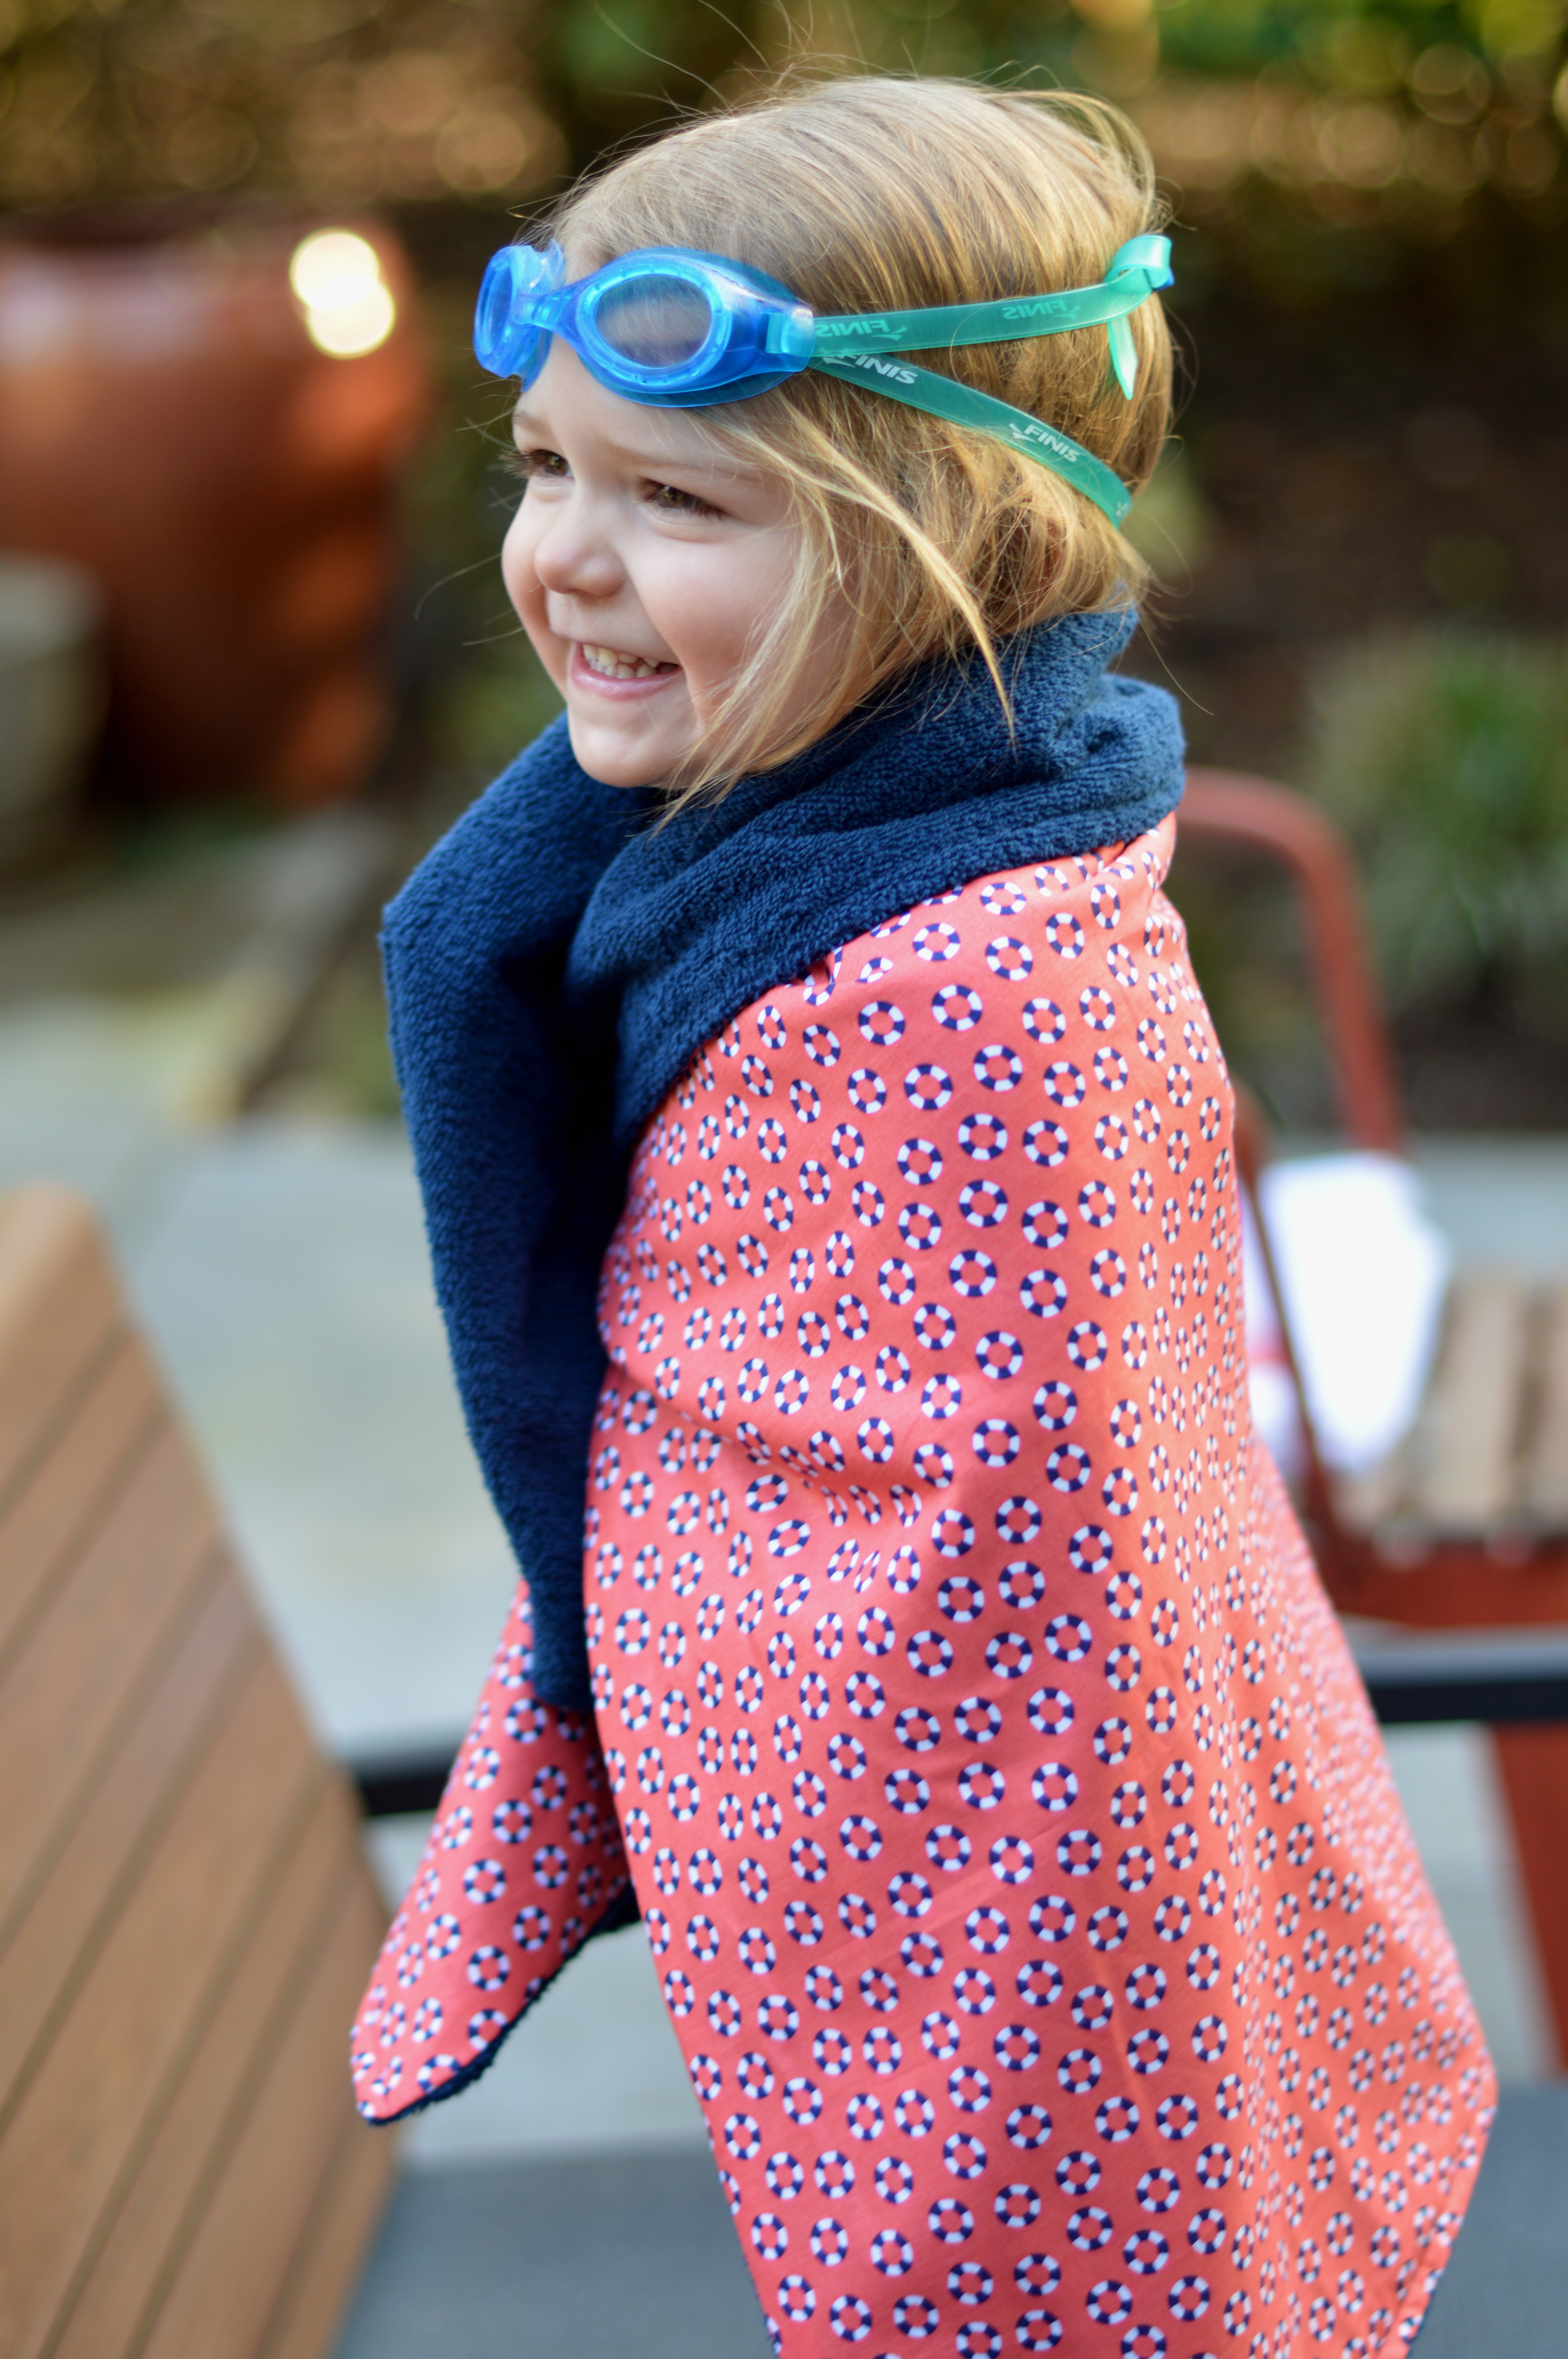
And the last items on my list were some embellished towels. As I mentioned above, when we head to the pool, it feels like we are planning to go for a week, even if it is only for a few hours. I decided to make some pint-sized towels, to cut down on the bulk. For this project, I used navy cotton terry cloth and chose the vibrant and crisp “little lifesavers” in coral to back the terry and add some pop to this poolside staple. I also appliquéd a seahorse design and a letter “P” on classic white towels for another fun and simple way to use this lively fabric.
  |
| *pictured above ~ Ta Dot, Little Lifesavers |
Thanks so much, Michael Miller, for letting me play with this vibrant new collection. I had a fantastic time imagining the sunny days of summer that are just a project or daydream away!


~ Lesley (Poole Party of 5)

Visting with Michael Miller Fabrics ~ Part 1
I am thrilled to share that I have a guest post (my first!) over on making it fun, the blog for Michael Miller Fabrics.
Click here to go visit my post, or you can also scroll down…

Friday, February 28, 2014
Lesley Poole and the Littles!
Hello there, I’m Lesley Poole from Poole Party of 5 . This summer I attended Alt SF and was extremely excited when I found out that Michael Miller Fabrics would be one of the sponsors for the event. I originally found out about Michael Miller Fabrics from my favorite fabric boutique in Seattle, Drygoods Design, where the owner, Keli, turned me onto the Mini Mikes collection. The Etsy line that I sew incorporates modern fabrics that I then appliqué onto classic silhouettes for custom gift giving. I have found that it can be difficult to find fabrics with patterns that have small enough repeats for my appliquéwork. And, as it turns out, many of the fabrics I go back to again and again are from Michael Miller. While I was at Alt, I made it a priority to meet the Michael Miller team and share with them how much I love to use their smaller patterns for the appliqué and embellishment sewing I do for Poole Party Designs.
The MM team recently contacted me to tell me about a brand new collection about to be launched that was designed with my type of work in mind. It incorporates the small repeats I am always looking for, as well as multi-directional patterns, which can help to maximize fabric usage. When I received a package of this new collection, The Littles (designed by Shawn Wallace of MMF), I just about swooned! There were so many fun and whimsical prints to choose from. I immediately set to work on some fresh new appliqués to test out the versatility of this line.
 |
| *pictured above ~ Little Whales, Clown Stripe, Little Sailboats |
 |
| *pictured above ~ Hospital Gown, Clown Stripe, Little Sailboats |
 |
| *pictured above ~ Ta Dot, Hospital Gown |
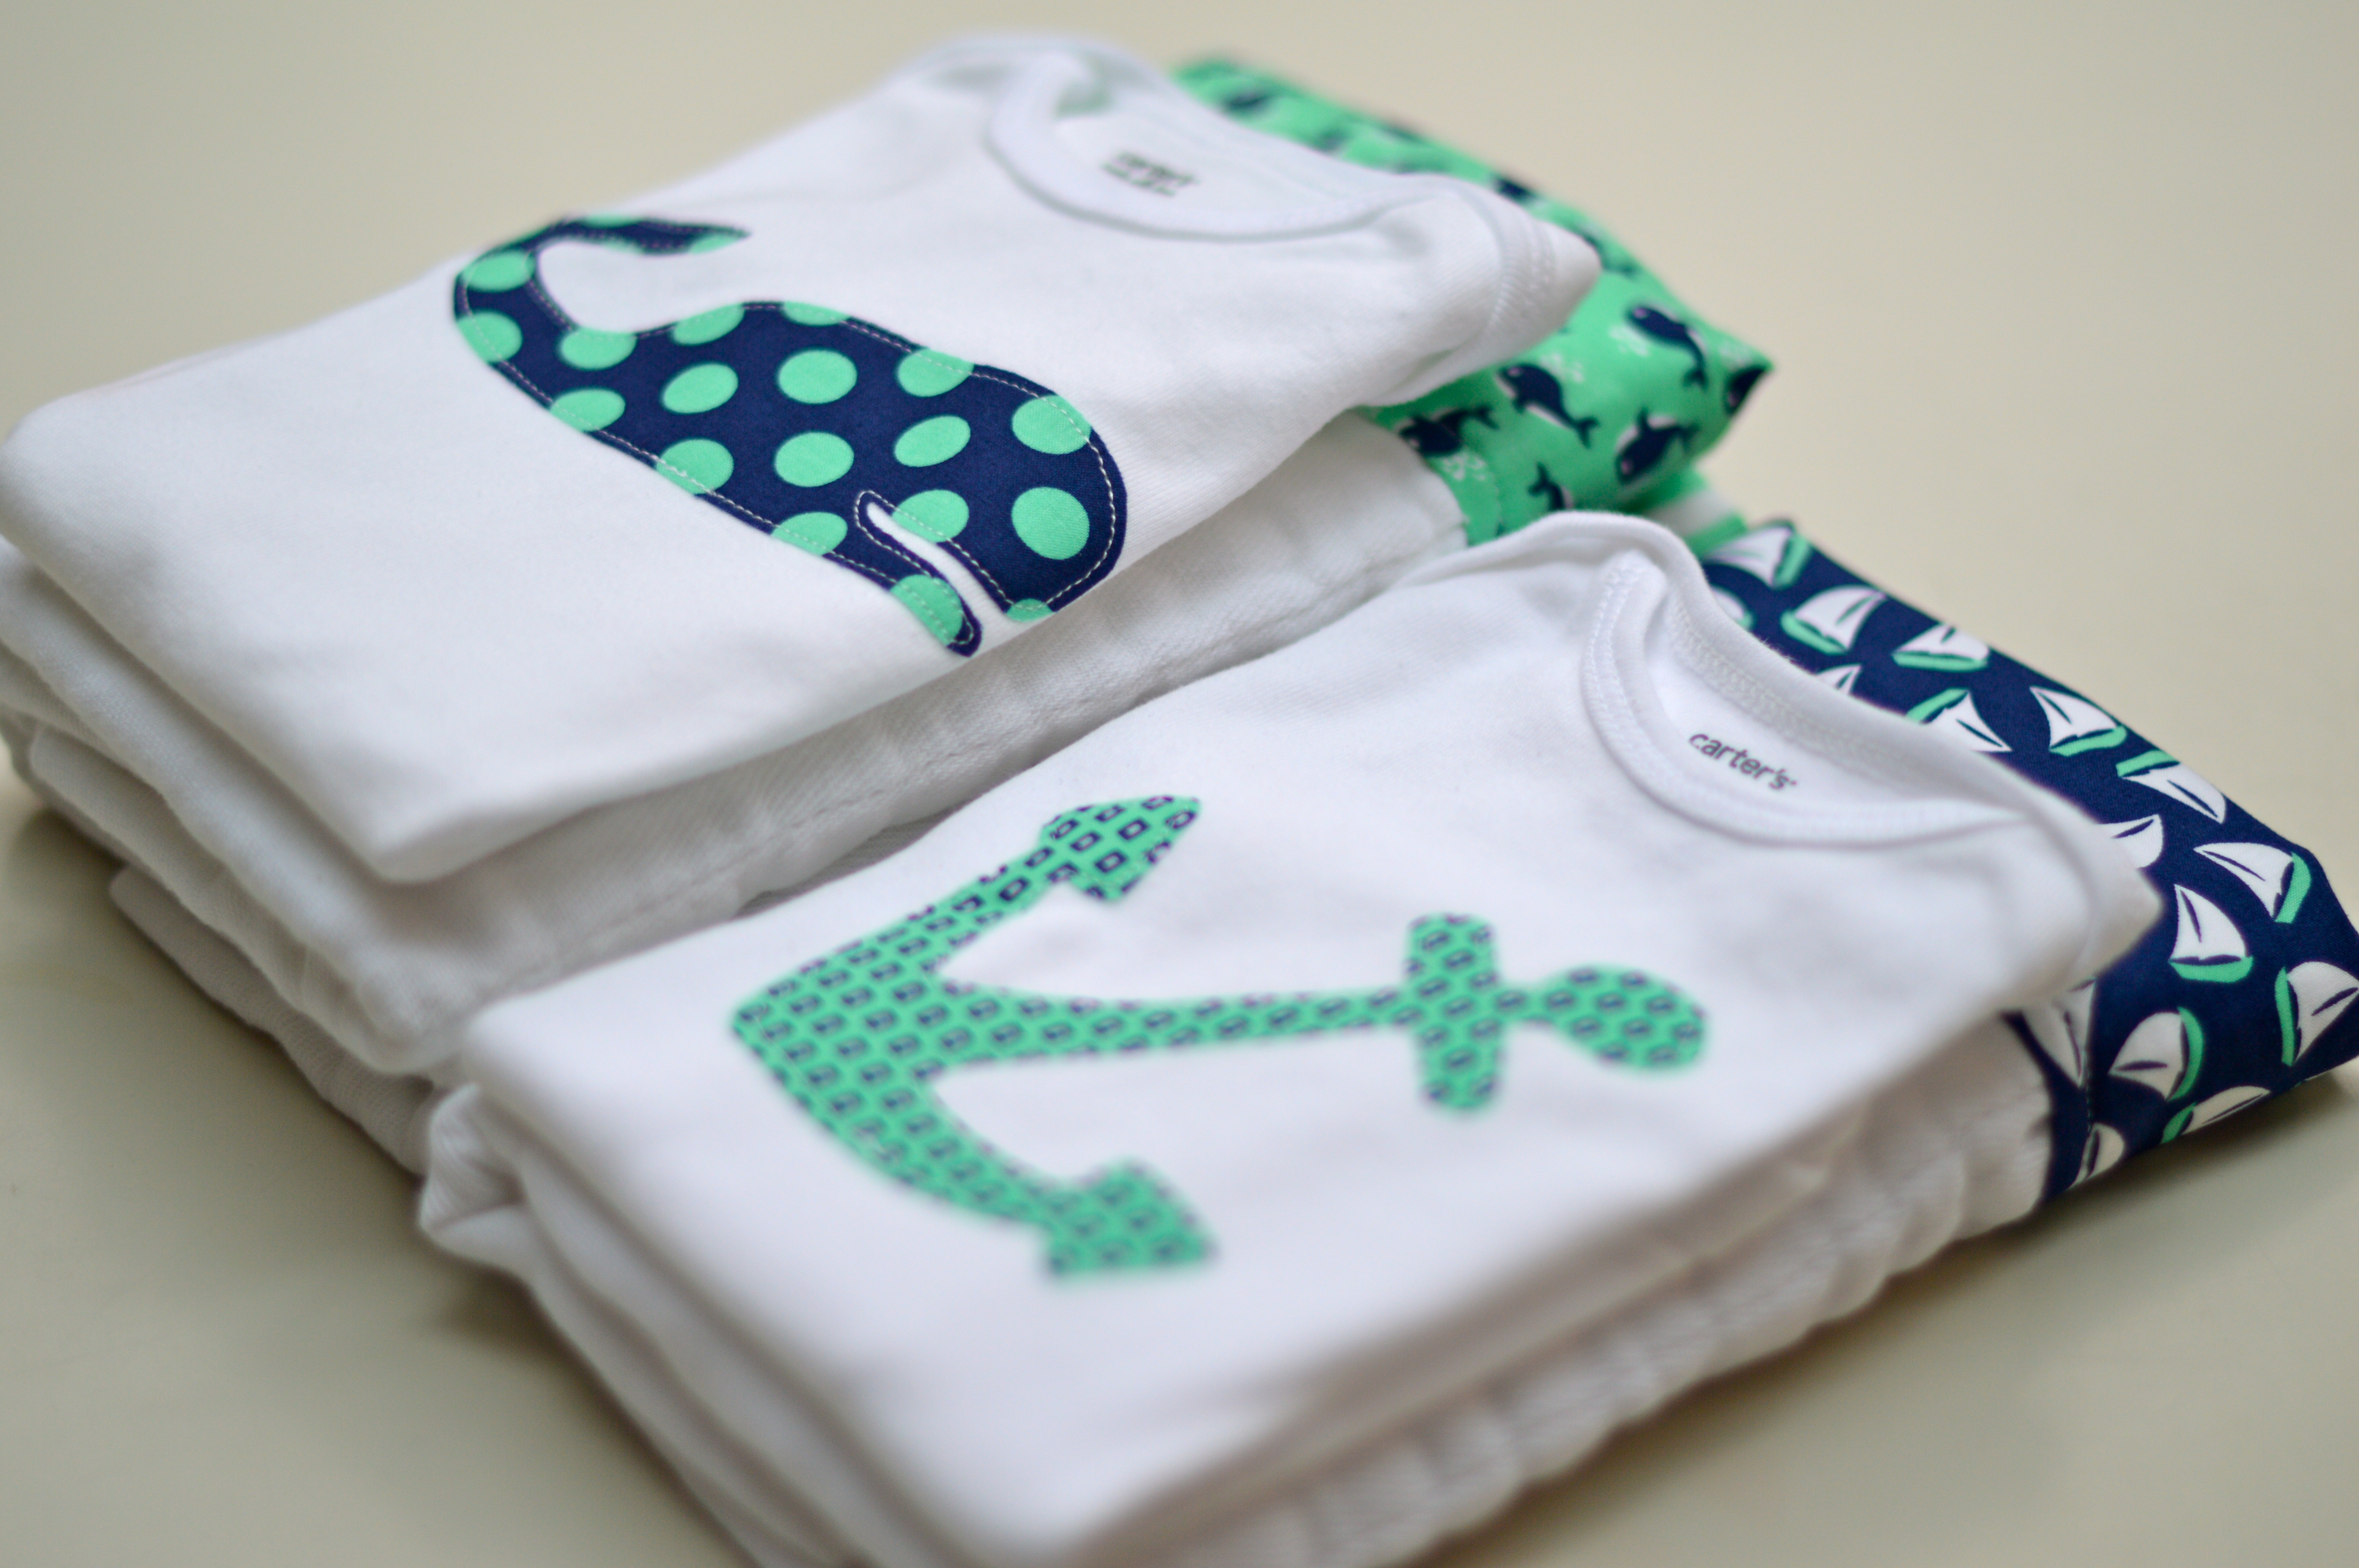
The “little sailboats”, “little whales” and “clown stripe” worked so well for the baby onesies and burp cloths.
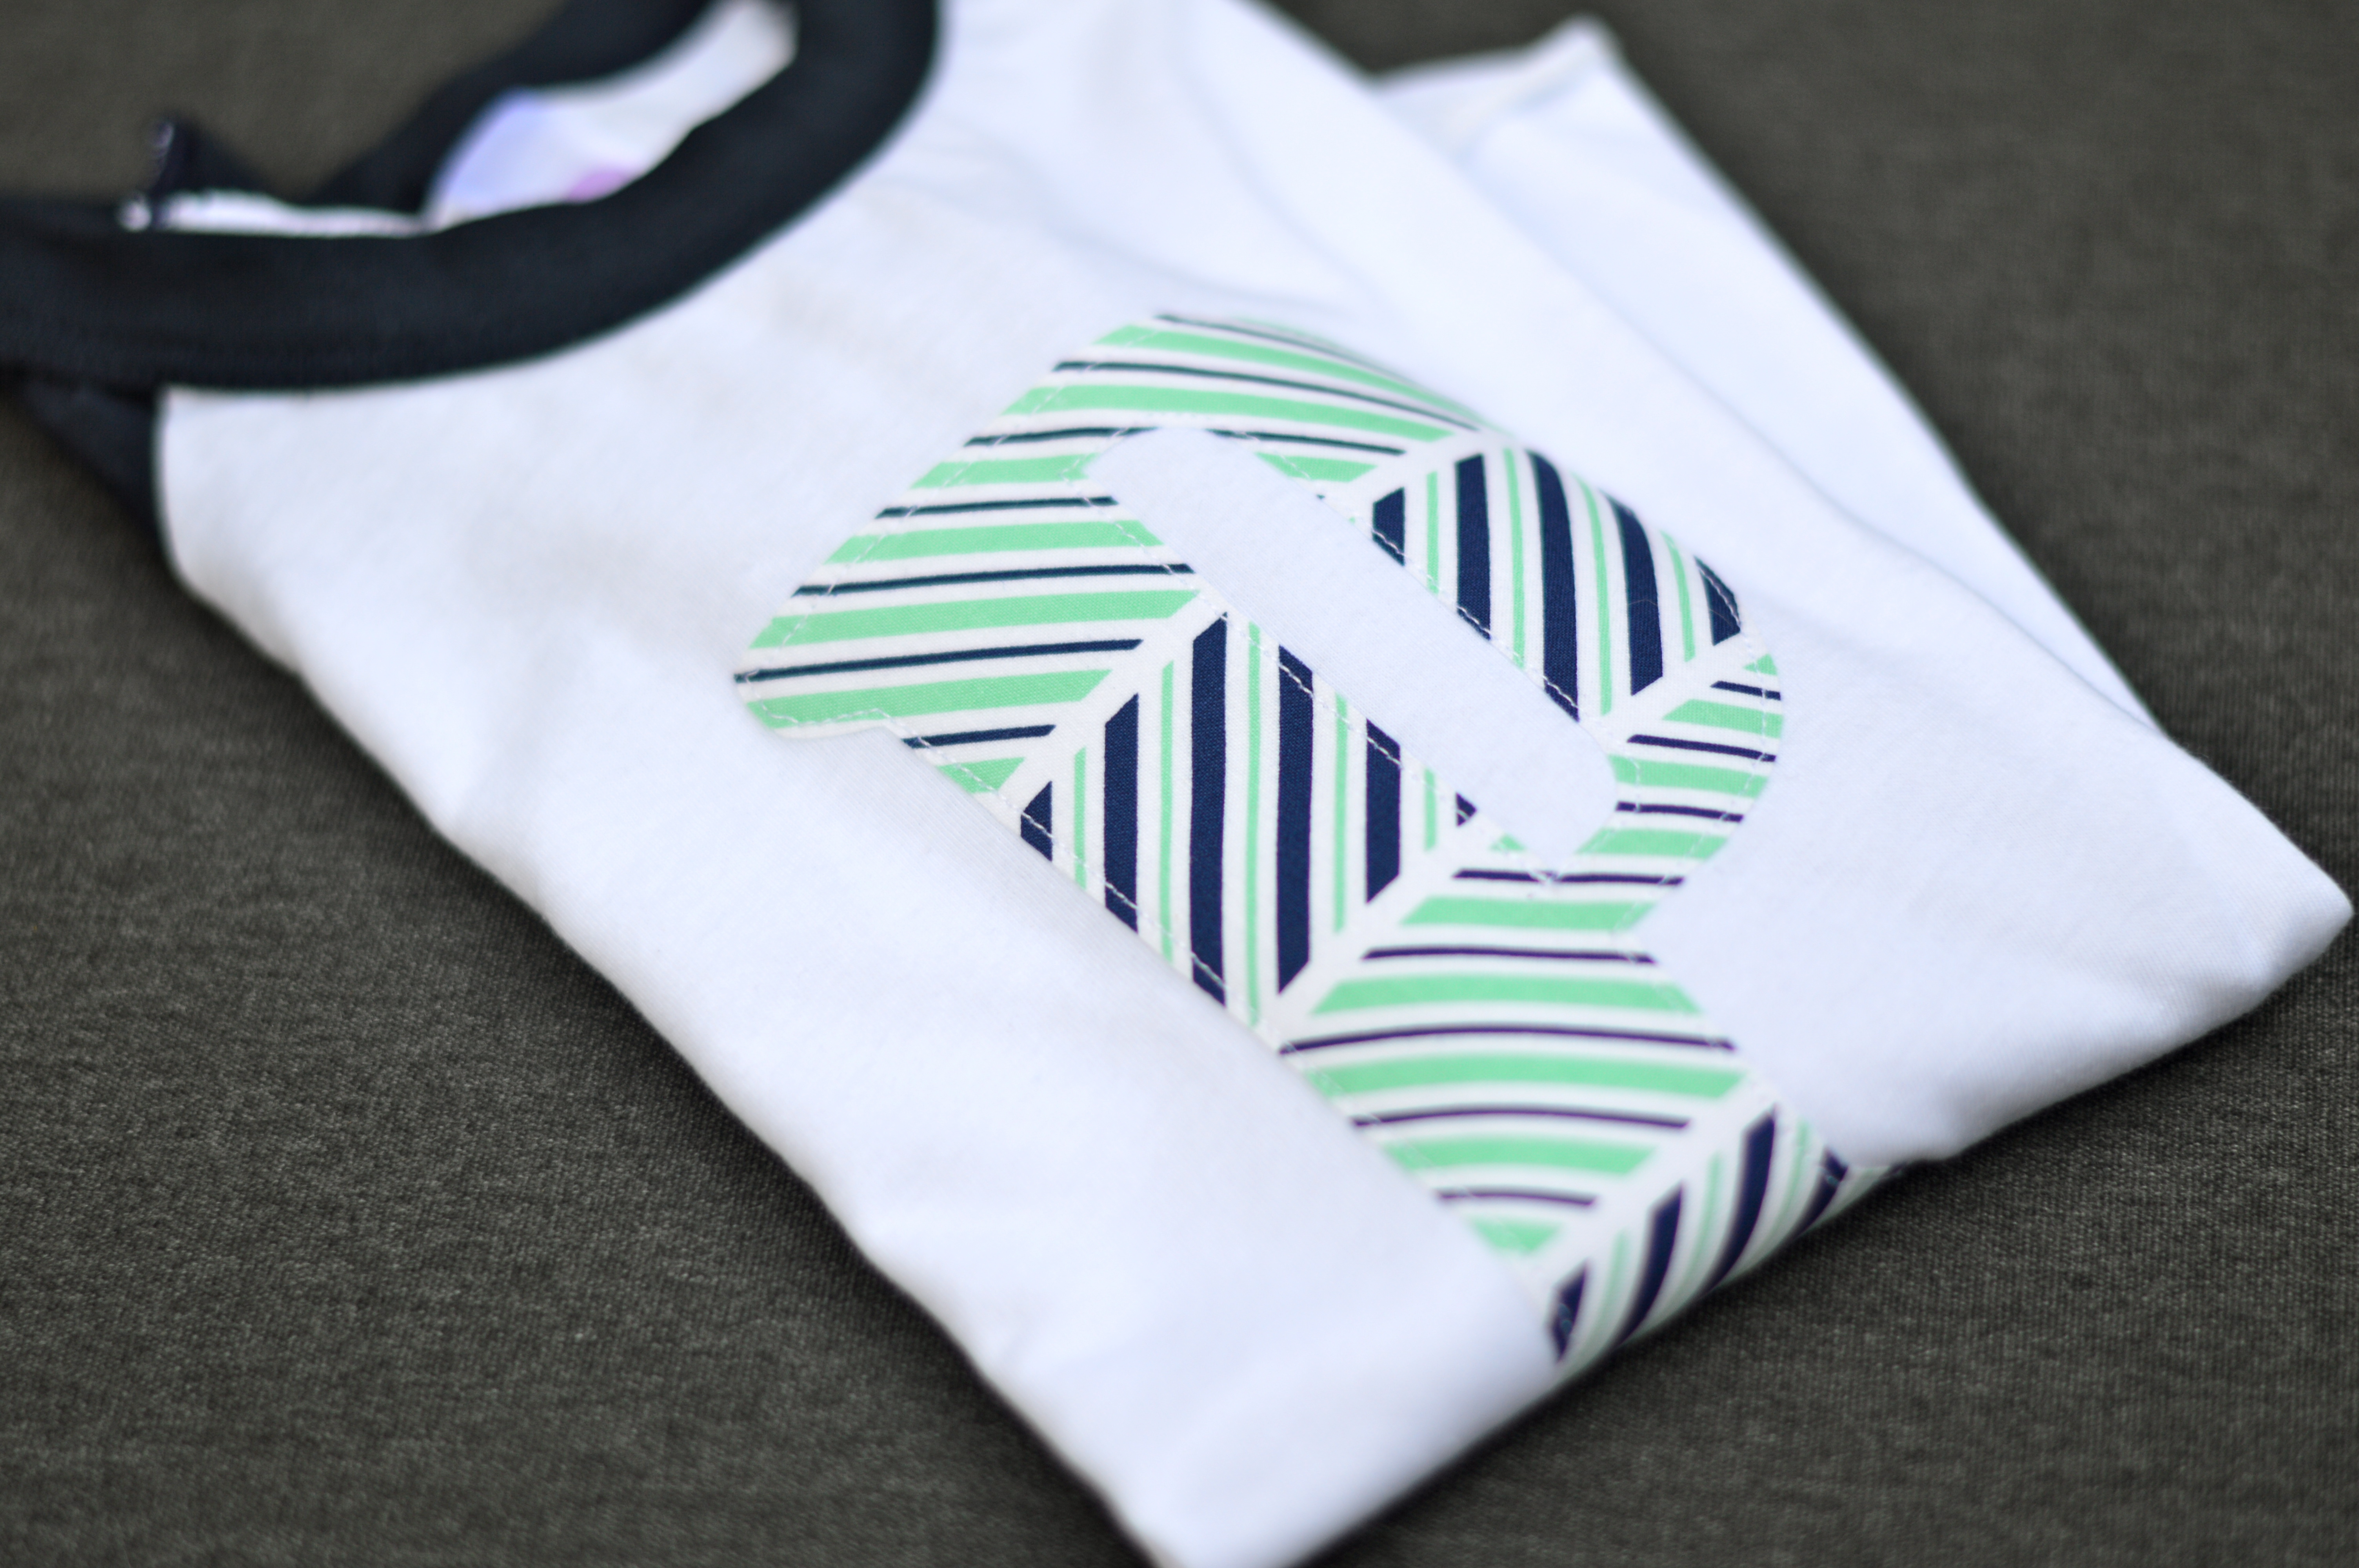 |
| *pictured above ~ Which Way Stripe |
And I love the “which way stripe” and “hospital gown” geometrics in the kid shirts. You’ll definitely be seeing these items show up on Poole Party Designs soon!
Stay tuned- I’ll be back with Part Two of the Littles very soon!
~Lesley

Homemade Play Dough
It is Mid-Winter Break here in Seattle…
Does everyone have this funny break, or is it just us?
Our family decided not to travel for this break, so instead, we’re digging deep with craft projects and getting a little messy! Sometimes I see that it takes a week of no school stretching out in front of me before I am willing to commit to messing up the kitchen with crafts. But I have to remember that the kids love it and (if I can let go of things being orderly) I do too.
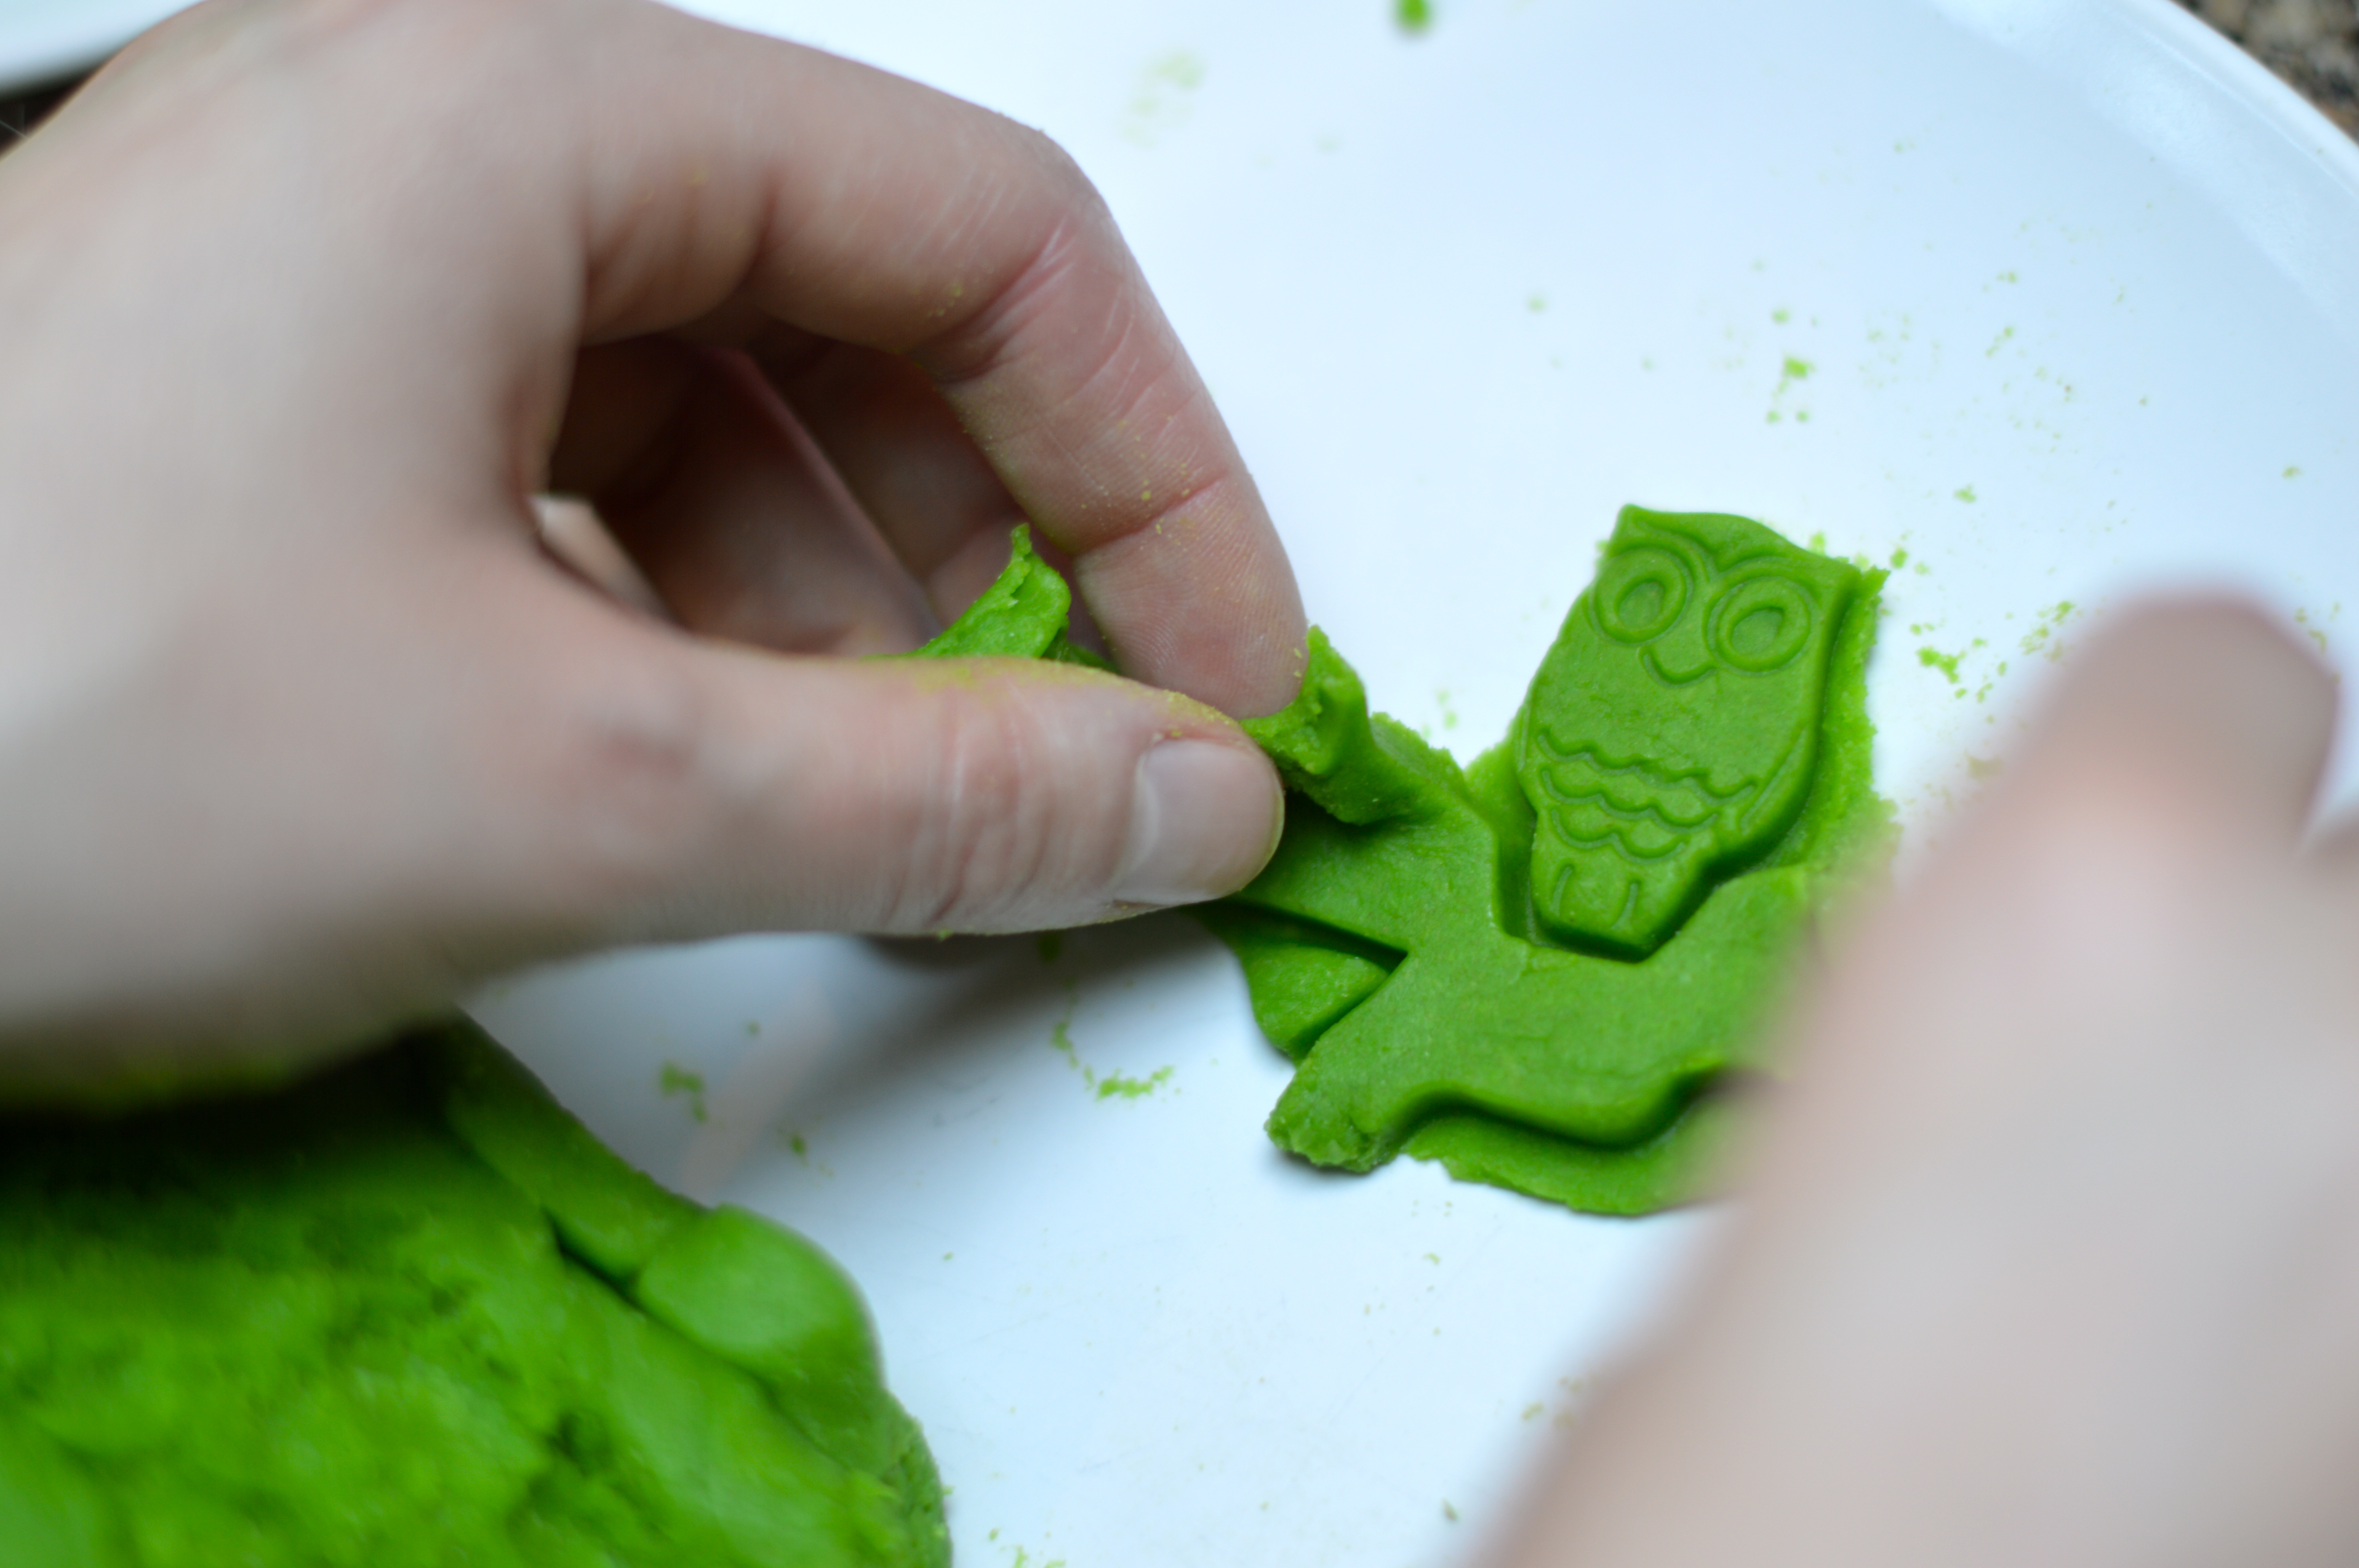
Does everyone know how easy it is to make homemade play dough? I am not saying we do this all the time (see above). And we definitely have gone through our share of store-bought Play-Doh. But truly, it is just a matter of making sure you have the ingredients in your pantry, a few minutes of mixing over the stove, and, Voila – you have super soft dough!
We were recently given a book from my sister-in-law called Lotions, Potions, and Slime by Nancy Blakey. As much as I wish this wasn’t true, sometimes I’m more up for that stuff than others. But, it reminded me of all sorts of ideas on how to encourage imaginative gooey play. (Thanks, B!) We were originally introduced to homemade play dough at Co-op Preschool and clearly there are lots of variations on quantities for this type of recipe, but this is the one we used yesterday. It worked beautifully. Be sure to have cleaning supplies at hand though, as getting messy is part of the… um, fun.


Classic Homemade Play-dough
Ingredients:
3 cups flour
1 1/2 cups salt
6 teaspoons cream of tartar (acts as a preservative)
3 cups water
3-4 tablespoons oil
2 tablespoons baker’s food coloring (available at Michael’s, Amazon, or other arts and crafts stores from Wilton)
Optional:
kool aid (for yummy smell)
glitter
Directions:
Mix dry ingredients (flour, salt, cream of tartar) in a large pot. Add the water and oil and stir over medium heat. Add food coloring to arrive at desired shade. Continue to cook and stir until dough thickens and gathers into a big ball.
Remove dough from heat and place onto a generously floured surface. When dough cools, knead until dough is smooth. Store in a plastic bag or covered bowl (no need to refrigerate).
Enjoy!

Snowflake Slump
Oh the cold weather outside is frightful
But the fire is so delightful
And since we’ve no place to go
Let It Snow! Let It Snow! Let It Snow!!
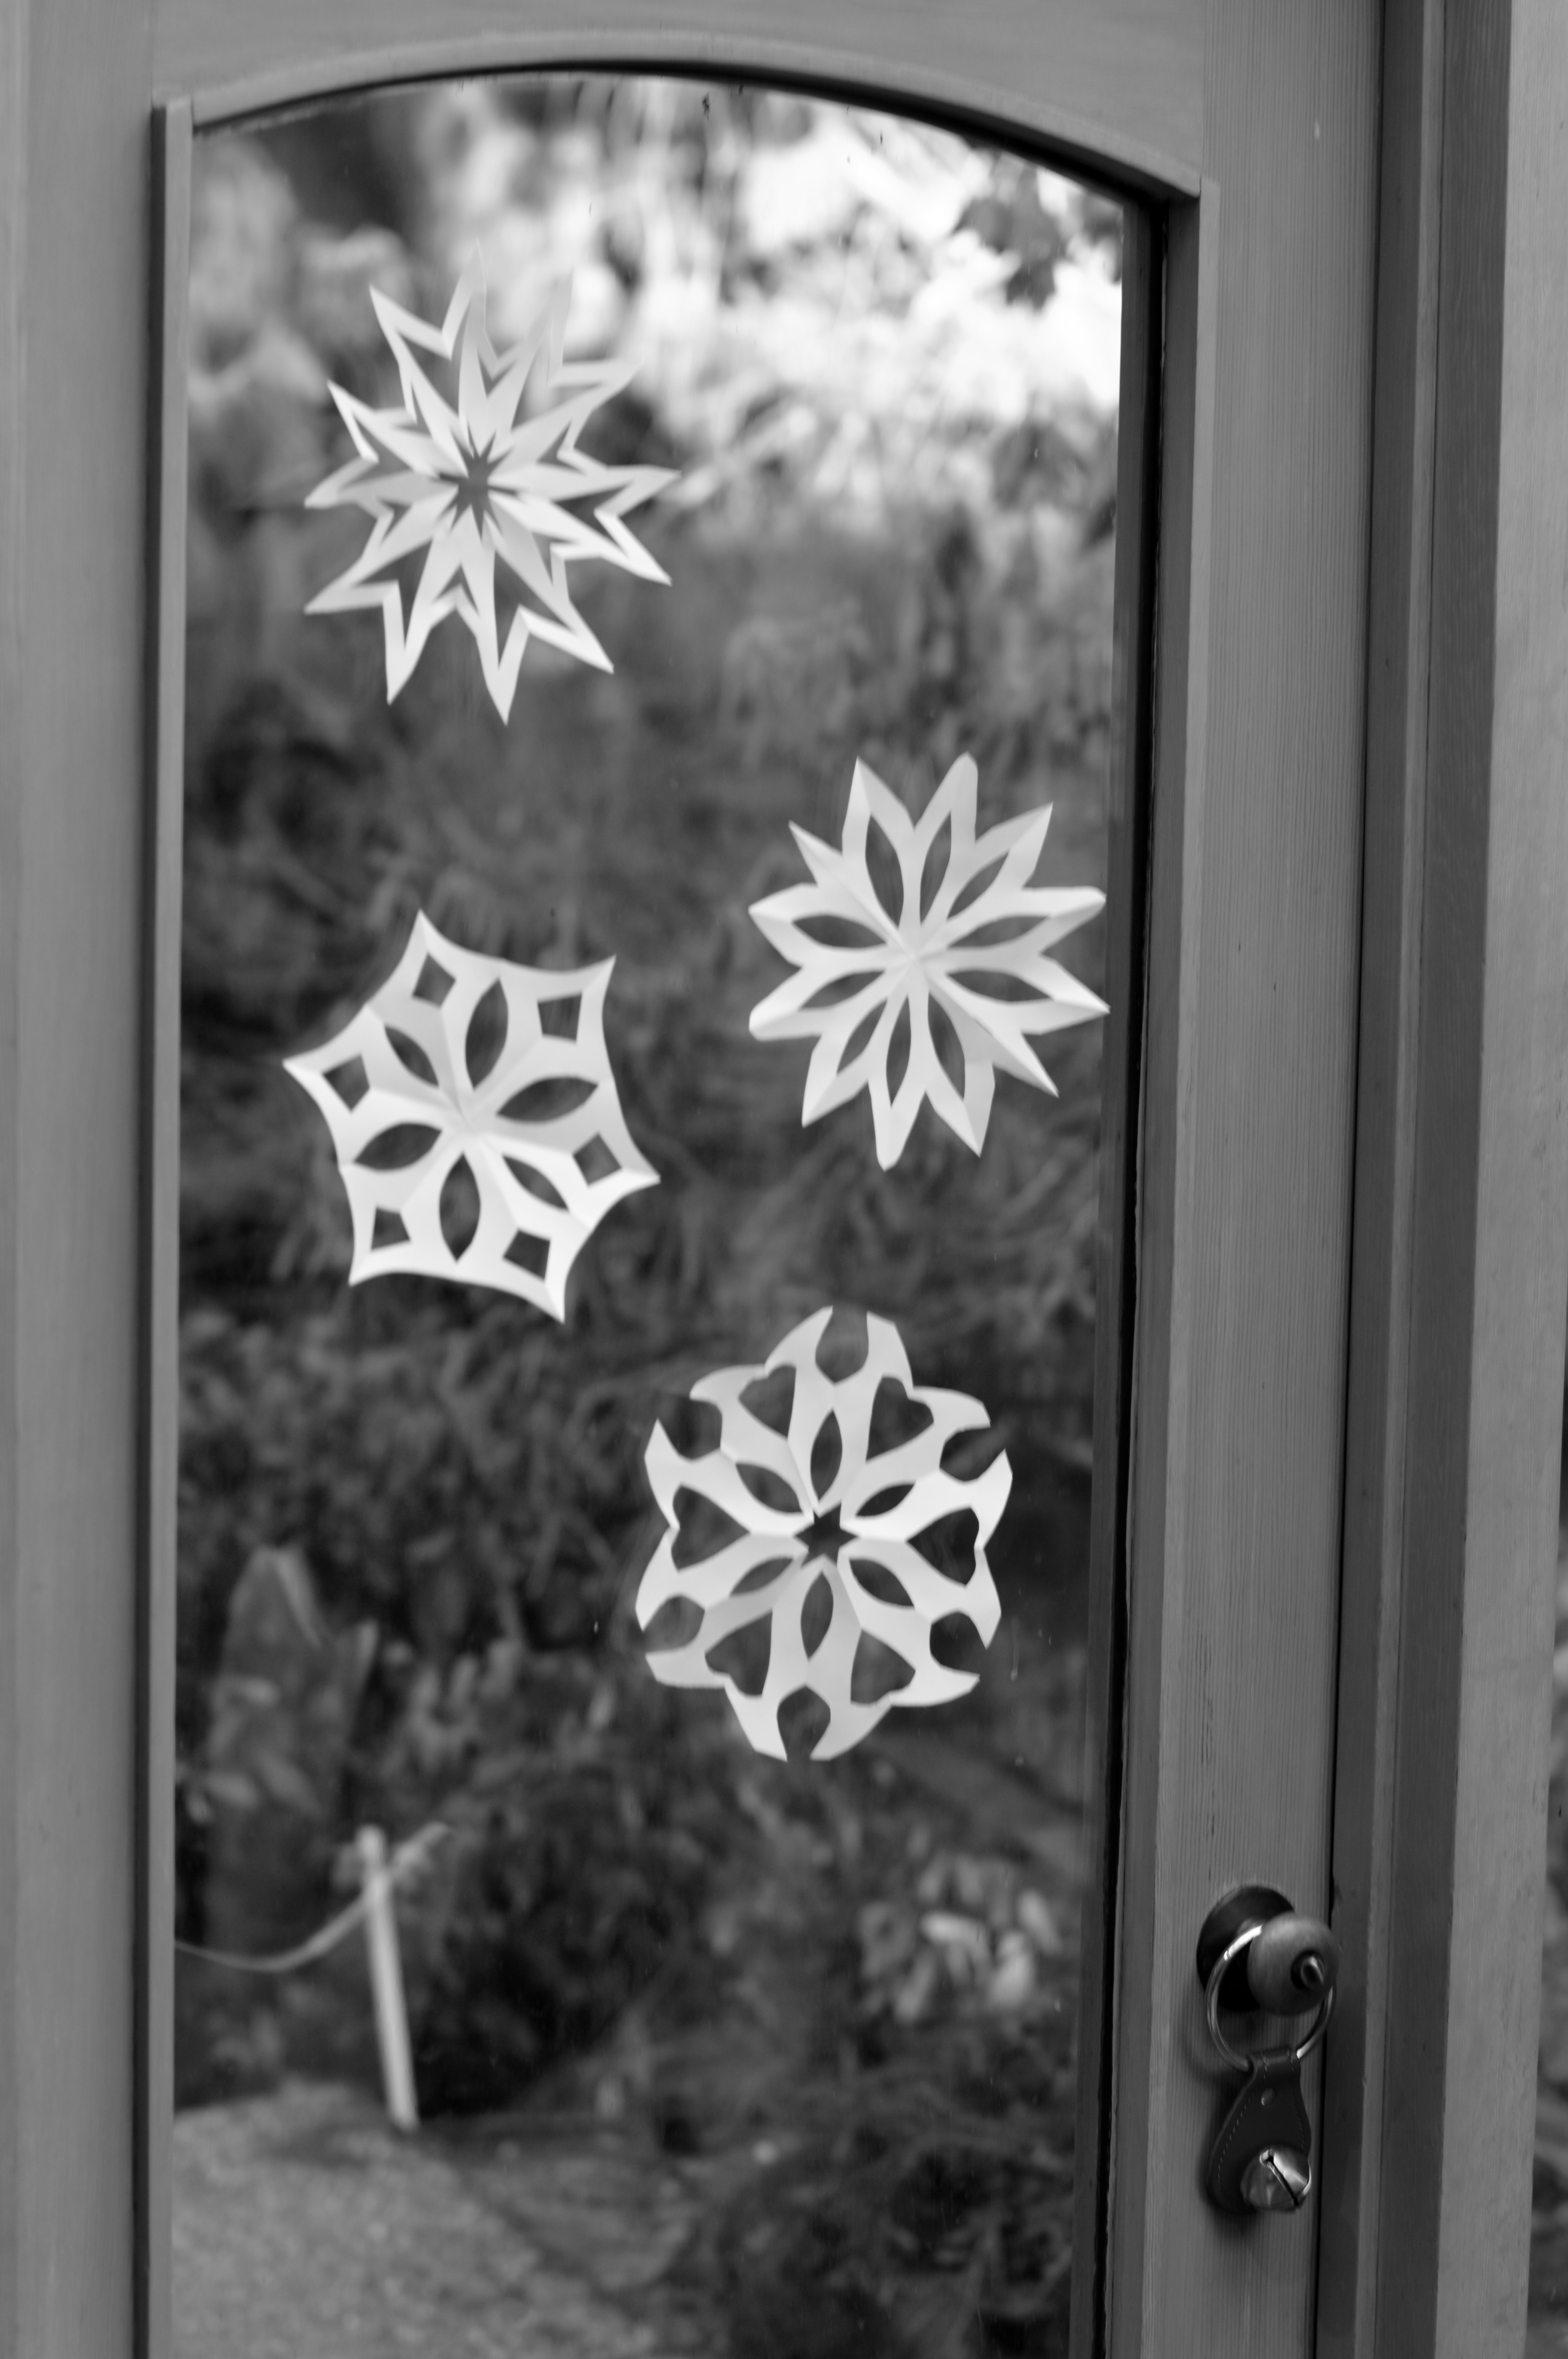
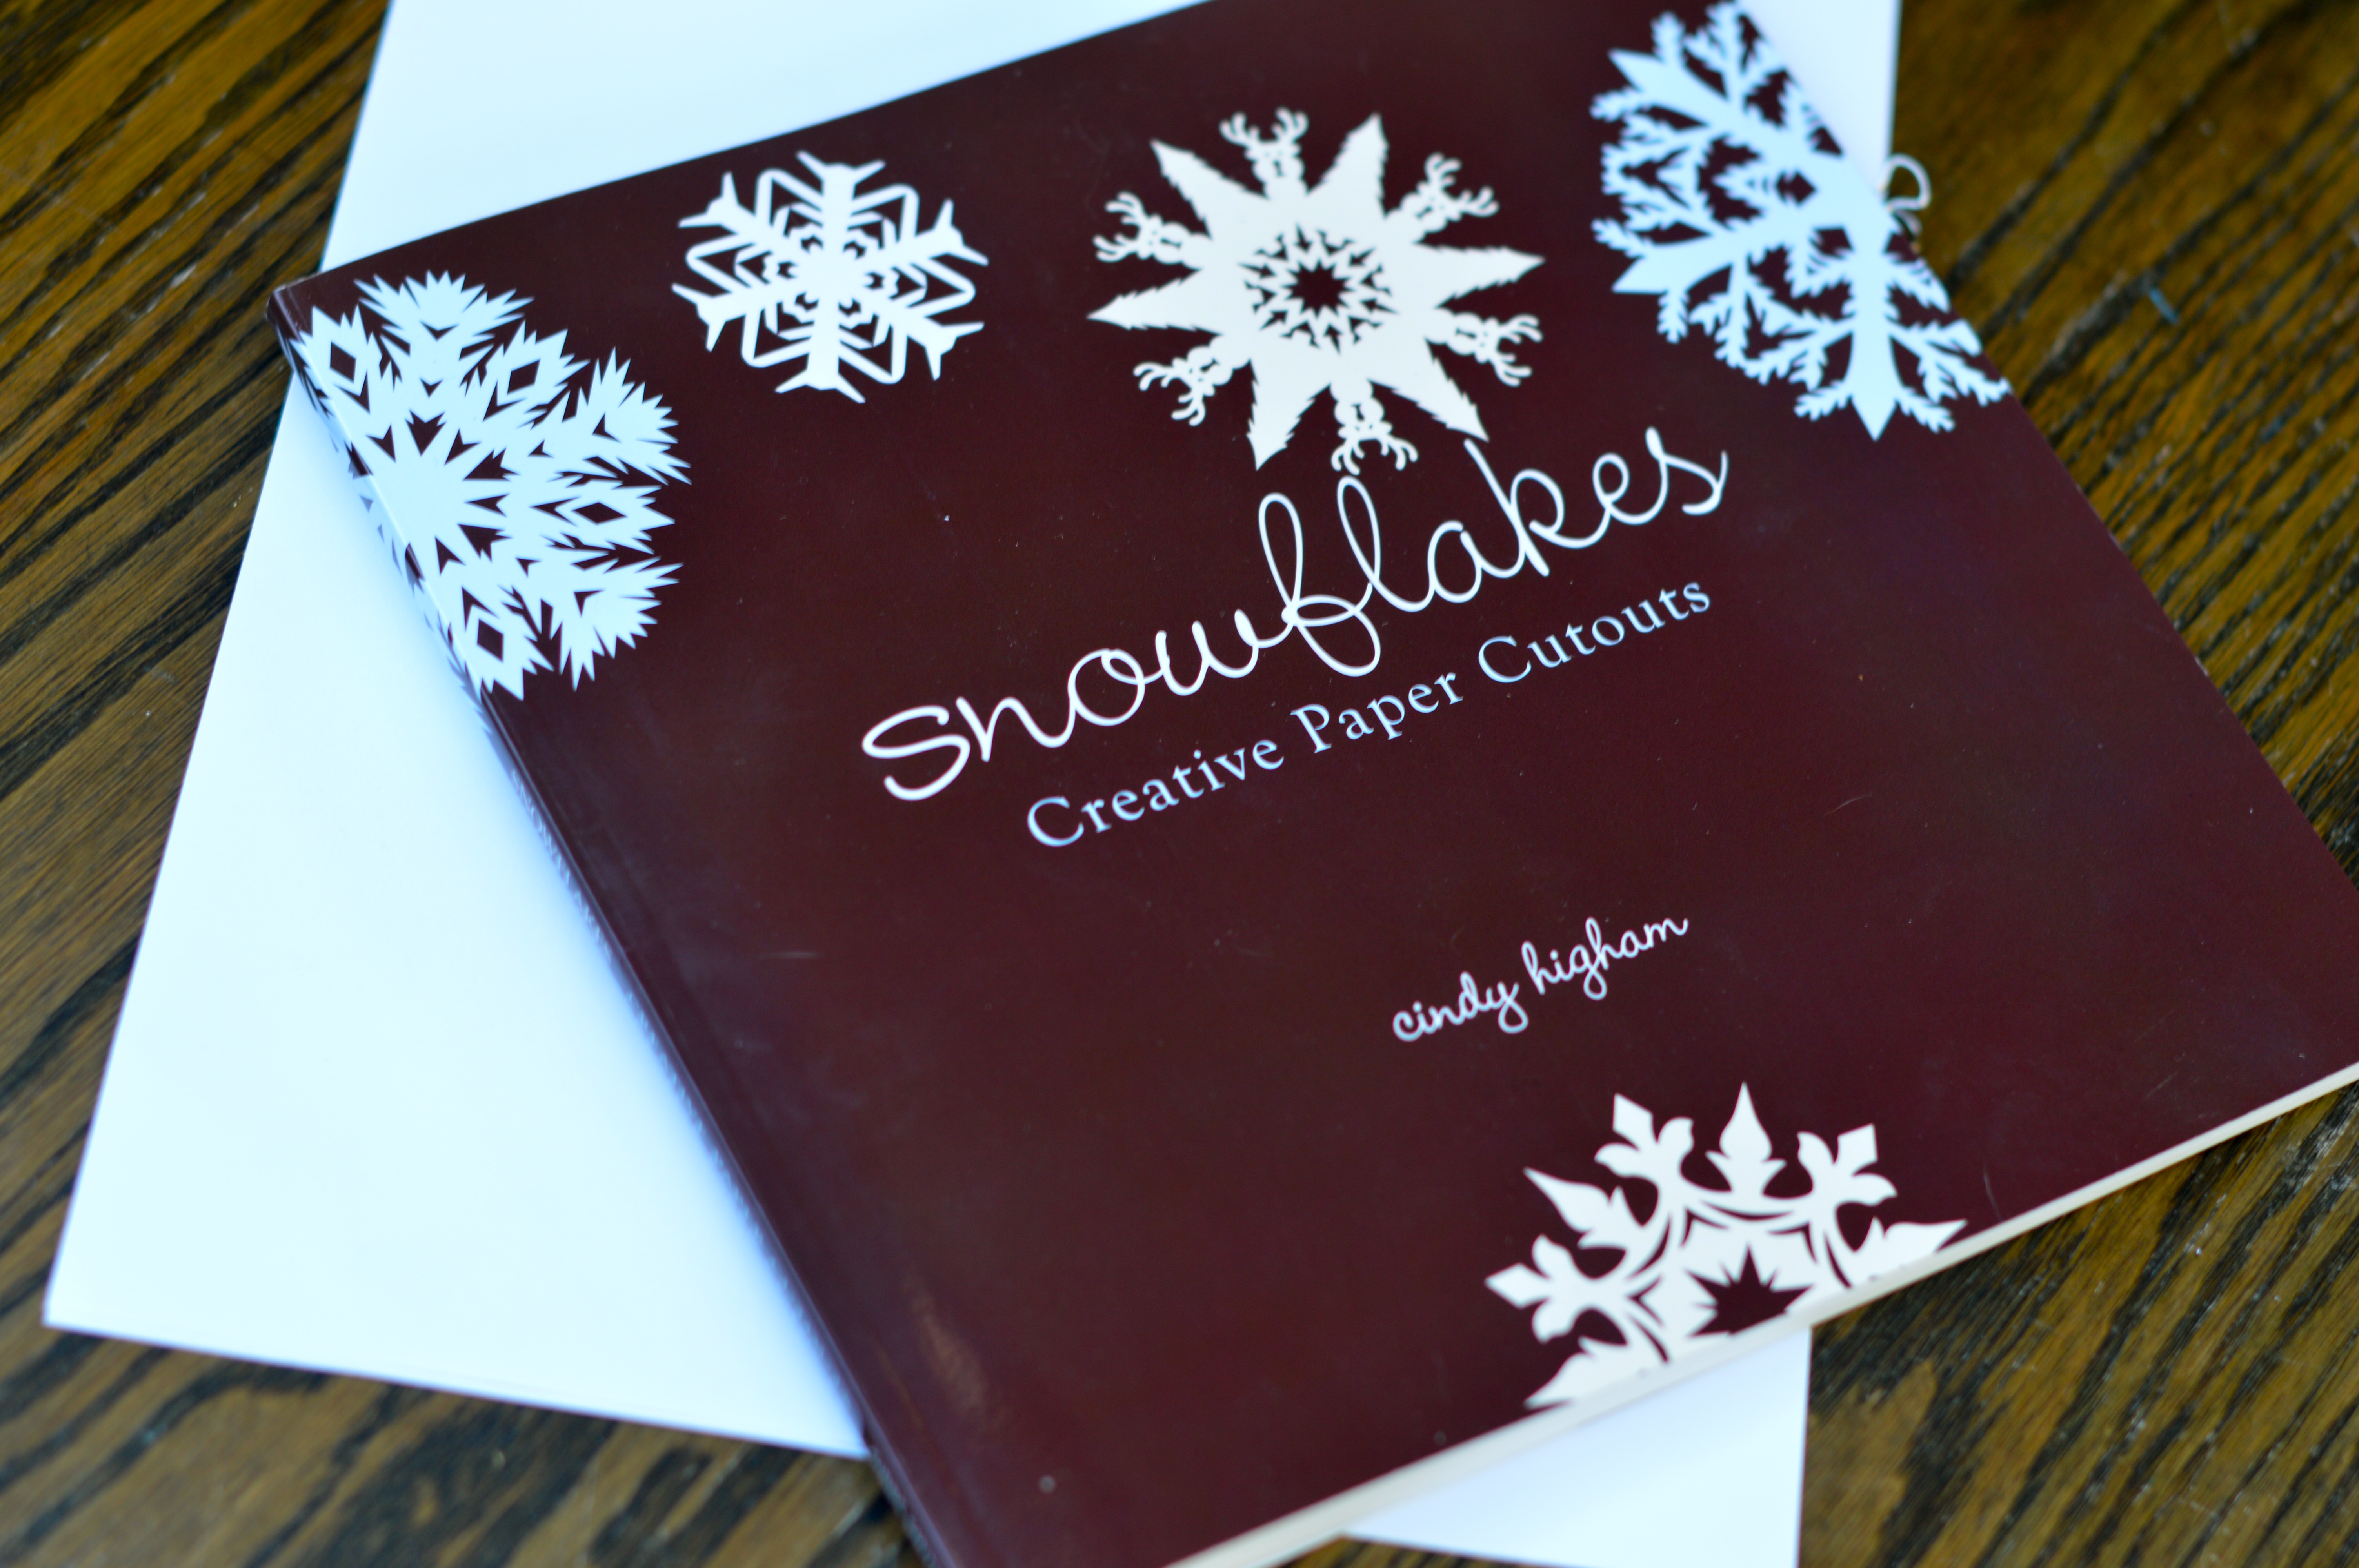
For years, paper snowflake making has been a rite of passage in our home, welcoming in the winter season. It is something our family does together and like many other families we decorate our windows with these paper creations. But for years, we have been making snowflakes that are simply adequate. This year, when the topic of snowflake making came up, my oldest son asked his grandmother if she had a book that would tell us how to make really beautiful snowflakes. And, being the amazing grandma that she is, my mother went out to our local bookstore to ask about such a book. Well, one thing led to another and a book was ordered. (At this point in the story, I must say that I was a bit skeptical. Keep in mind that the oldest of our three kids is six years old. I figured that any book we came home with about “snowflake making” would be a complicated manual that would definitely be over his head; ending in a more frustrating versus helpful situation for my little perfectionist.) But, I will say it here, I was completely wrong. Our wonderful local bookstore, Island Books, found a fantastic book that has taken our mediocre snowflake making to the next level. Until looking at this book, I really didn’t even know that I had been in a snowflake slump all these years!
Snowflakes: Creative Paper Cutouts by Cindy Higham touts that it can turn anyone into a snowflake pro, and I believe it. The book includes 75 snowflake designs that include easy-to-follow directions and very clear pictures. Buy the book, or just check out the photos below, for an example of how to make your home a winter wonderland.

Paper Snowflakes
Supplies necessary: white paper & scissors
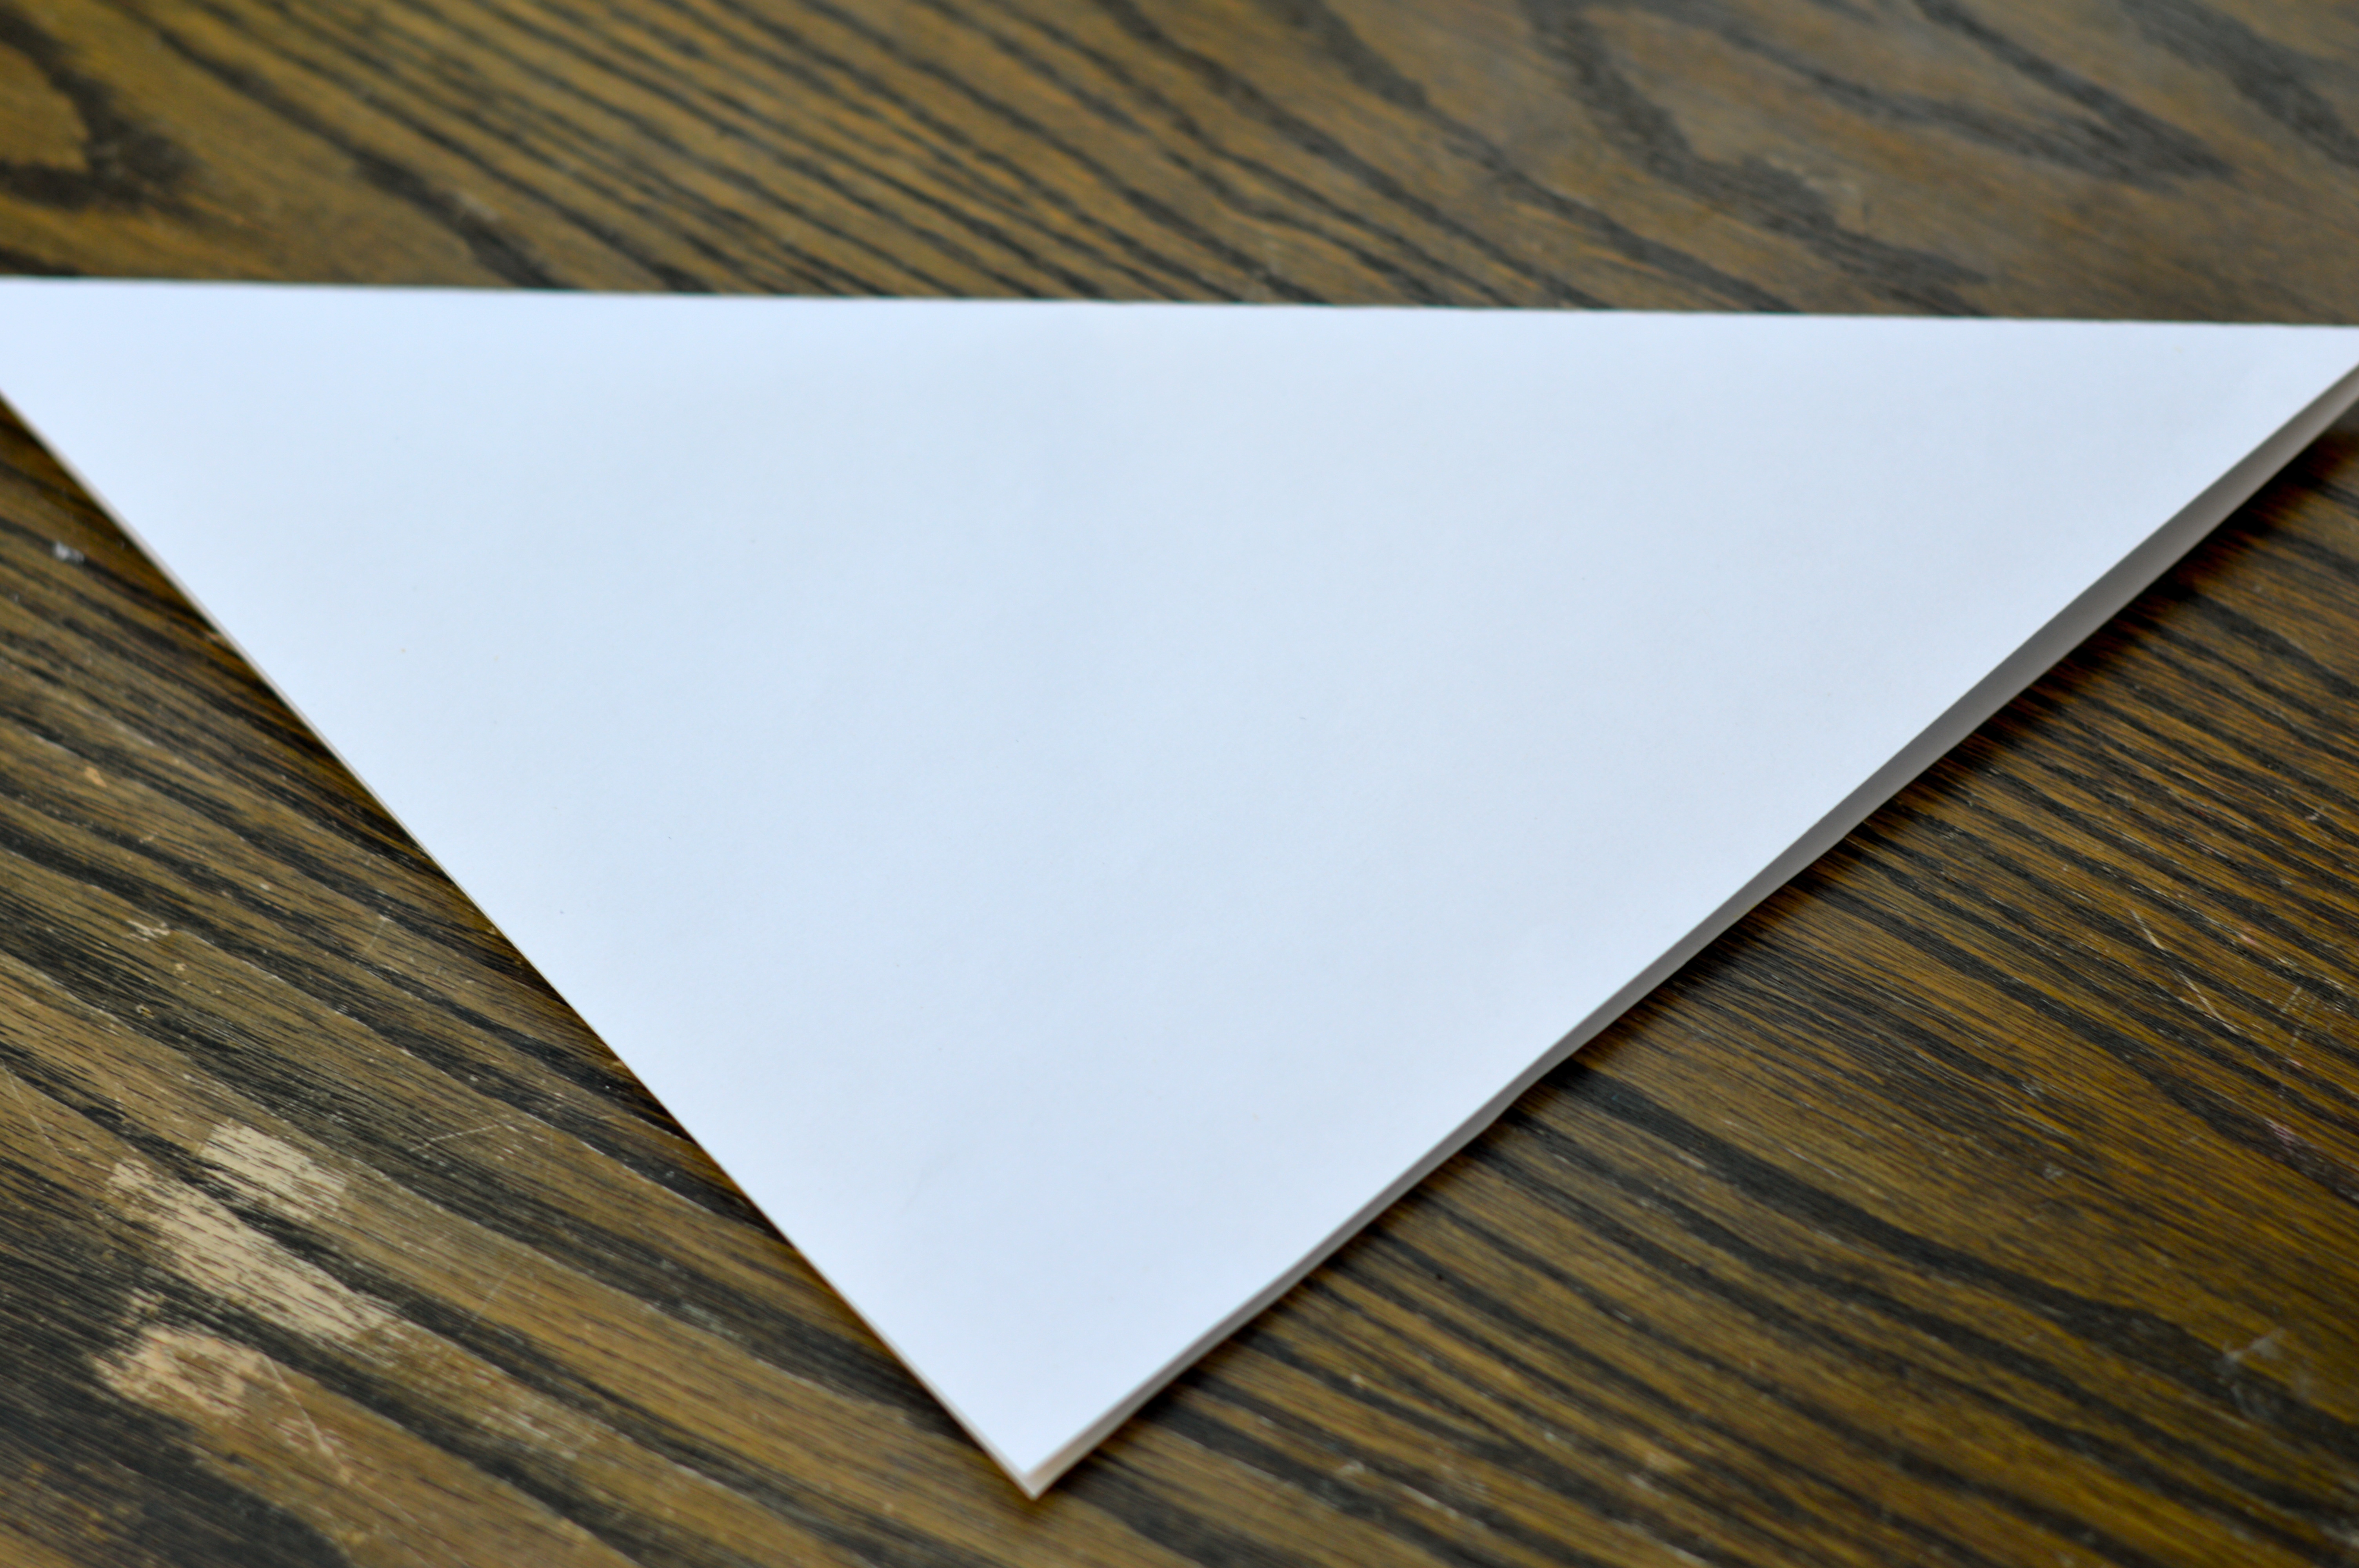
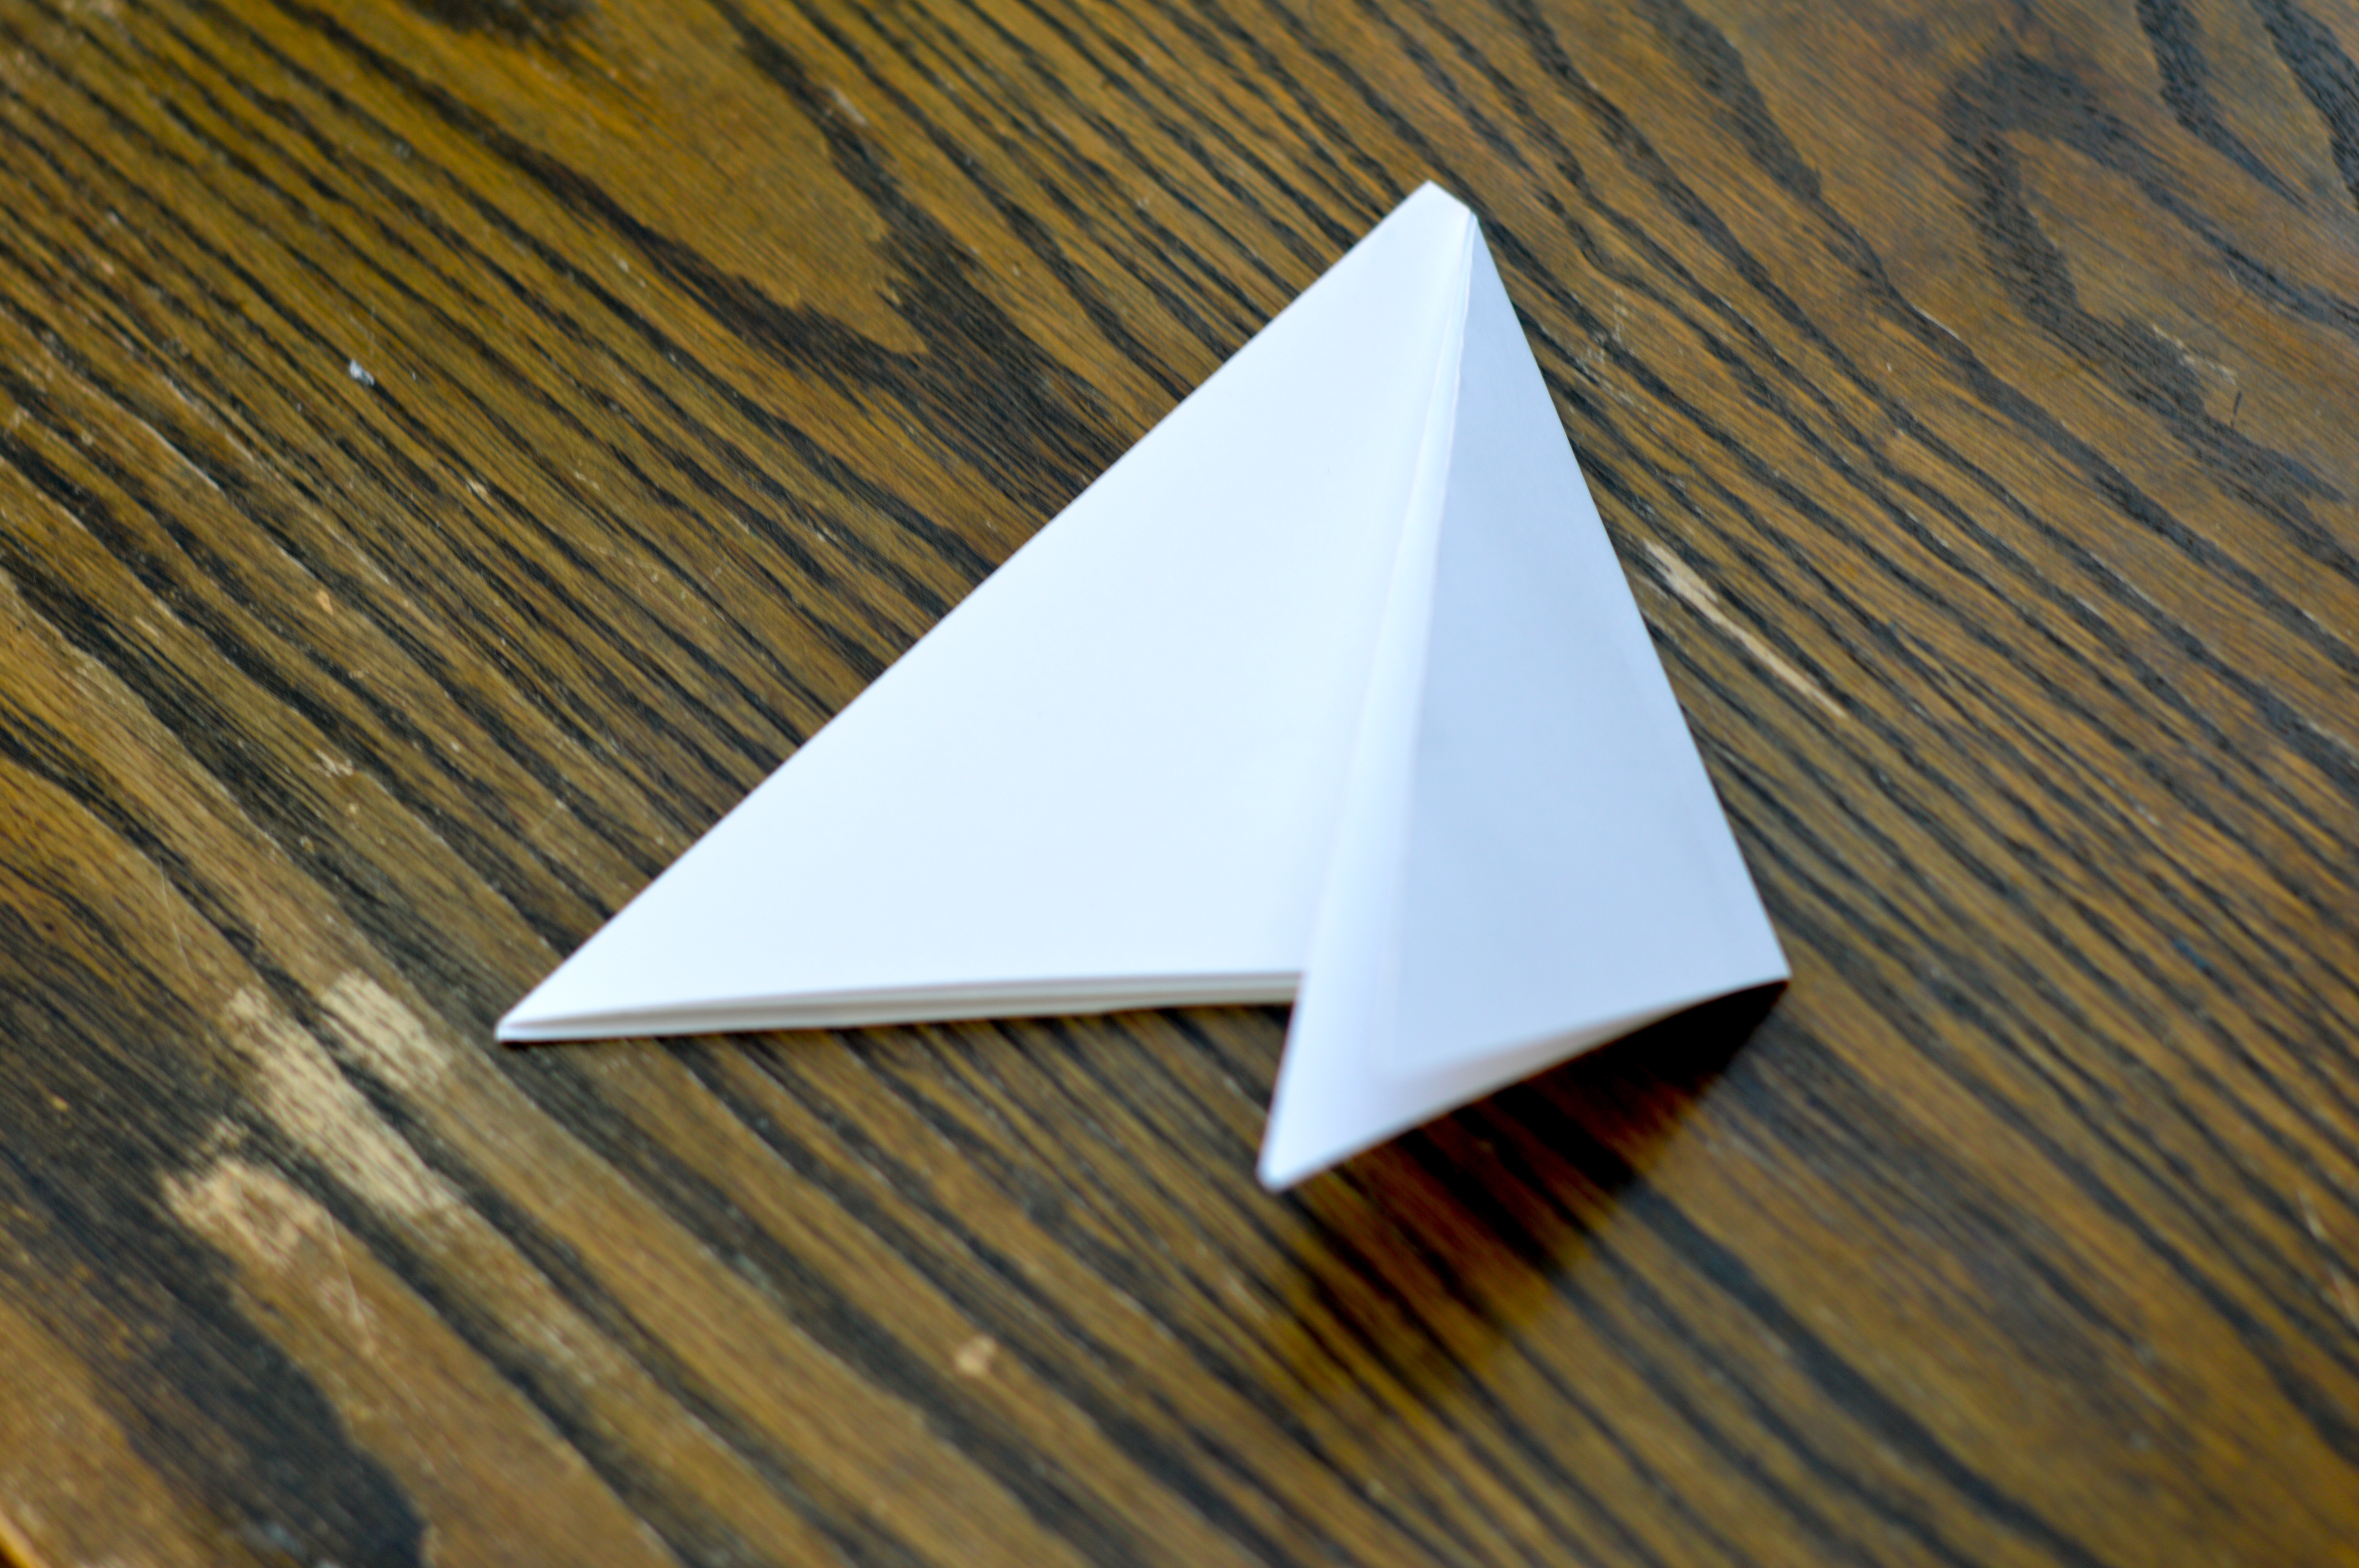
- Begin by making your folded paper triangle from an 8.5″ x 11″ piece of paper. Standard copy paper or something similar works best.
- If your paper is a rectangle, fold a top corner to opposite edge. Cut off the paper that extends past the triangle you have folded. Unfold your triangle and now you have a square.
- Refold your square into a triangle again and repeat one more time to make a triangle one quarter the size of your square. It is worth noting here, the tighter and more perfect your folds are, the more perfect your snowflake will be. But, even if it is not perfectly folded, it will still work.
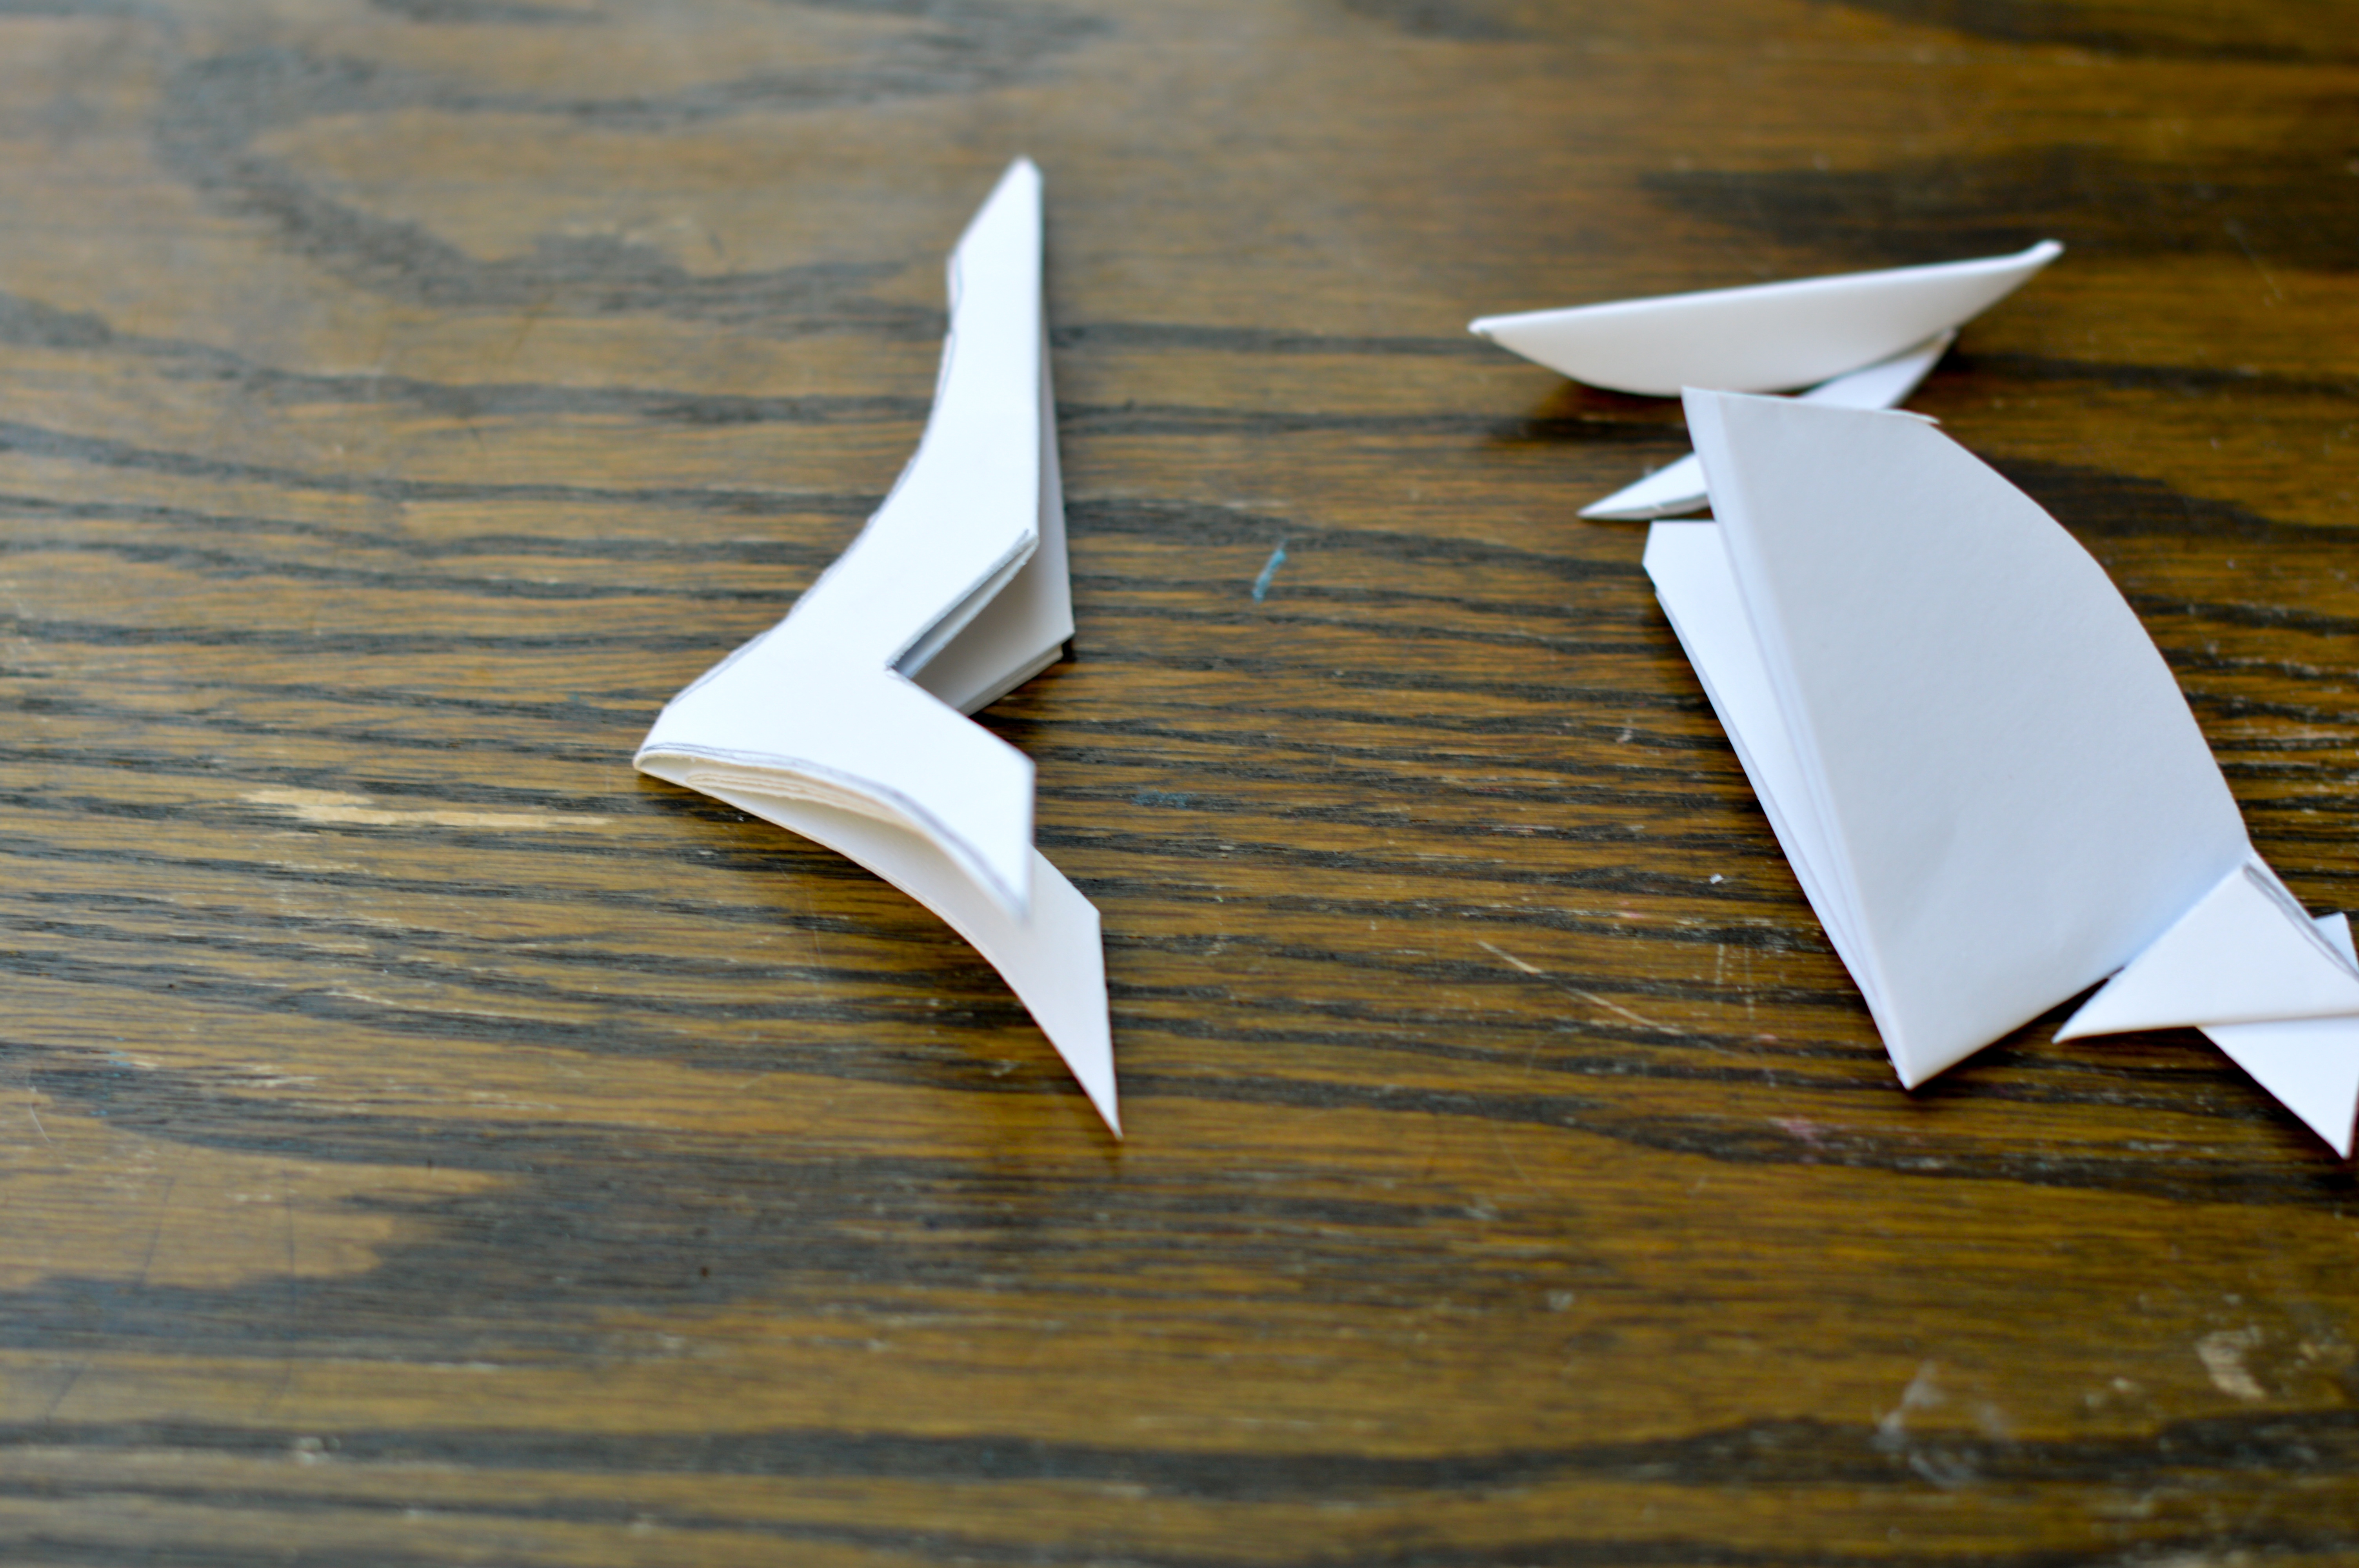
- Fold your triangle into thirds. Cut points off the bottom of your triangle in a straight line. You are now ready to begin!
- Once your triangle is folded, you are ready to choose a design.


- Refold your square into a triangle again and repeat one more time to make a triangle one quarter the size of your square. It is worth noting here, the tighter and more perfect your folds are, the more perfect your snowflake will be. But, even if it is not perfectly folded, it will still work.
- Fold your triangle into thirds. Cut points off the bottom of your triangle in a straight line. You are now ready to begin!


The beauty of this book is how simple it is. All the designs are shown two ways: 1) as the snowflake will look once complete, and 2) as the folded triangle with lines necessary to cut in order to achieve that particular snowflake. If you own this book, you can copy the photos and actually tape them onto your triangle for perfect cuts. I was happy to simply look at the photos for inspiration and cut them in a “close enough” fashion. You choose what makes you feel happy.


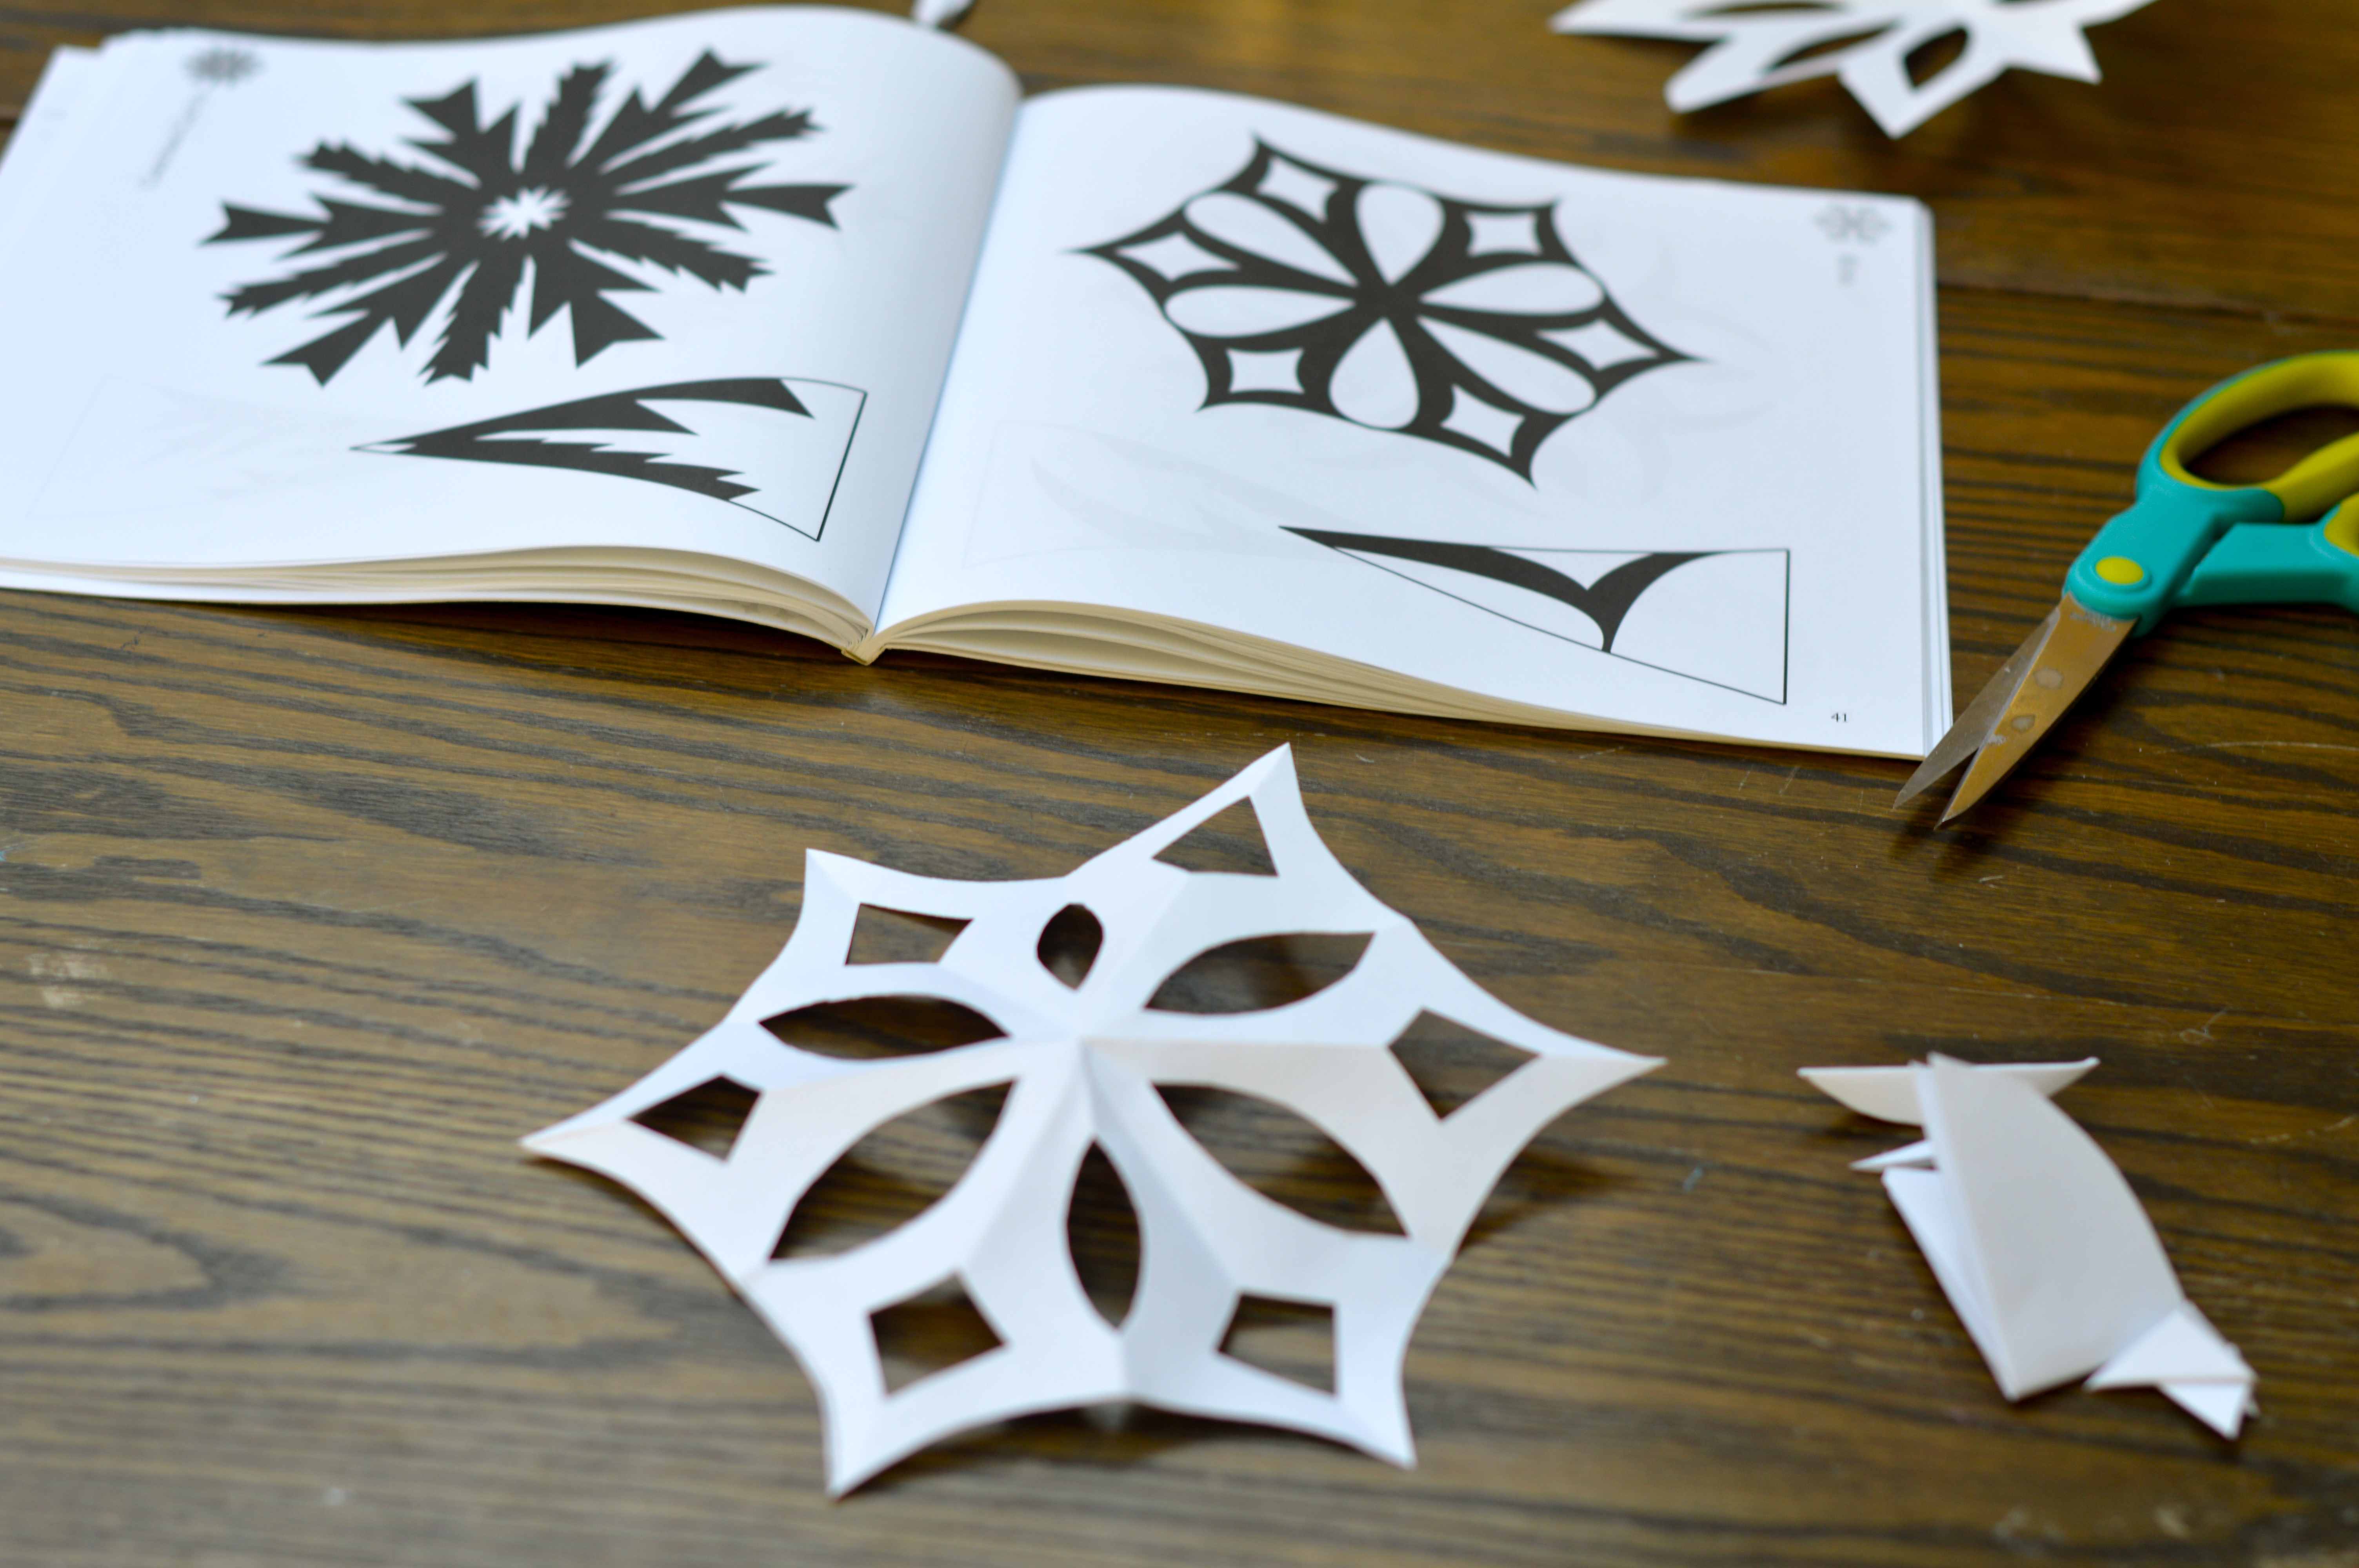
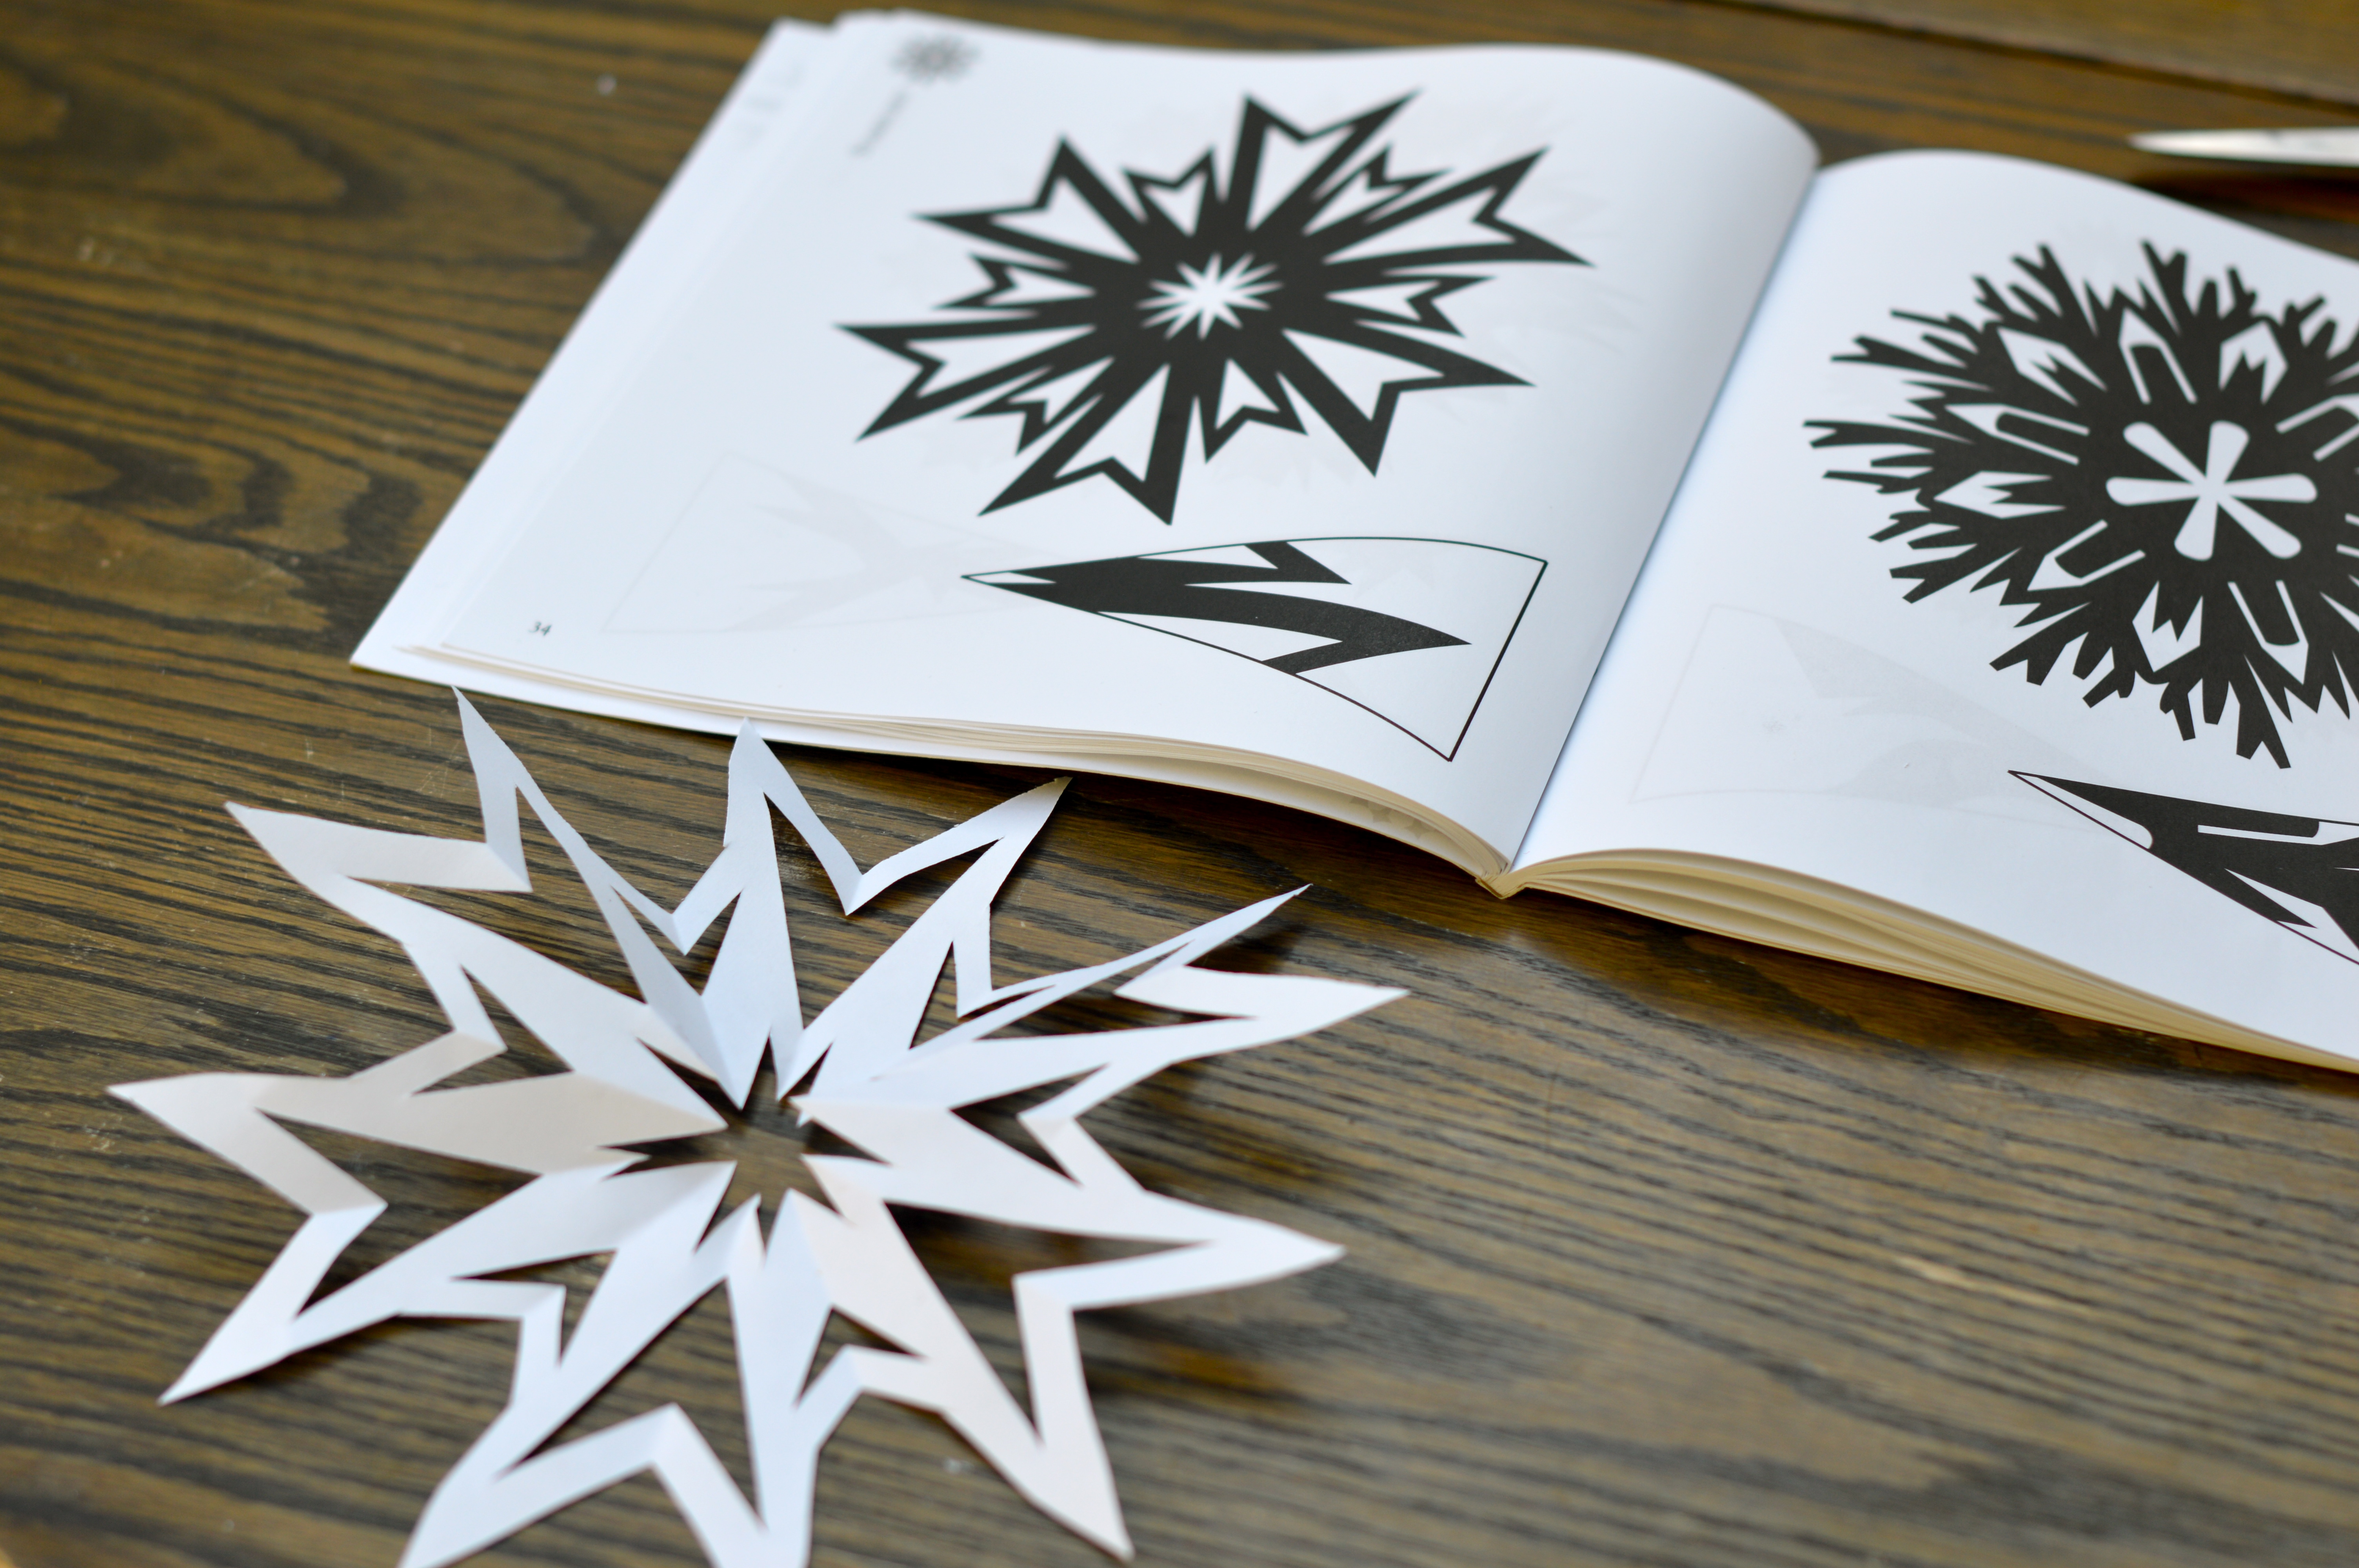
I love looking at how simple the cuts can be on the triangle image, and what kind of amazing snowflake you can create! Our windows are covered and I am happy to say that many of them were created by my kiddo.
Happy Snowflake Making!

Bitters
IF THE BITTER CUP CANNOT BE PASSED, DRINK IT AND BE STRONG
Jeffrey R. Holland

November has arrived and we need a little restart here on the blog. September and October were surprisingly busy and I am trying like heck to keep up with my life. I am also noticing that a different sort of drink is calling my name these days. As the leaves turn and fall off the trees, one of the warm-ups I relish is a lovely, mixed cocktail. This is a bit of a departure for me, as in the past I would have called myself a wine or beer drinker, but last winter I discovered rye whiskey and a fabulous cocktail from Zig Zag Cafe, called a Blessed Event. And it is just that… I was inspired to look at this drink a bit more closely and try to recreate it at home.
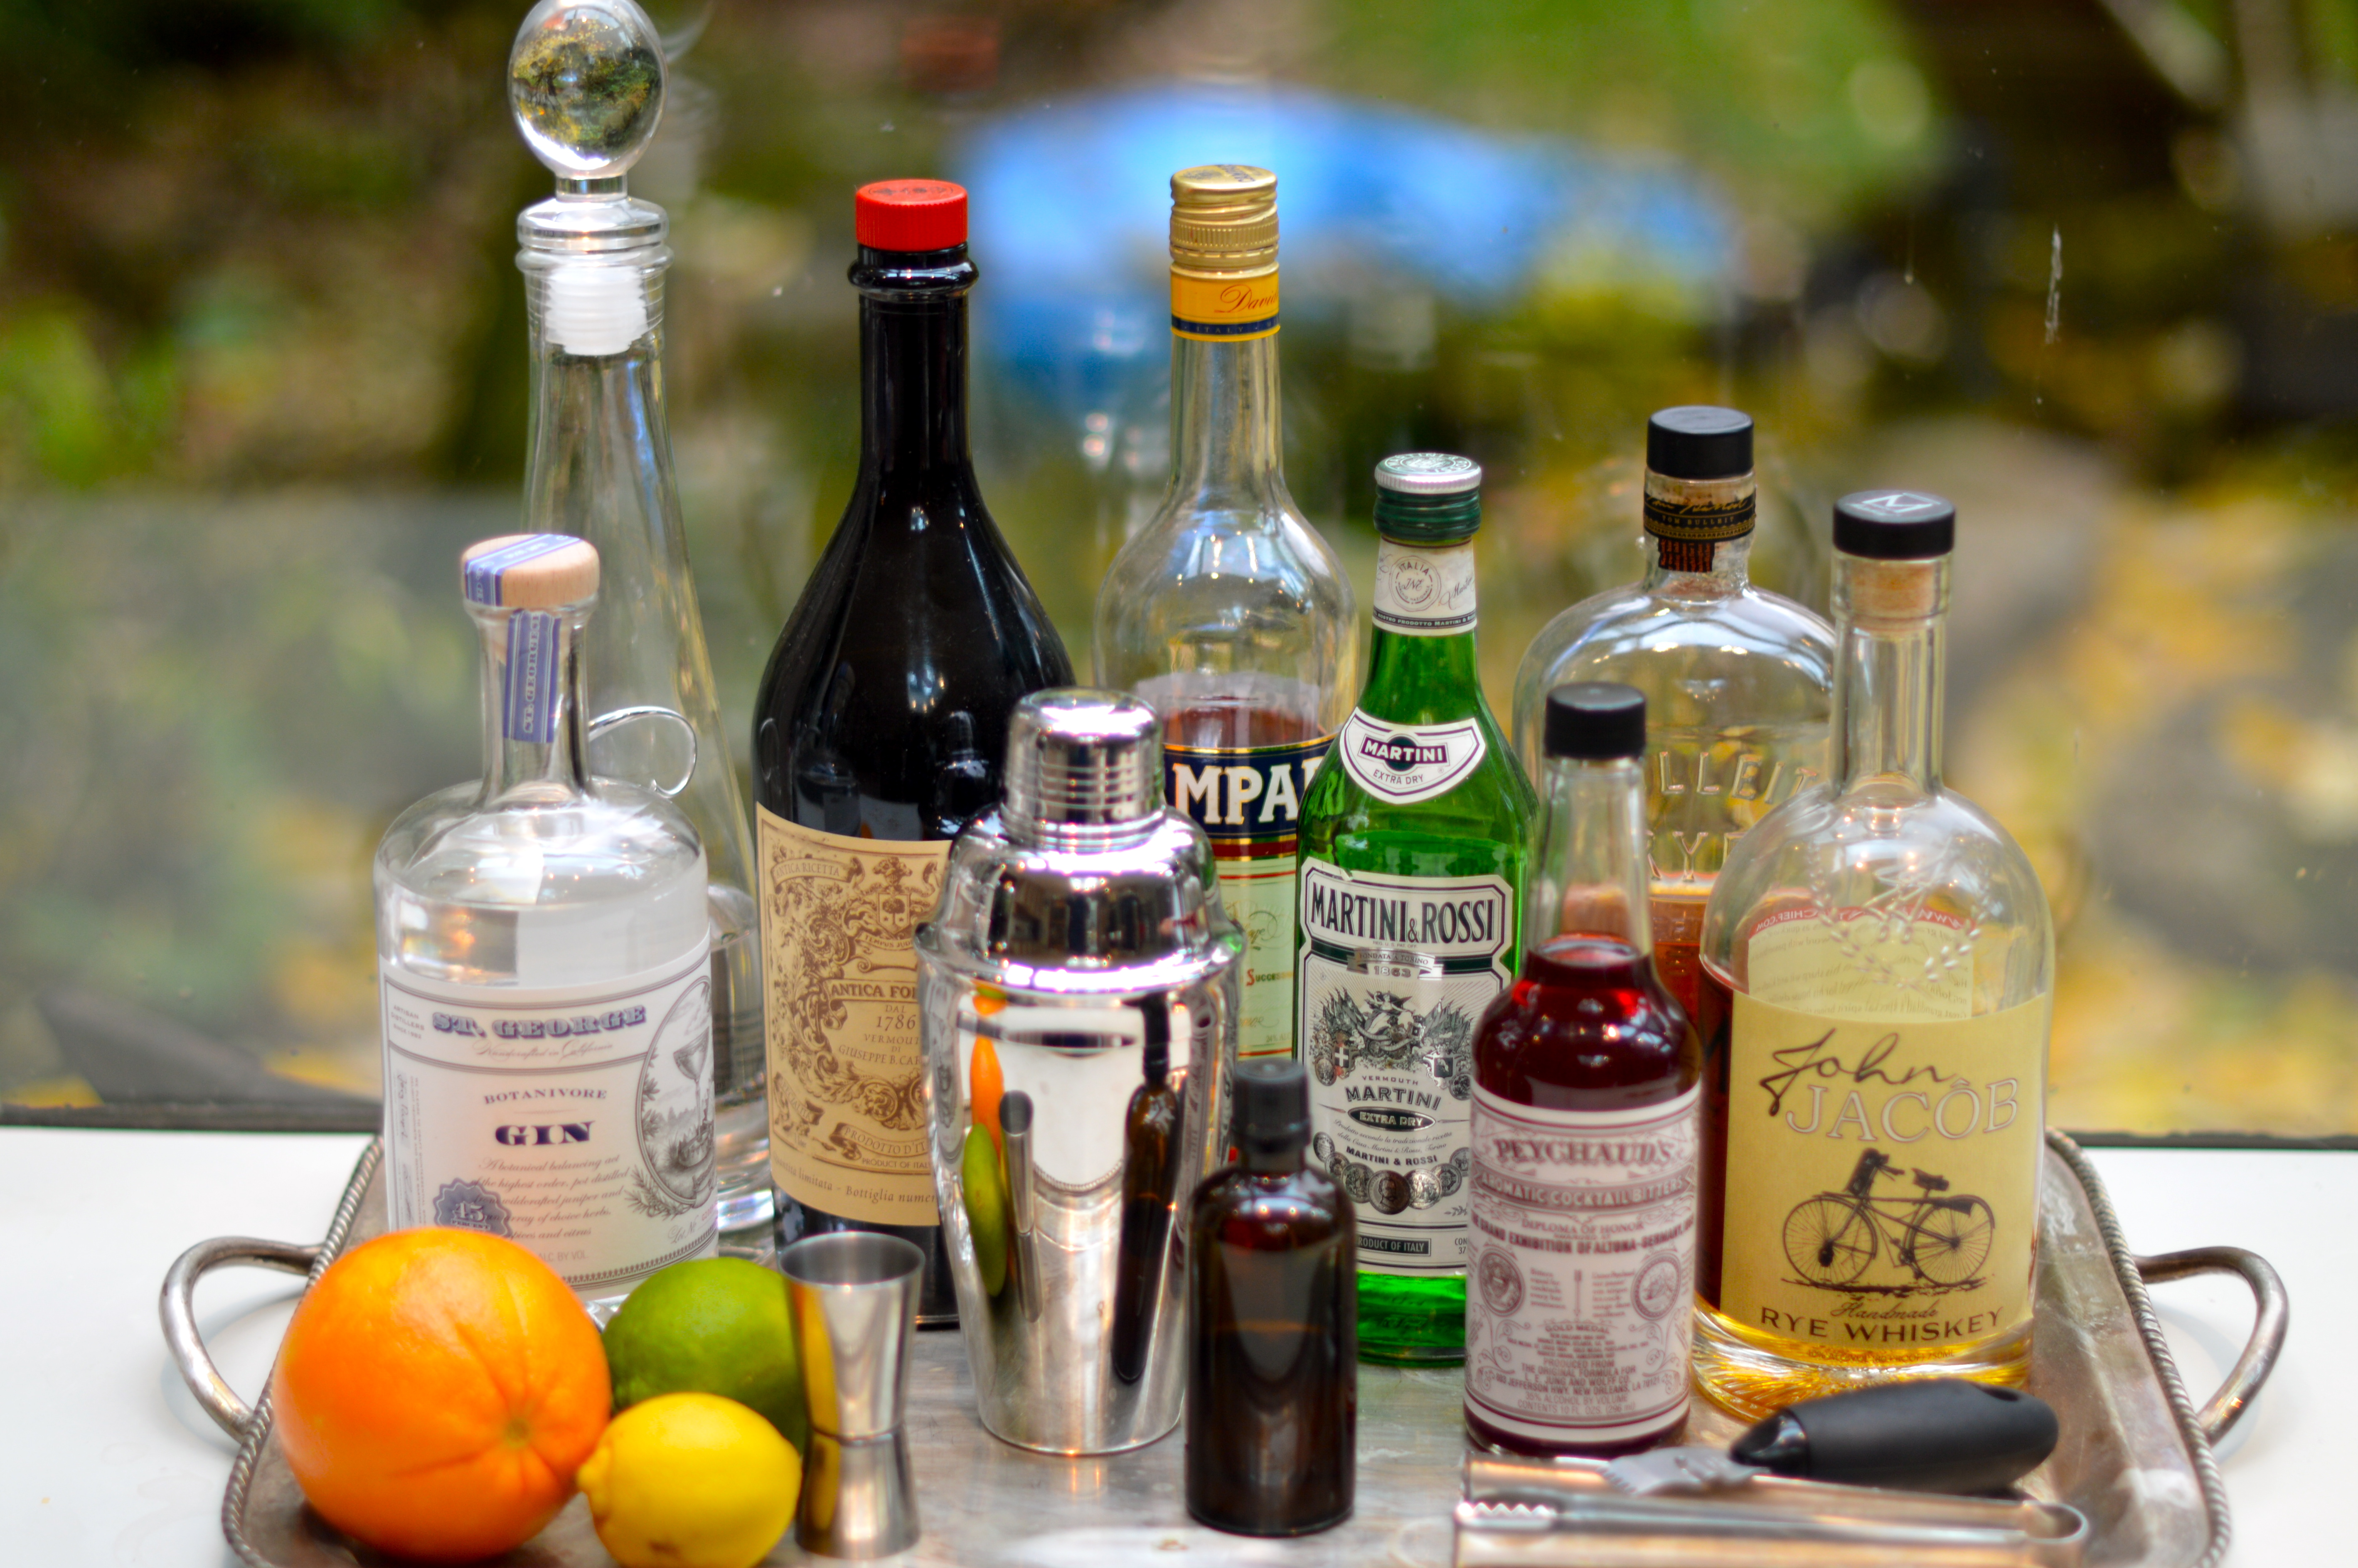
Over the last twenty years, both wineries and breweries experienced a surge in popularity and now it appears to be the distillery’s turn for a time in the spotlight. Distilleries are popping up all over the Pacific Northwest, as well as a revival of prohibition-style speakeasy bars, specializing in the “craft cocktail”. As we enter the season for entertaining, I recommend adding classic cocktails to your party menus. A well-stocked bar is easy to pull together, as long as you have a few ideas of what cocktails you are ready to make for your thirsty guests!
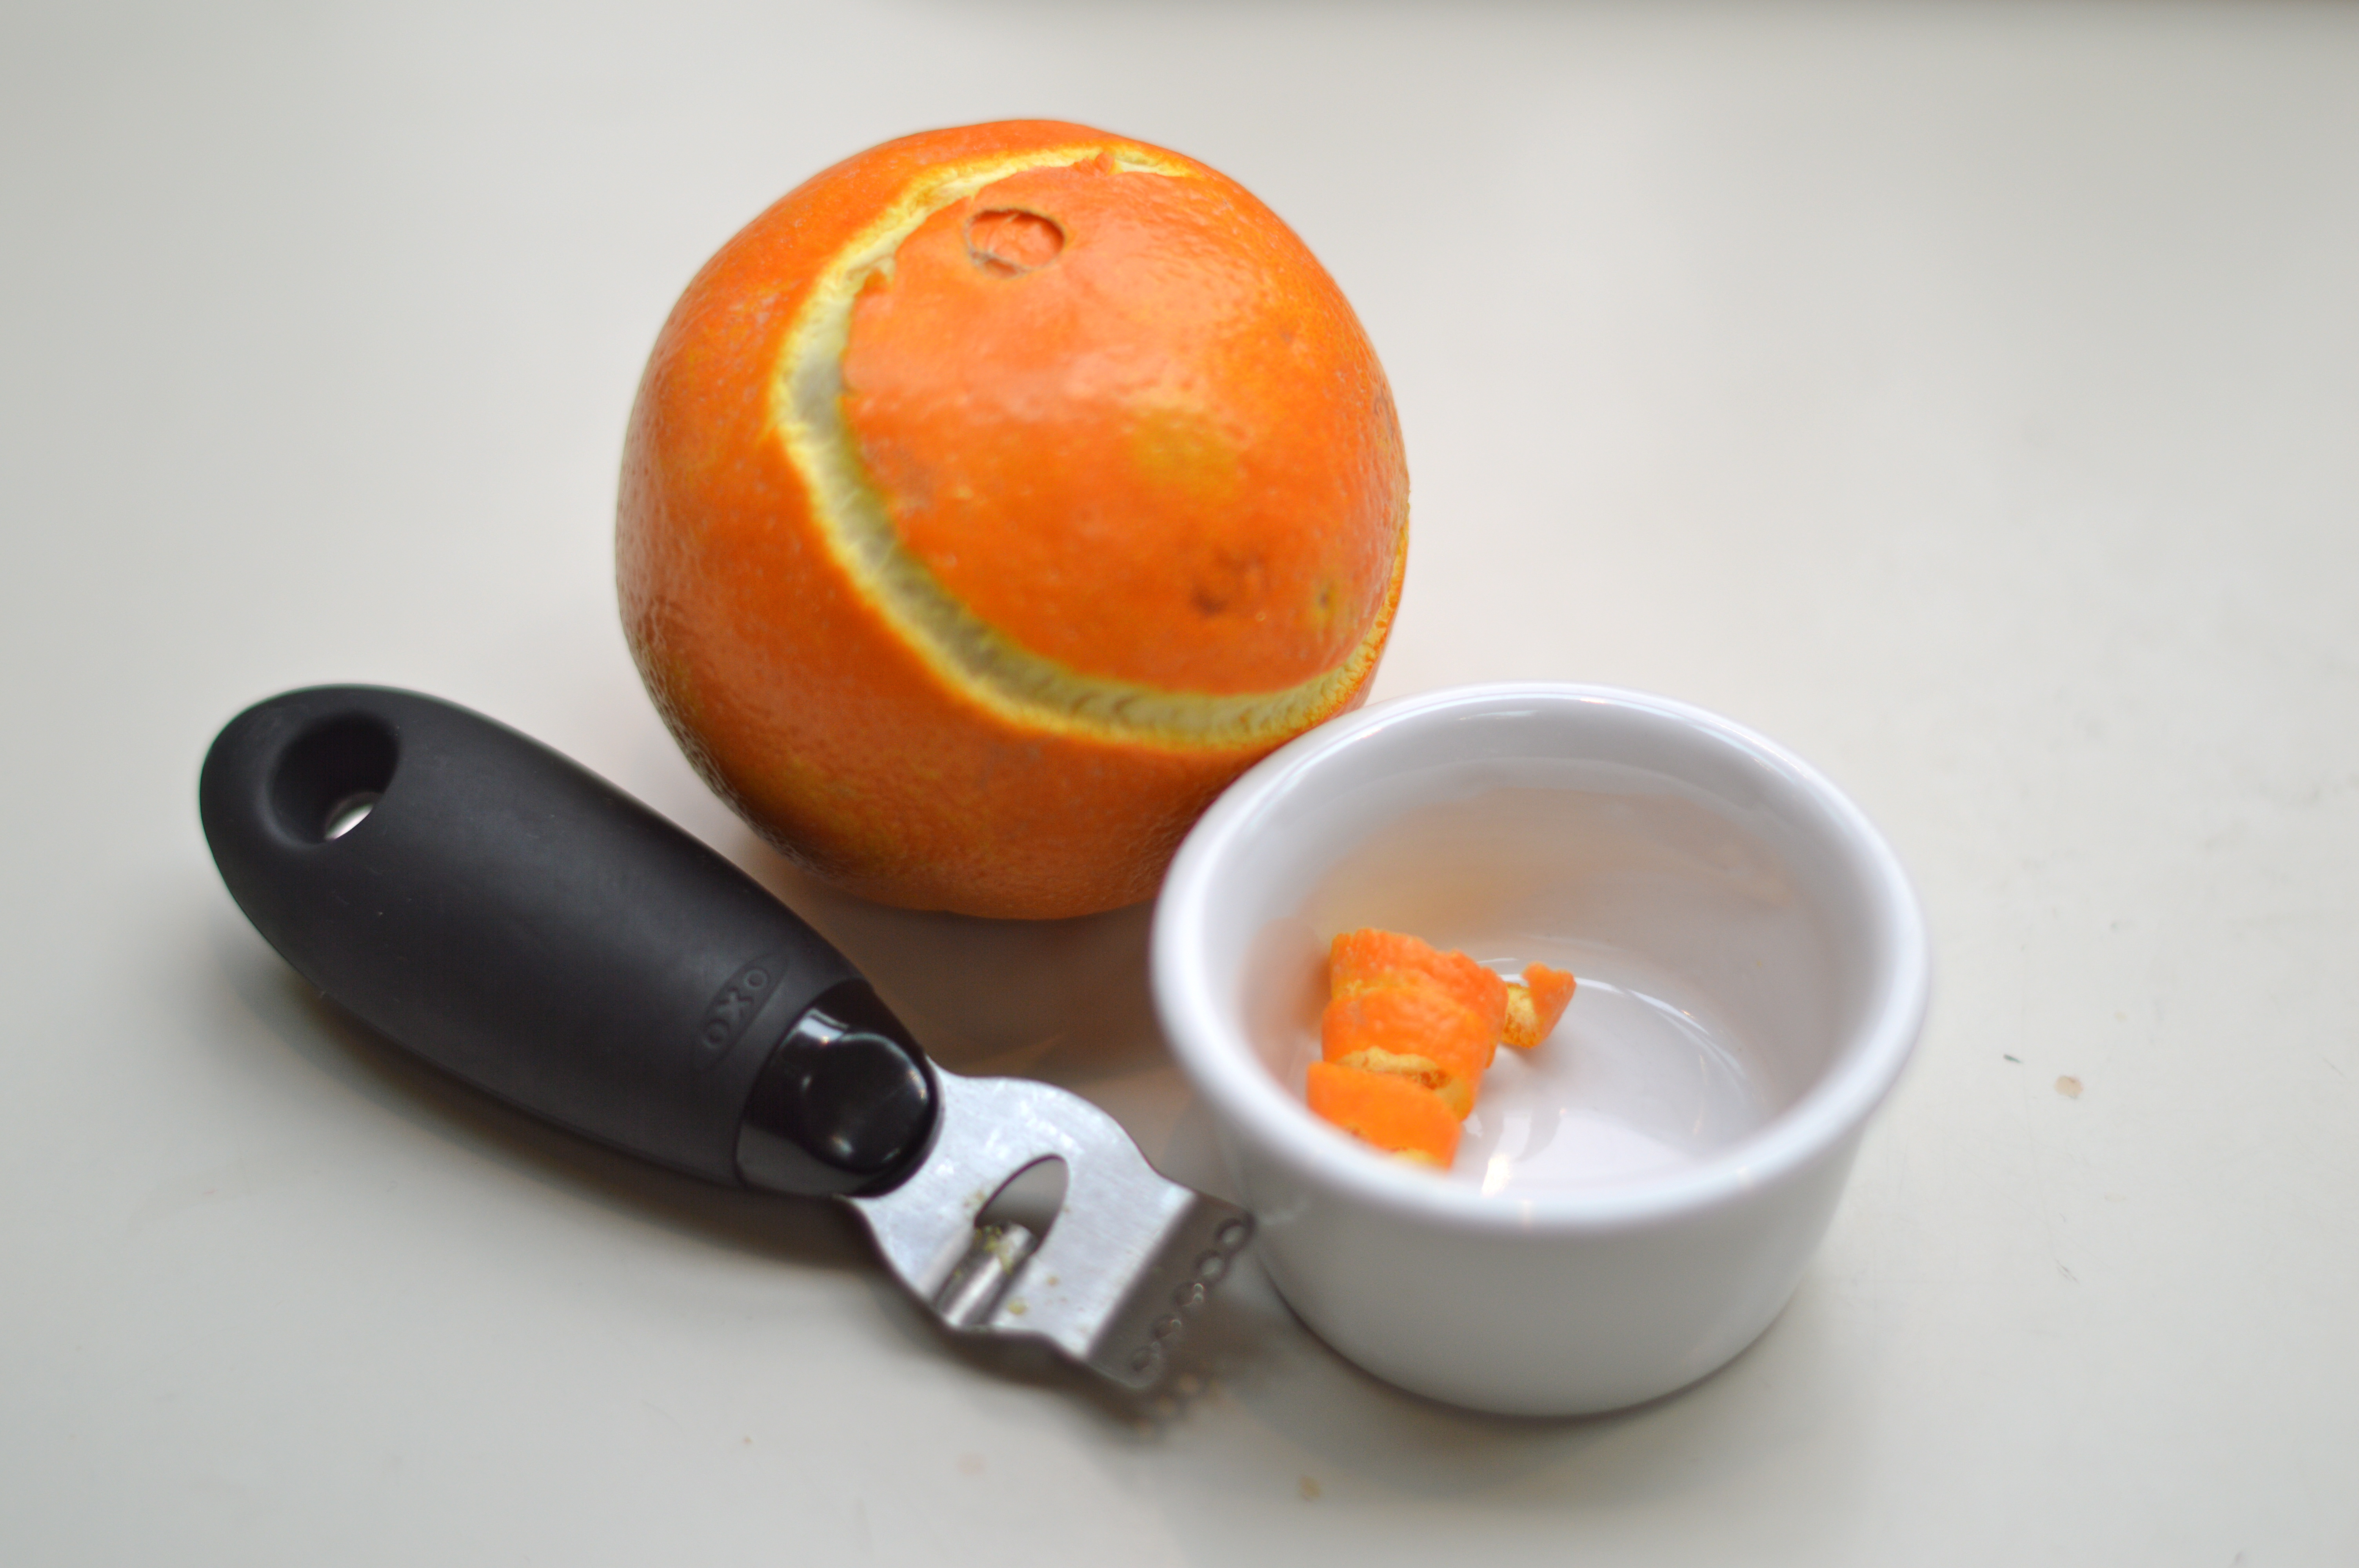
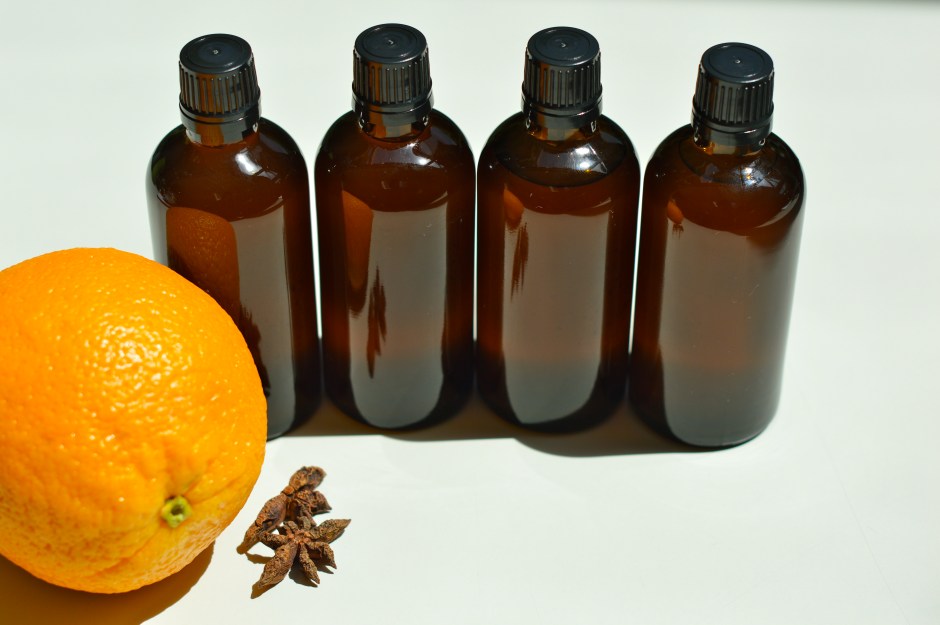
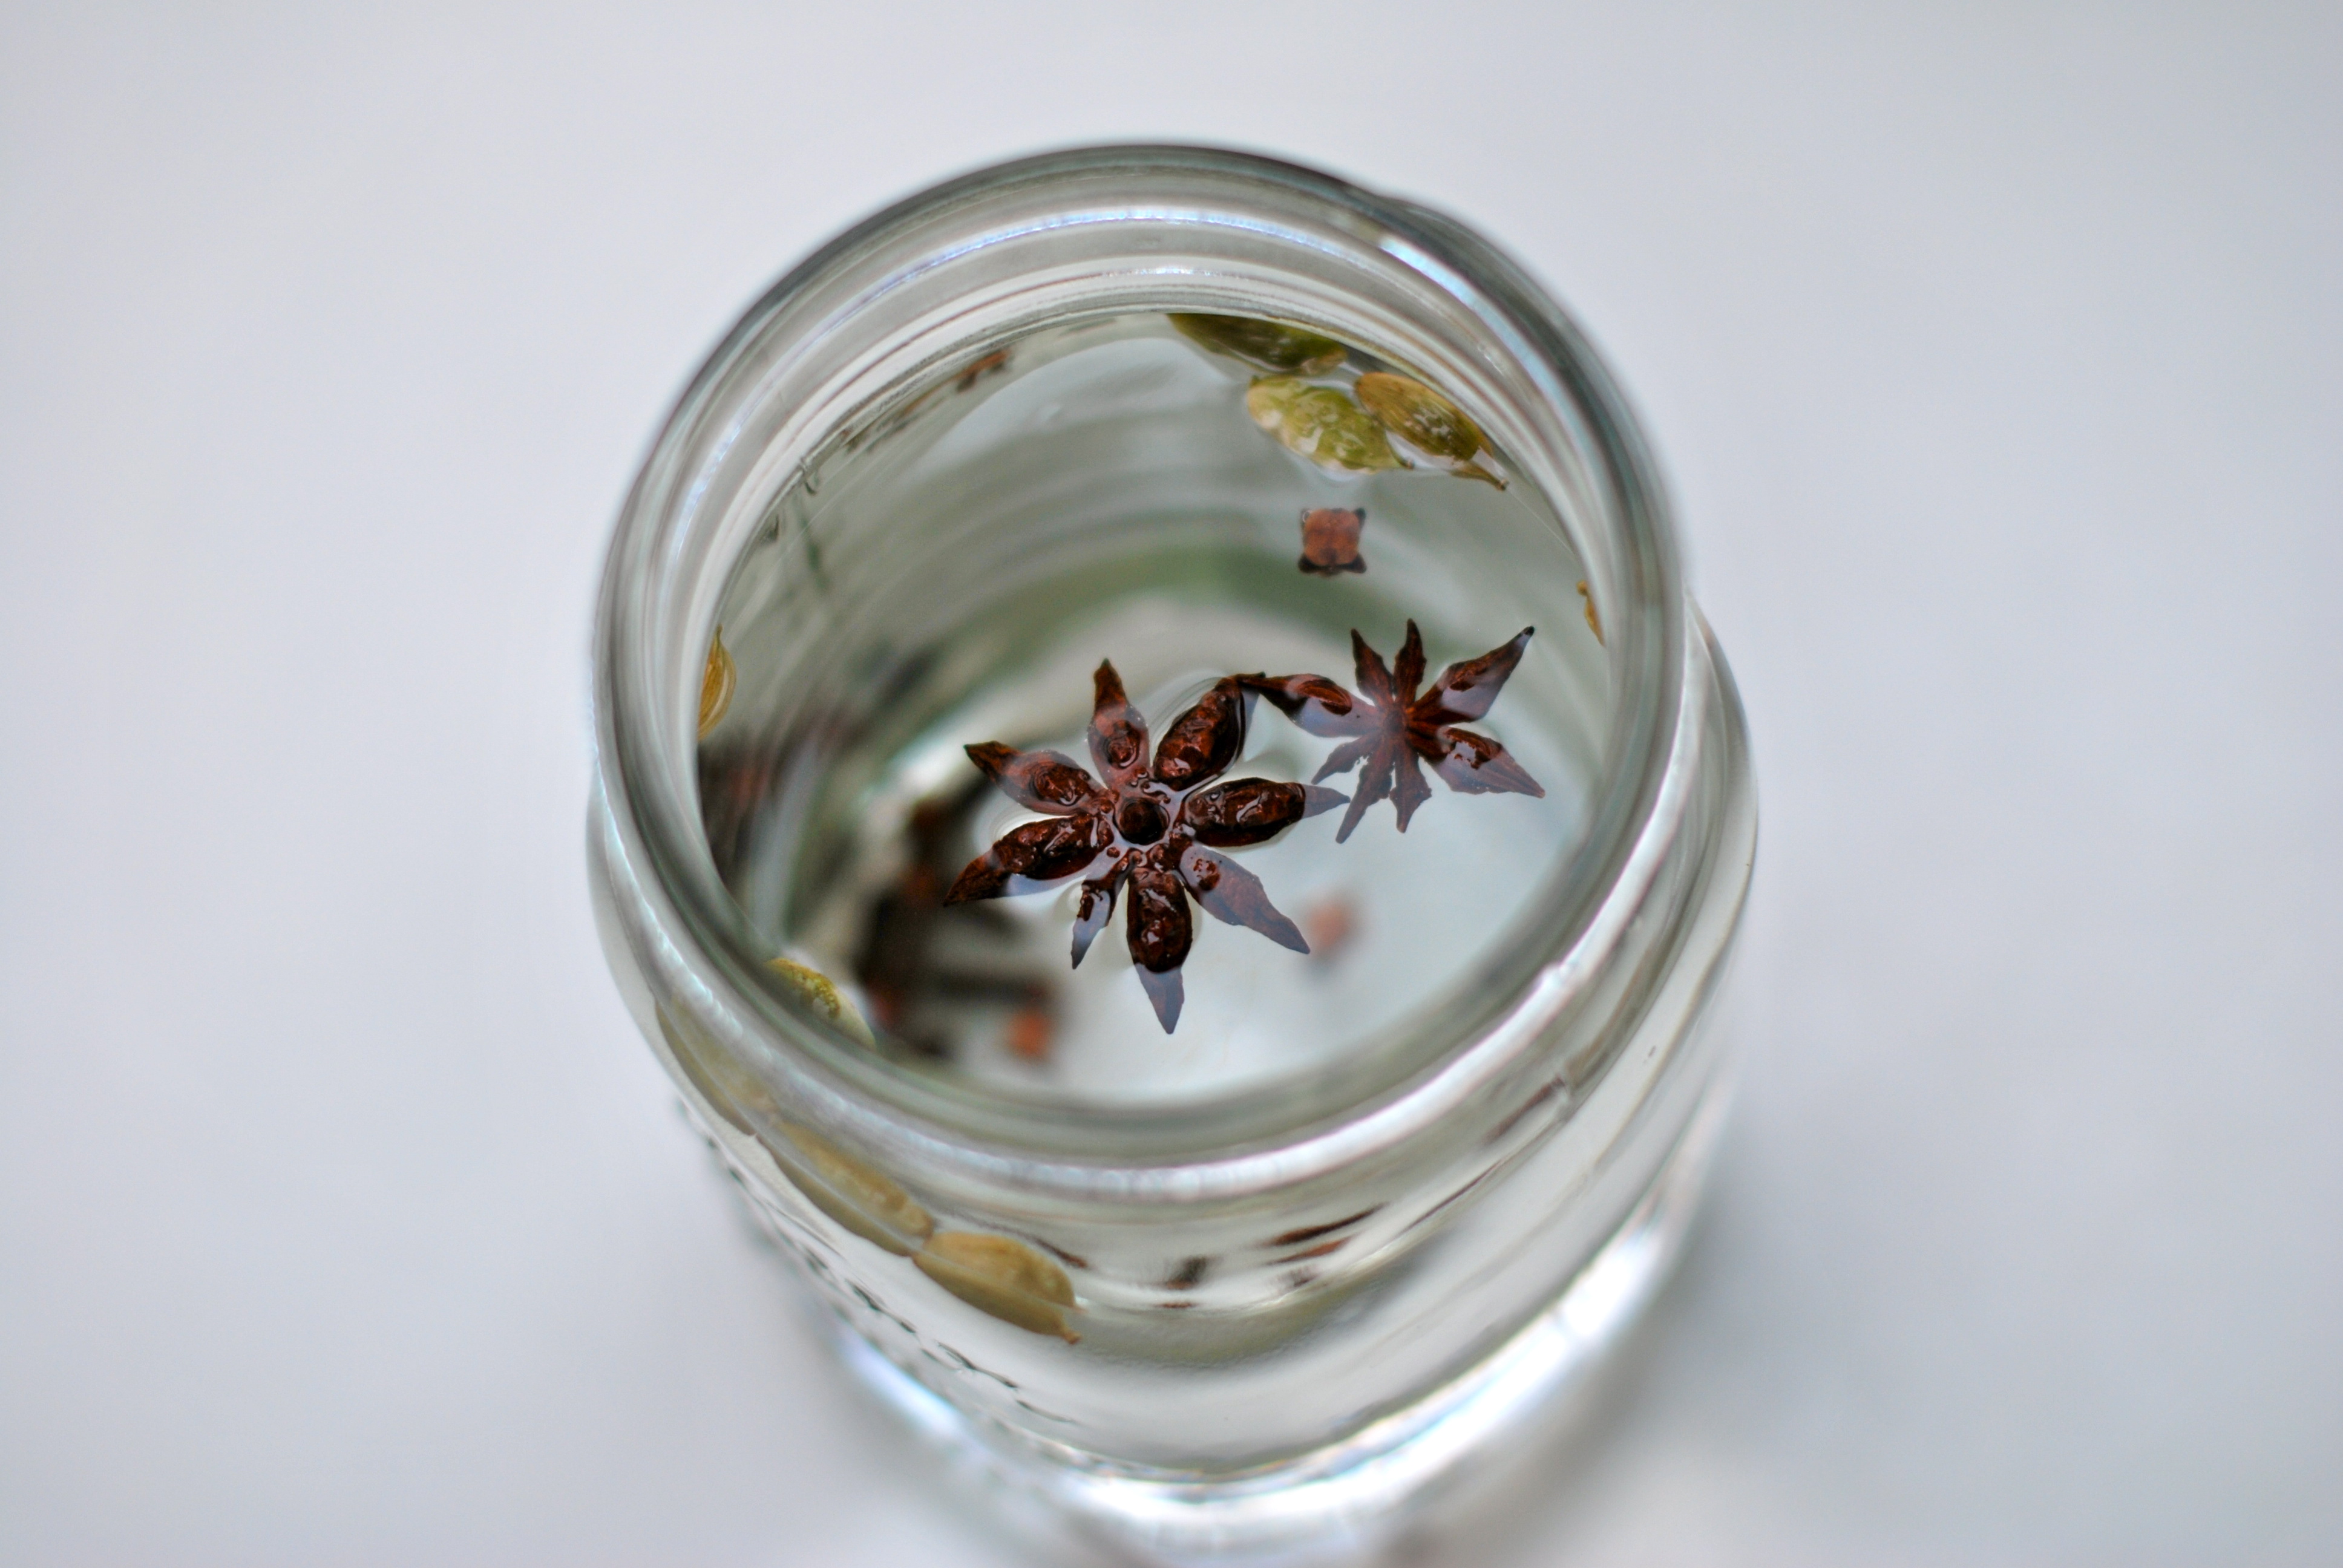
Bitters are an ingredient in many of these classic cocktails that I had never spent much time thinking about, but they are an intriguing element to be sure. With only a dash or two, bitters can transform your craft cocktail, adding warmth, complexity, and dimension. For a full description of bitters, head over to The Kitchn for their conversation on All About Bitters. Last winter it came to my attention that it is possible to make bitters. My curiosity was immediately piqued and I tried it. Over the course of a couple of weeks, I made my own bitters using wonderfully aromatic ingredients like orange peel, ginger, star anise, cinnamon, and cloves. Although I made this during the summer months, I kept thinking how perfect it would be come autumn. (Scroll down to see the recipe for orange bitters and the accompanying photos). But, if a cocktail is what you seek, we’ll start there…
As I mentioned above, this fall has been a crazy one. We have been getting used to the schedule of kindergarten, and this has been admittedly tougher than I thought it would be. I’d like to raise a glass to the fact that we are two months into this new elementary school gig and all members of the Poole household are here to tell about it. Sometimes it is just important to celebrate the fact that you are surviving. So, without further ado… three “bitter” cocktails that you can raise your respective glass to:
Part 1: Cocktail Recipes
1) The Classic Manhatten
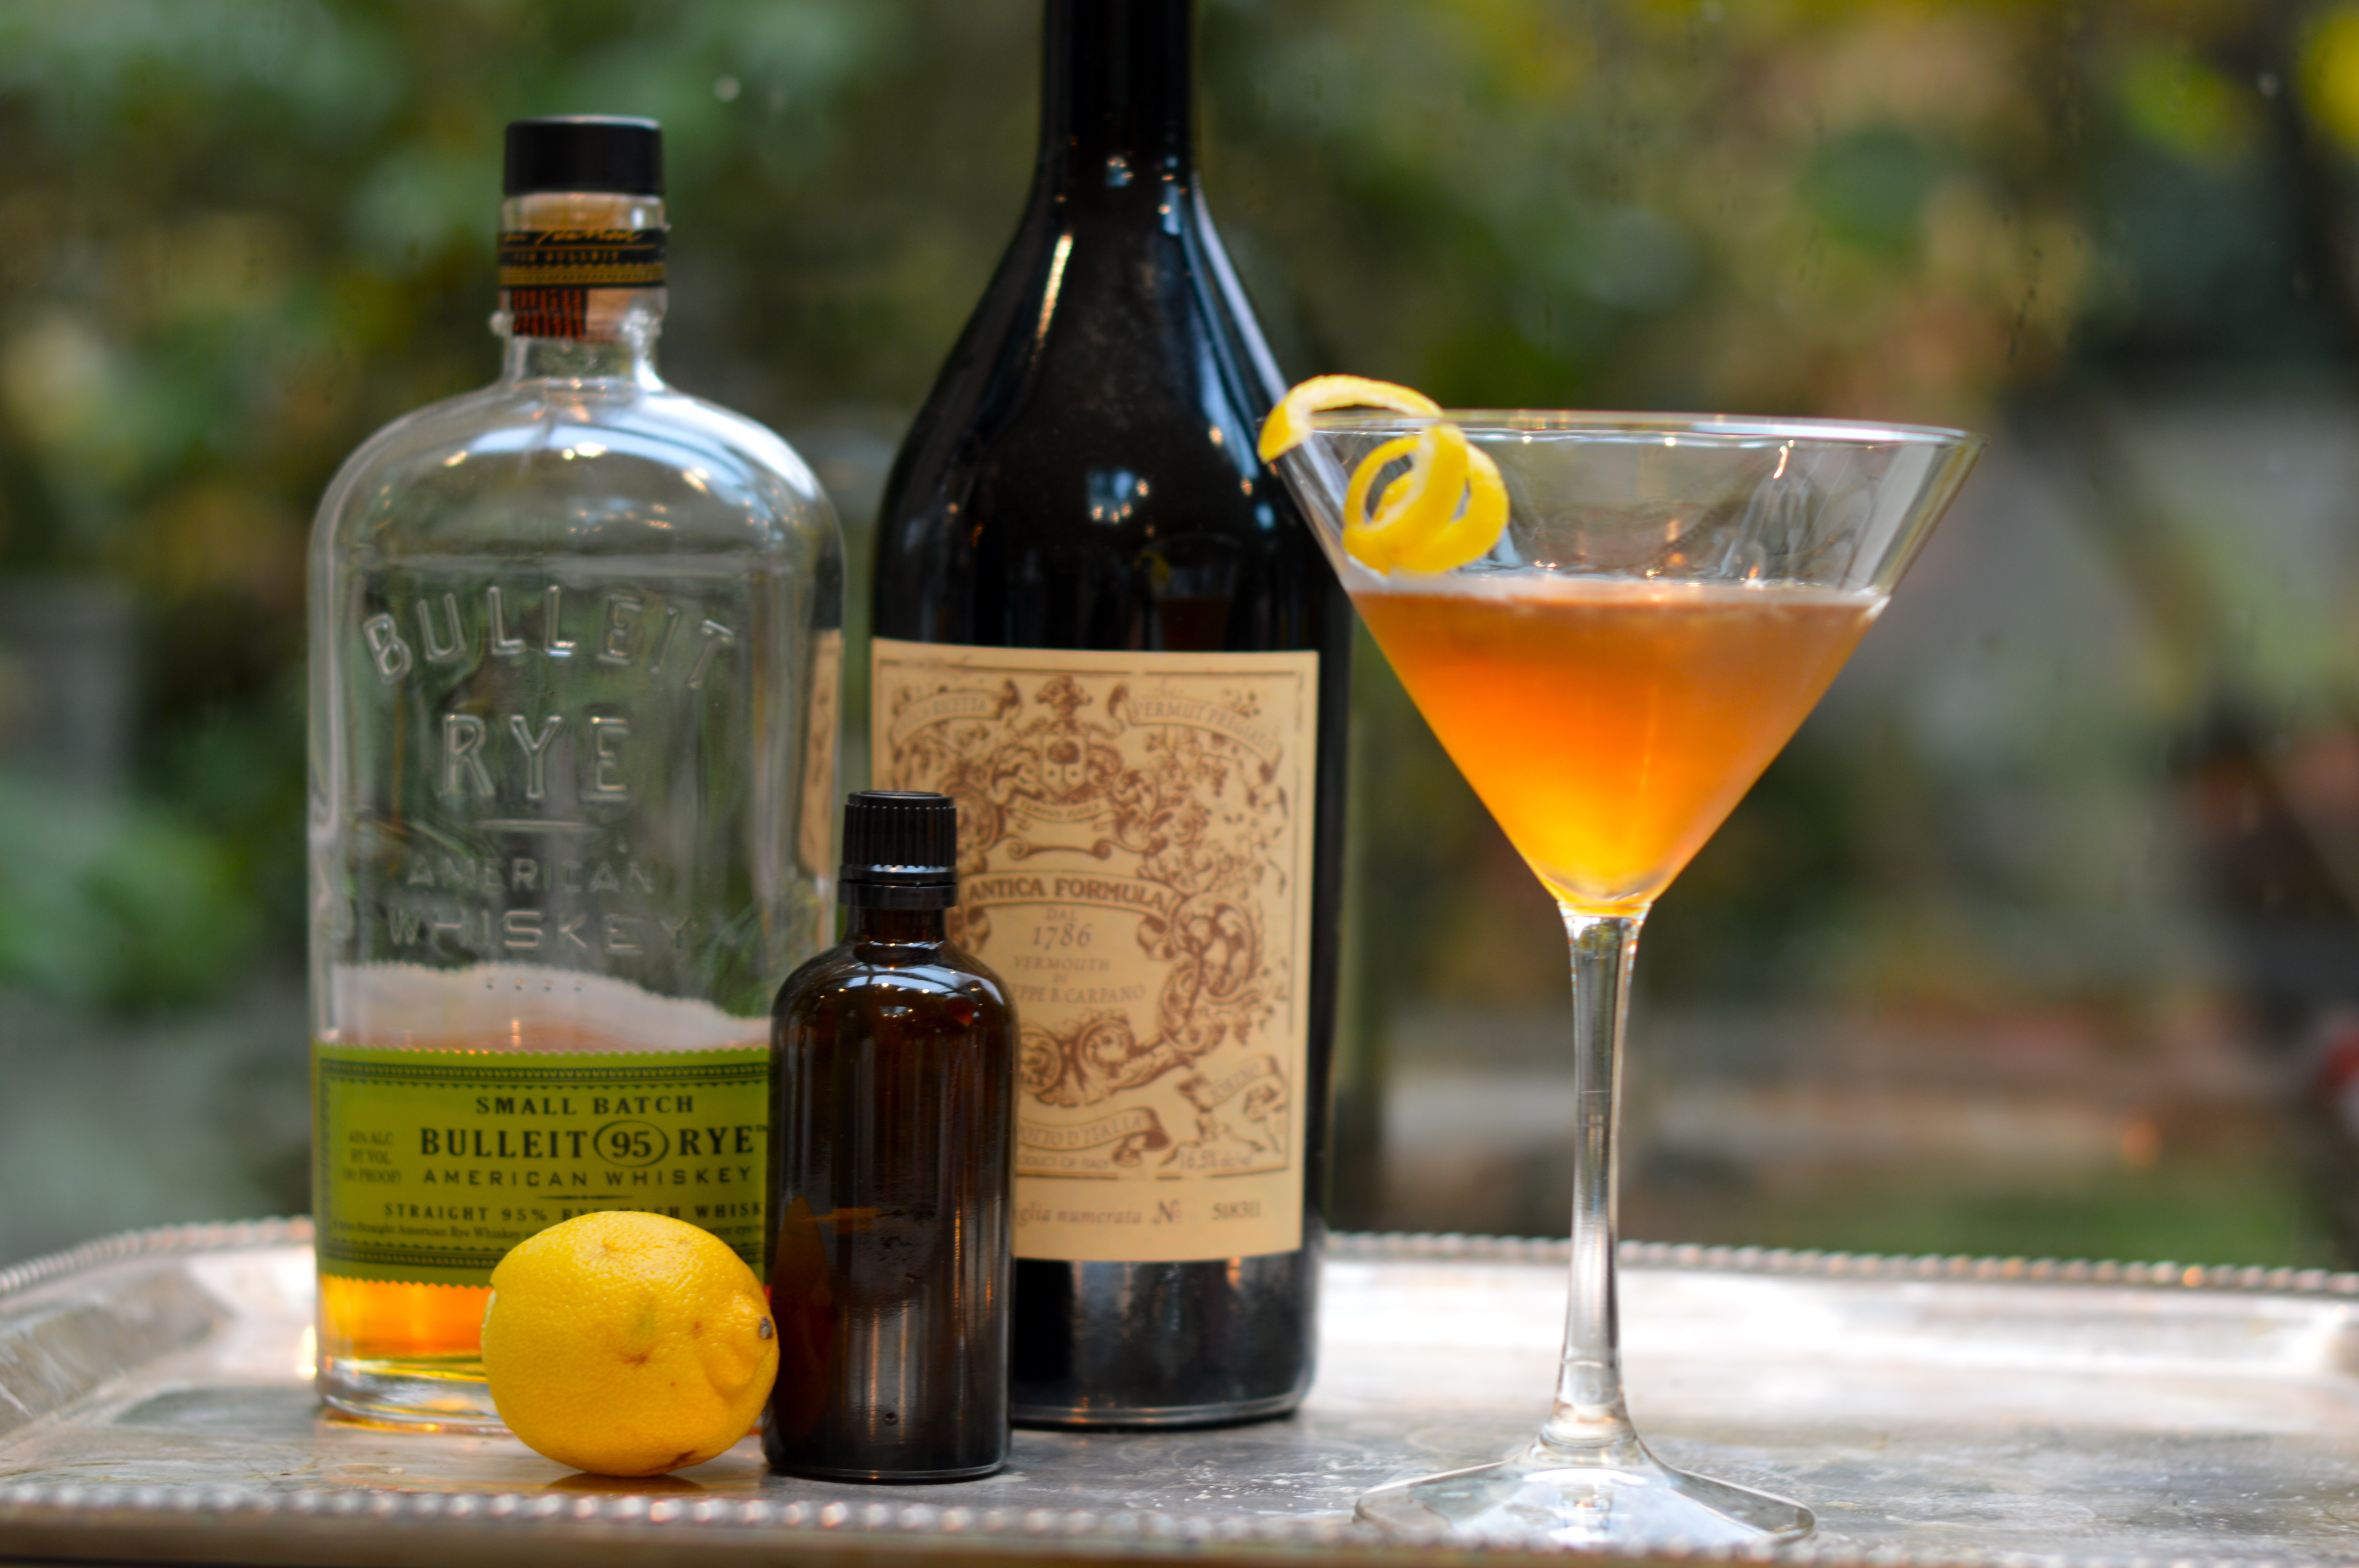
This classic cocktail was my grandmother’s favorite. Listing it here is a nod to her and how eminently hip she was.
1 3/4 ounces rye whiskey or bourbon
2/3 ounce sweet vermouth (Carpano Antica formula is my favorite)
dash of bitters (homemade orange bitters, recipe below, was used)
maraschino cherry or twist of lemon (my grandmother always drank hers, “Up with a twist.”)
2) Blessed Event

As I mentioned above, this is my current fave. The renowned bartender, Erik Hakinen, at Zig Zag Cafe is credited with its creation, as a twist on the classic Boulevardier.
1 ounce rye whiskey
3/4 ounce sweet vermouth (Carpano Antica formula)
3/4 ounce Campari
1/2 ounce lemon juice
3) Soda with Bitters

I loved the article written about the refreshing nature of this simple beverage found here on The Kitchn. Bitters are known to have a medicinal quality and they add a light and refreshing, yet complex addition to a glass of soda.
Dash or two of bitters (Peychaud’s brand preferred)
Soda water
Wedge of lemon or orange
Cheers!
Part 2: Making Orange Bitters


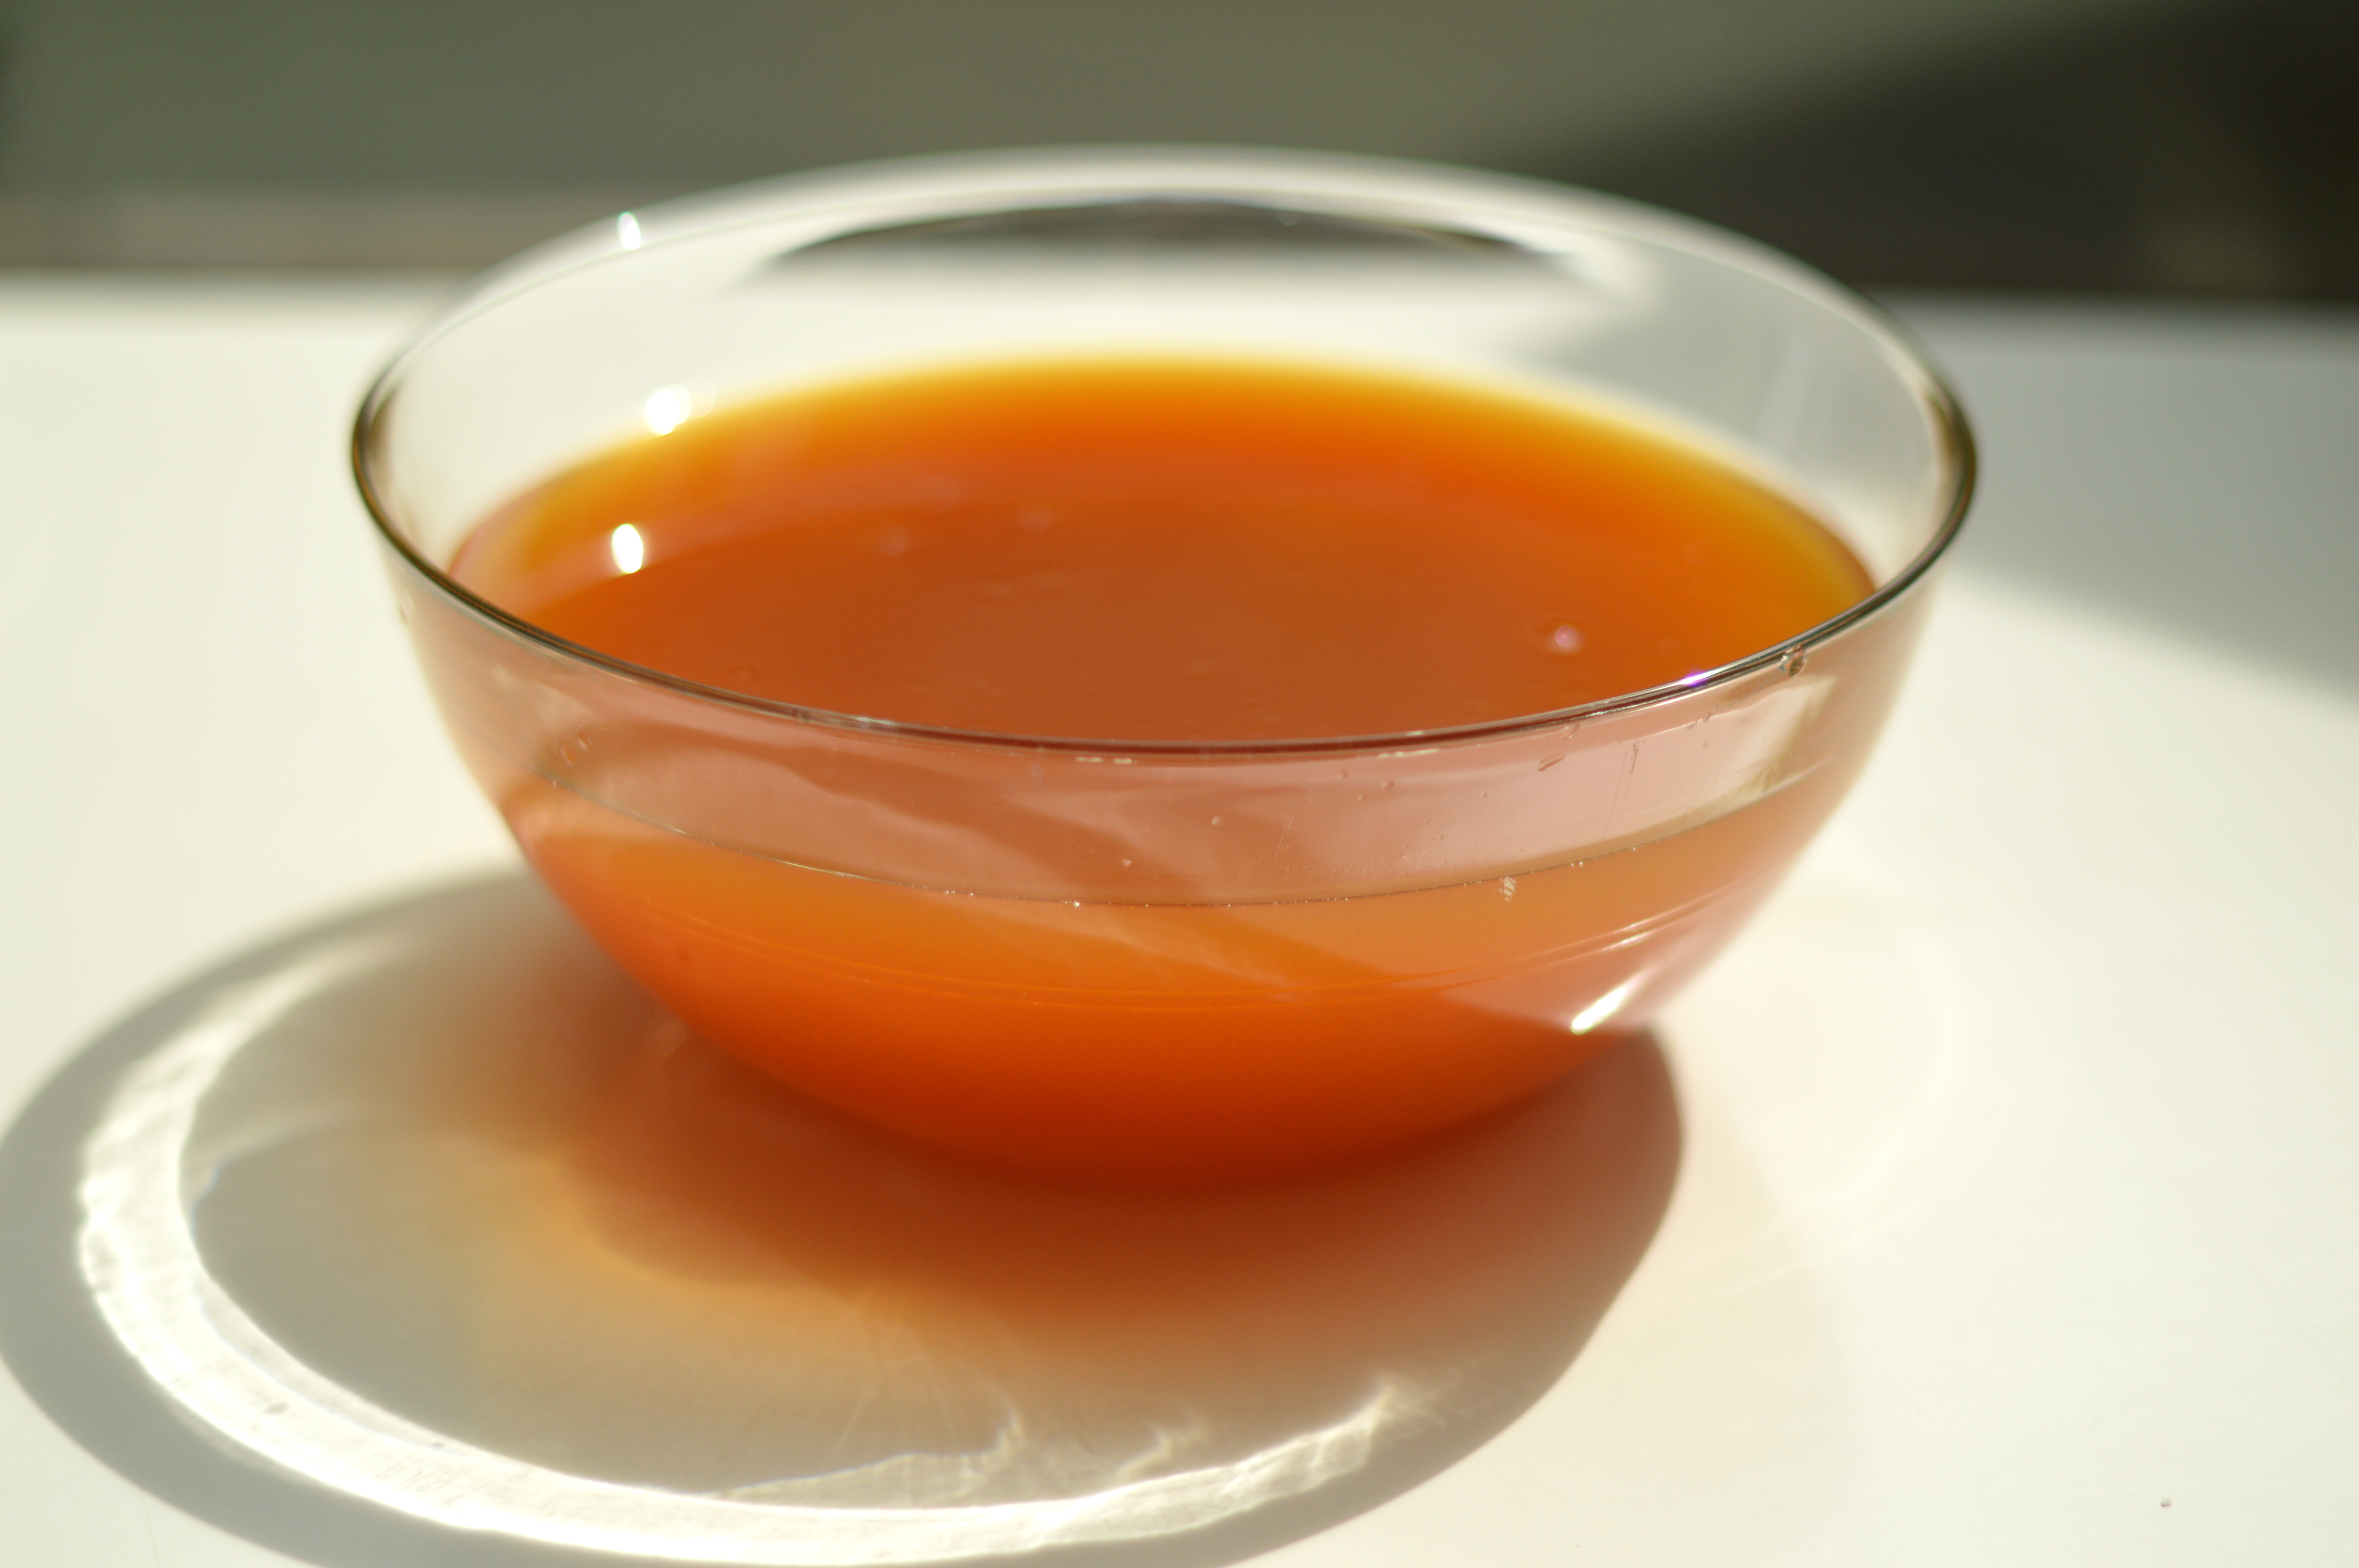


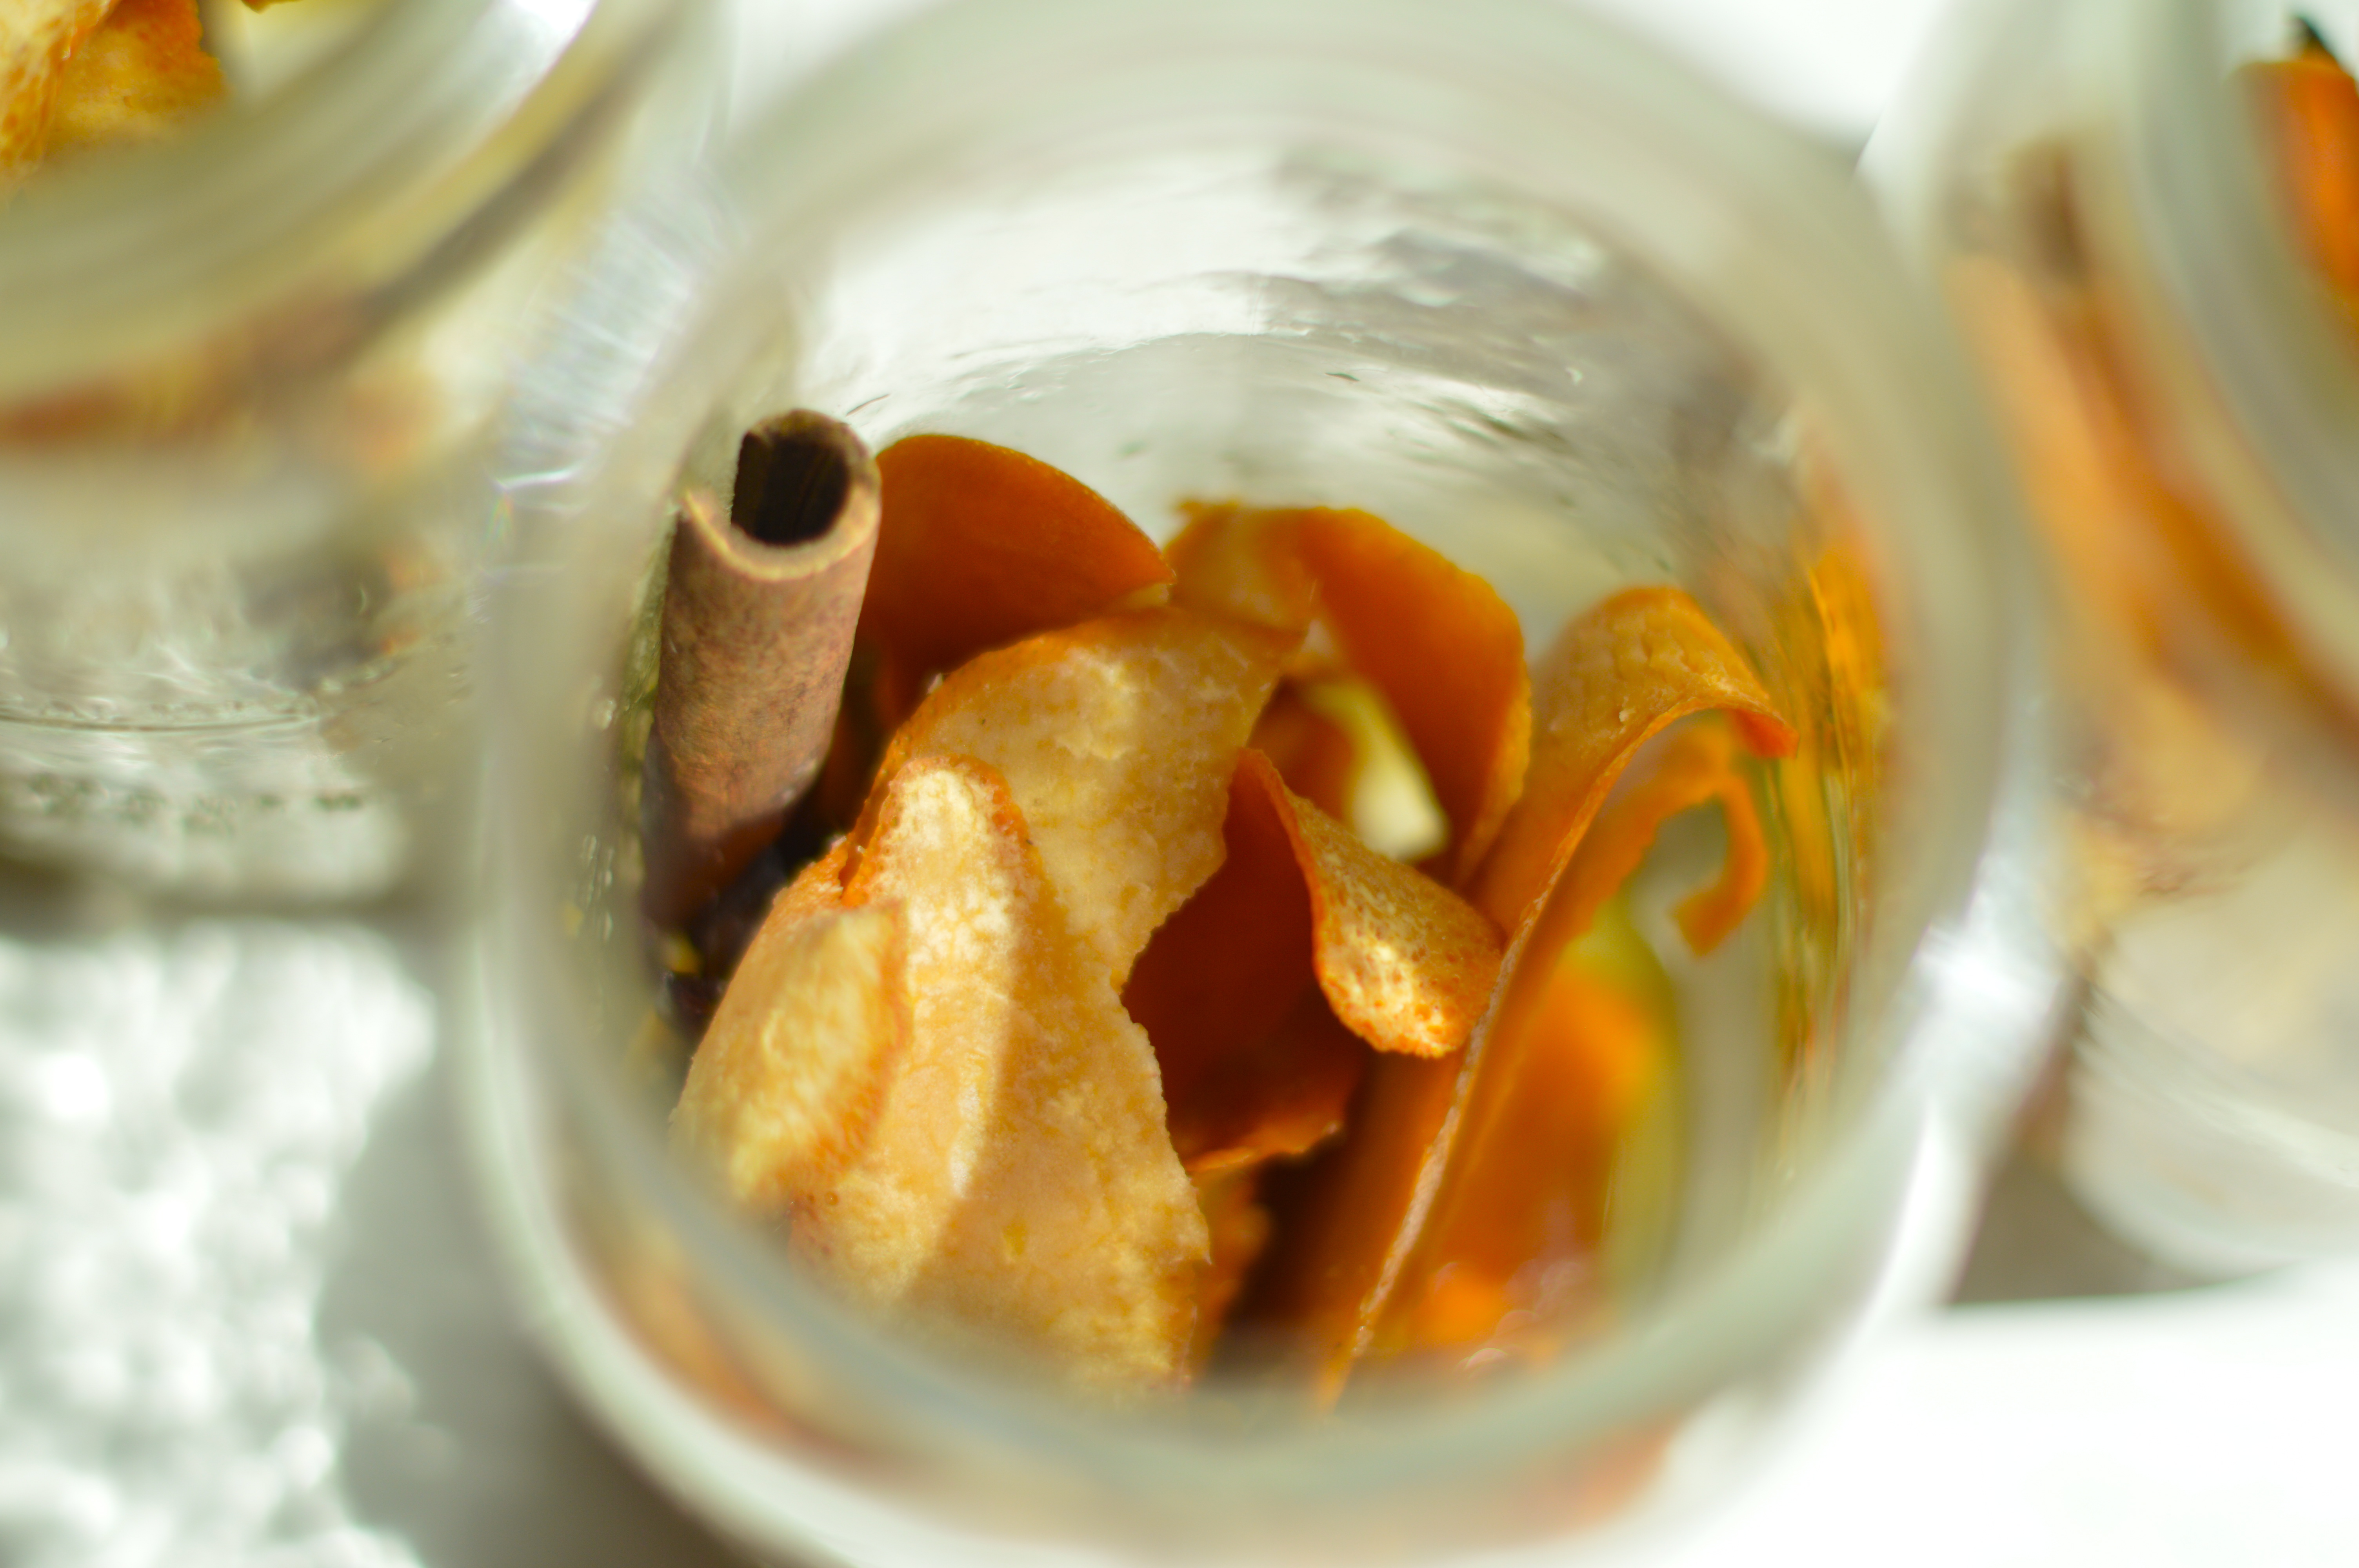

Orange Bitters
- 2 oranges
- 1 bottle (750 ml.) Everclear* (grain alcohol)
- 10 cardamom pods
- 2 whole star anise pods
- 3 cinnamon sticks (each 2 1/2 in.)
- 1 teaspoon whole cloves
- 1 tablespoon plus 1 tsp. chopped fresh ginger
- 1 cup sugar
Preparation
- Preheat oven to 250°. Remove zest from oranges with a vegetable peeler and put zest on a baking sheet (save fruit for another use). Bake until zest dries, starts to curl up, and begins to brown, 20 to 25 minutes. Let cool.
- Put all ingredients except sugar in a 1-qt. glass jar and seal tightly. Let sit in a cool, dark place for 2 weeks.
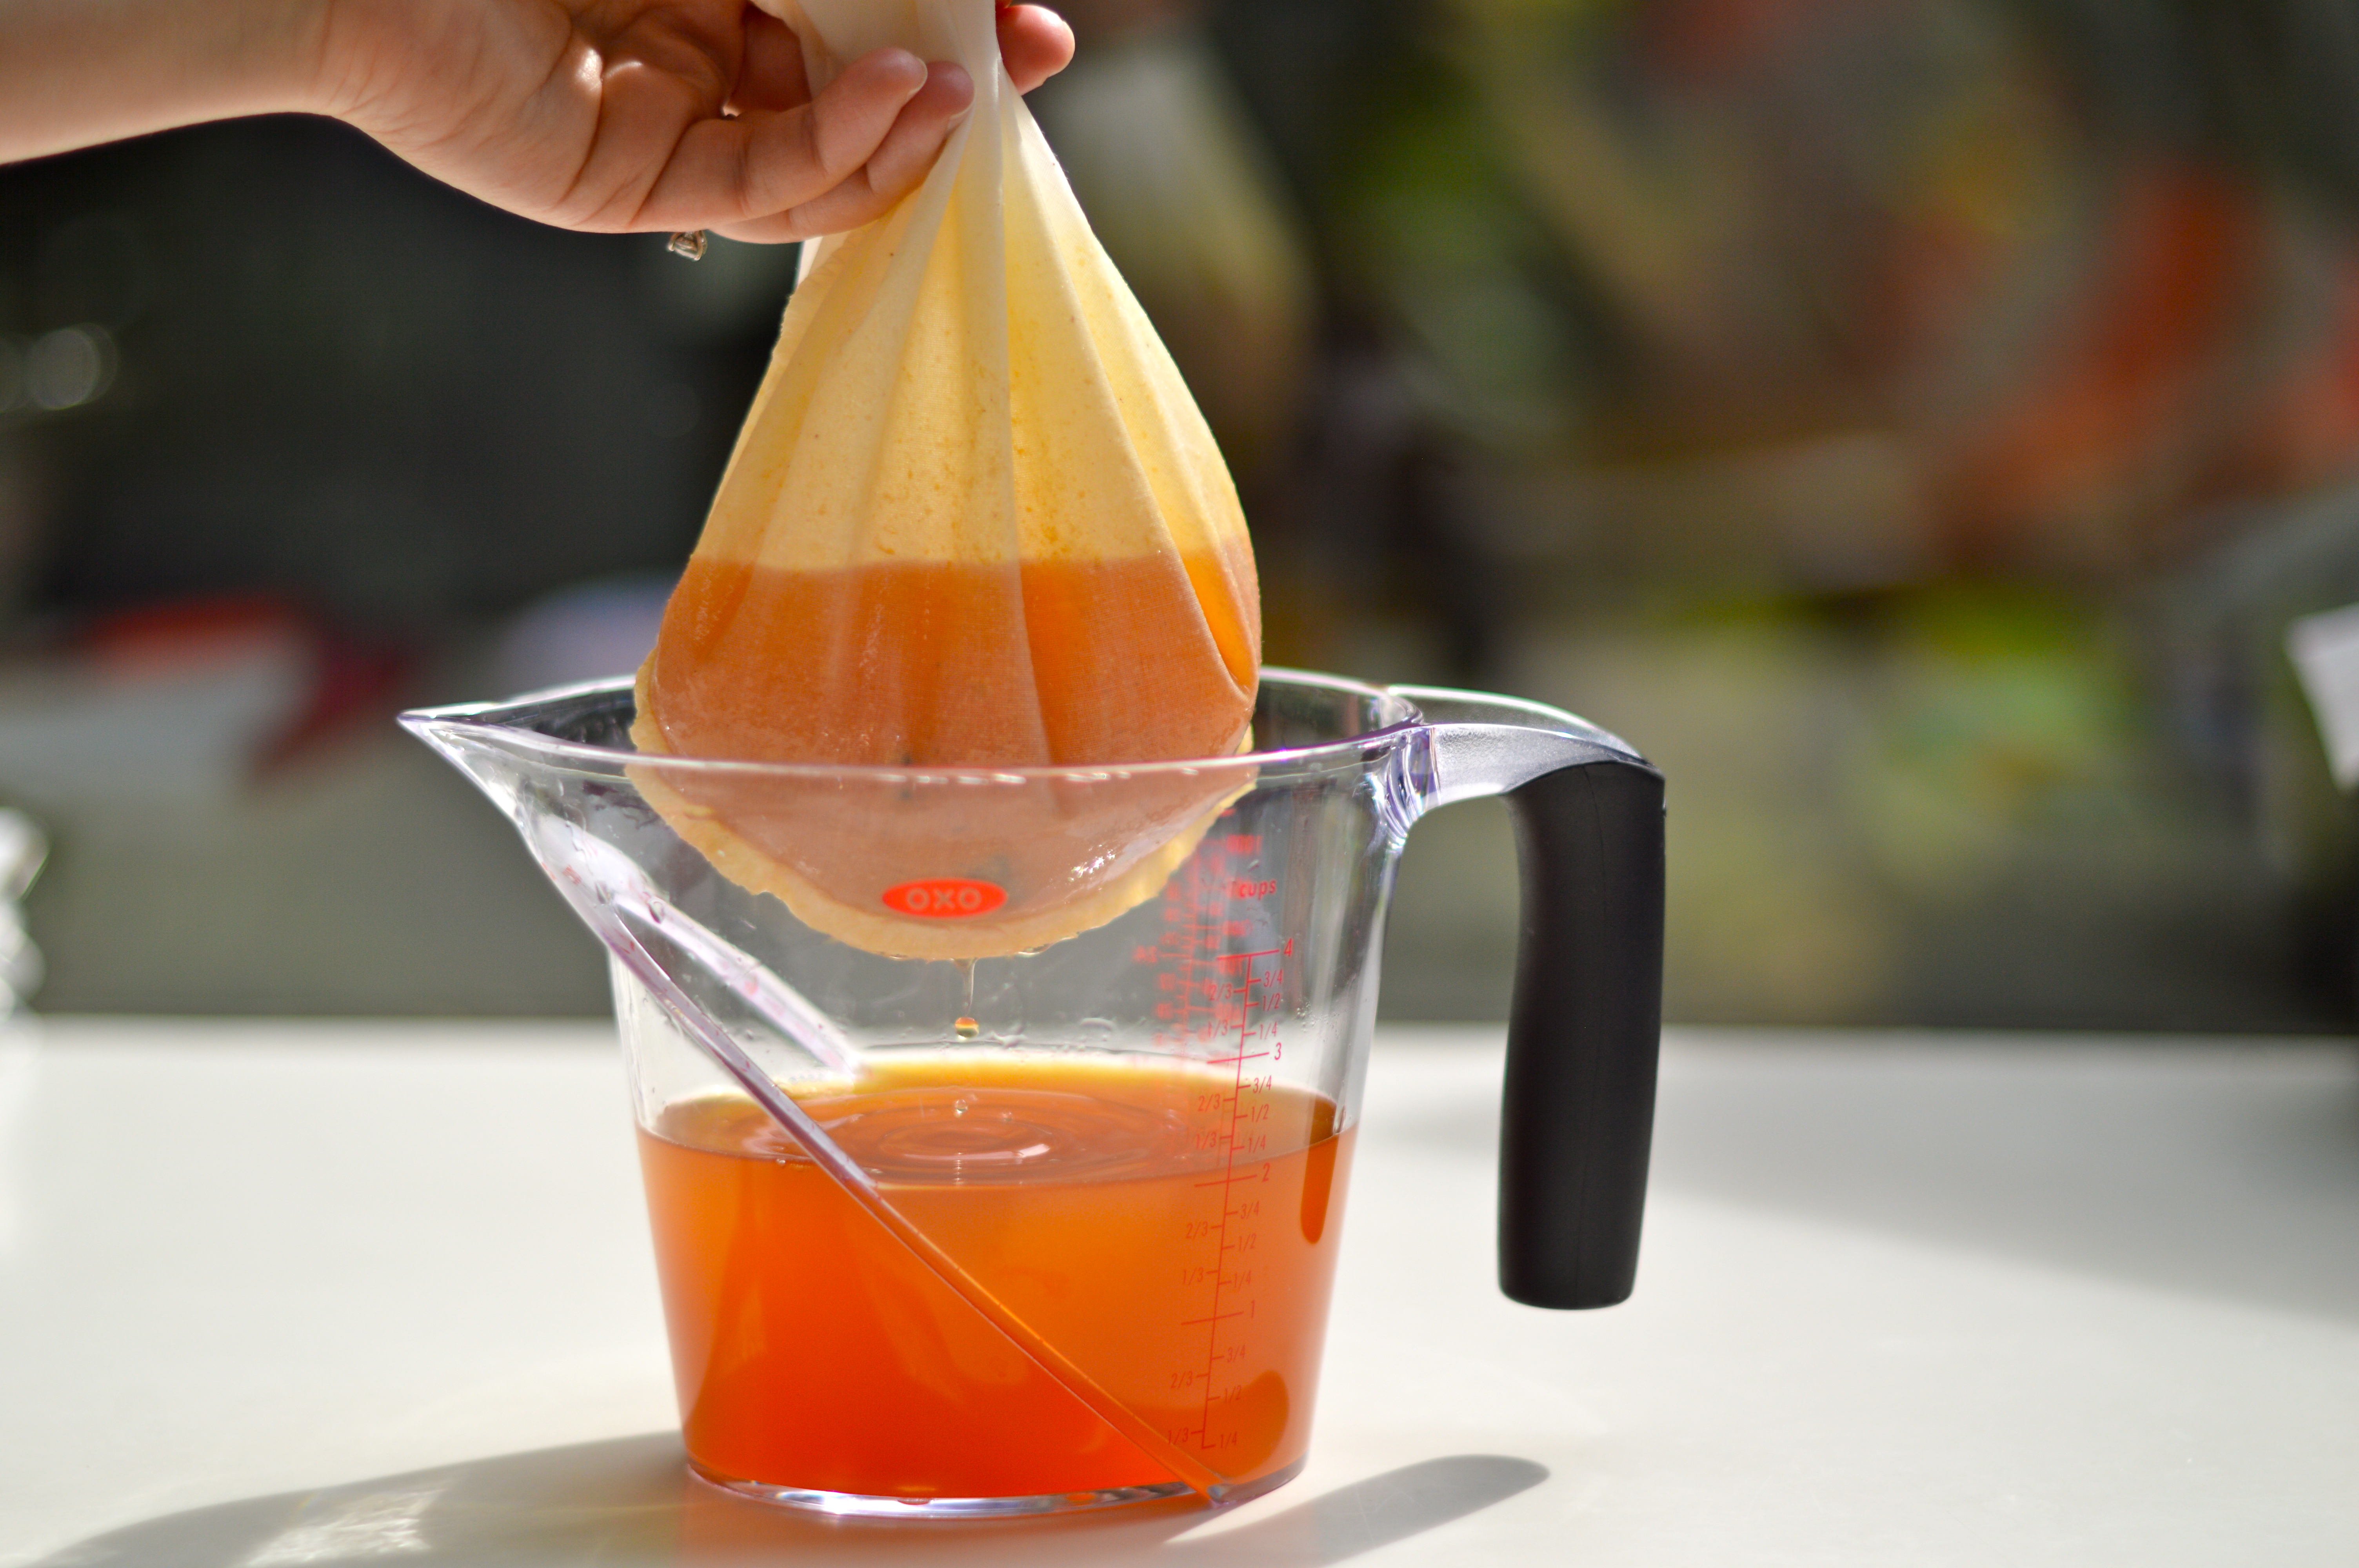
- Strain liquid through cheesecloth into a 1 1/2- to 2-qt. glass jar (save spice flavorings) and set aside. Put flavorings in a small saucepan with 2 cups water. Cover and bring to a boil, then reduce heat and simmer 10 minutes. Set aside.
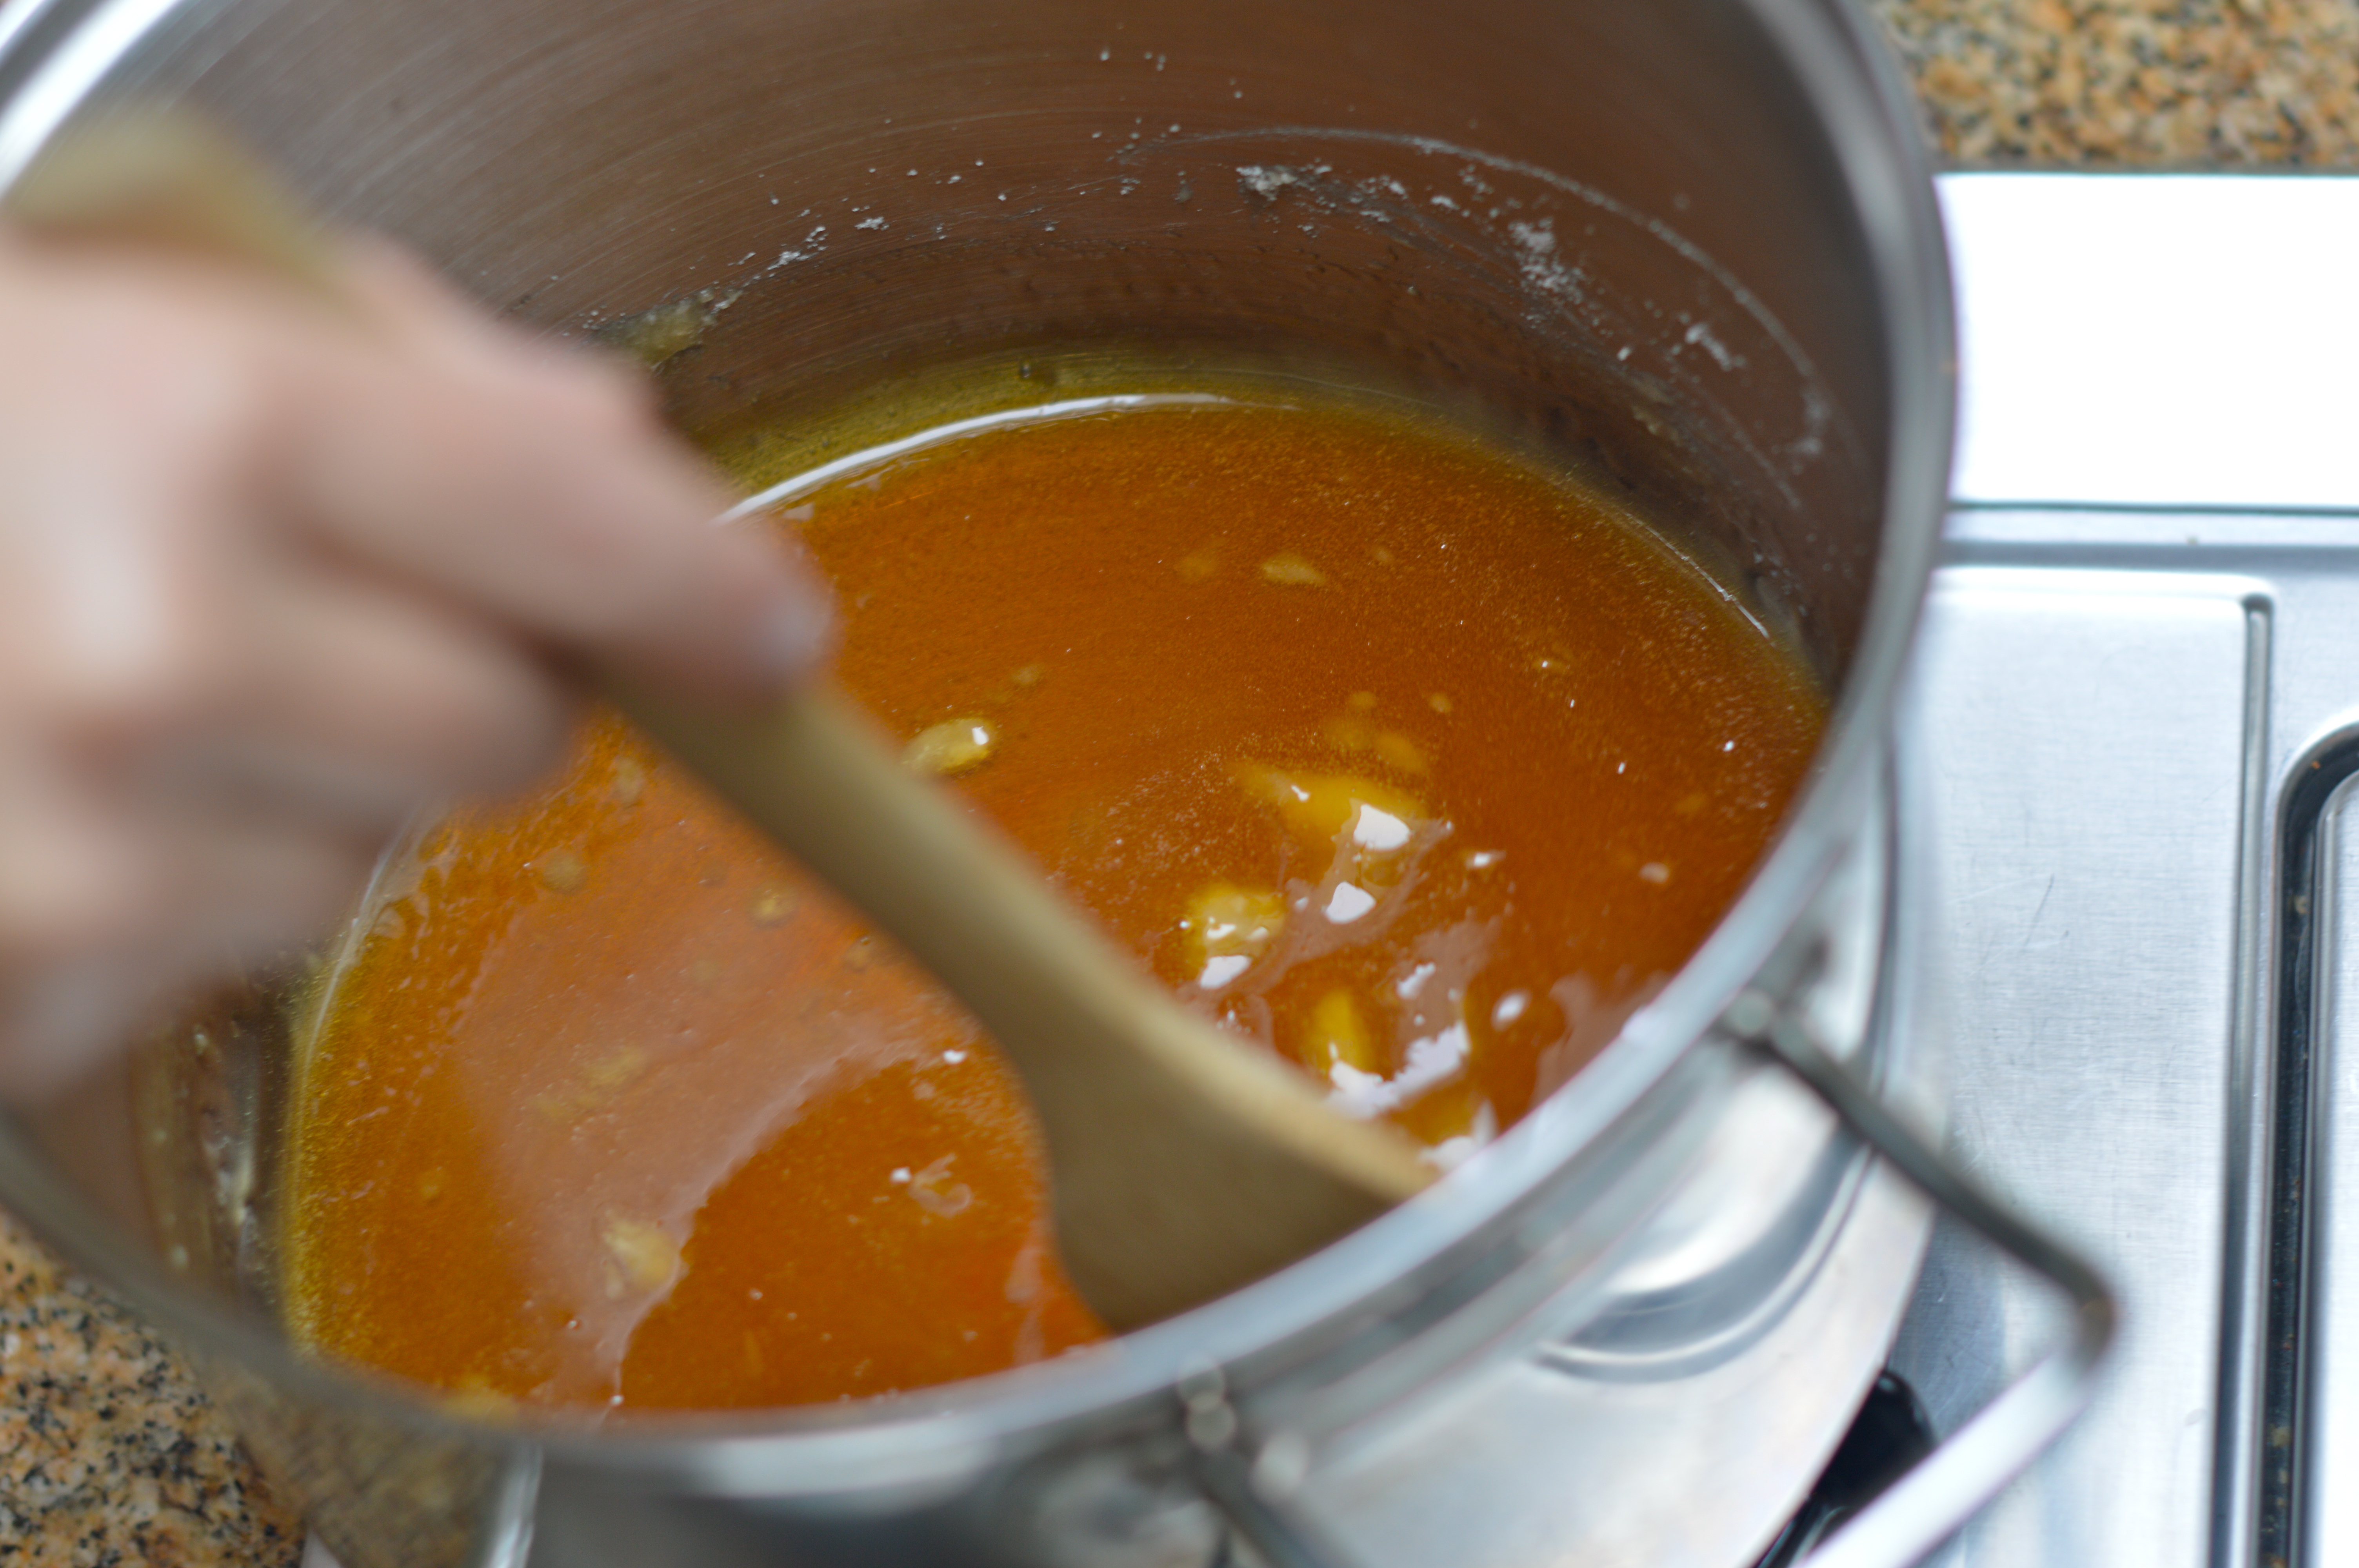
- Cook sugar in a small saucepan over medium-high heat, lifting and shaking pan occasionally, until sugar caramelizes and turns deep amber, 8 to 10 minutes. Pour caramel into liquid in pan (it will bubble furiously and may firm up). If needed, return pan to medium heat and cook, stirring, for a few minutes until caramel melts again.
- Set pan in a bowl of ice water until liquid is cold, about 10 minutes. Pour into jar with first infusion. Seal and let stand in a dark place 5 days.
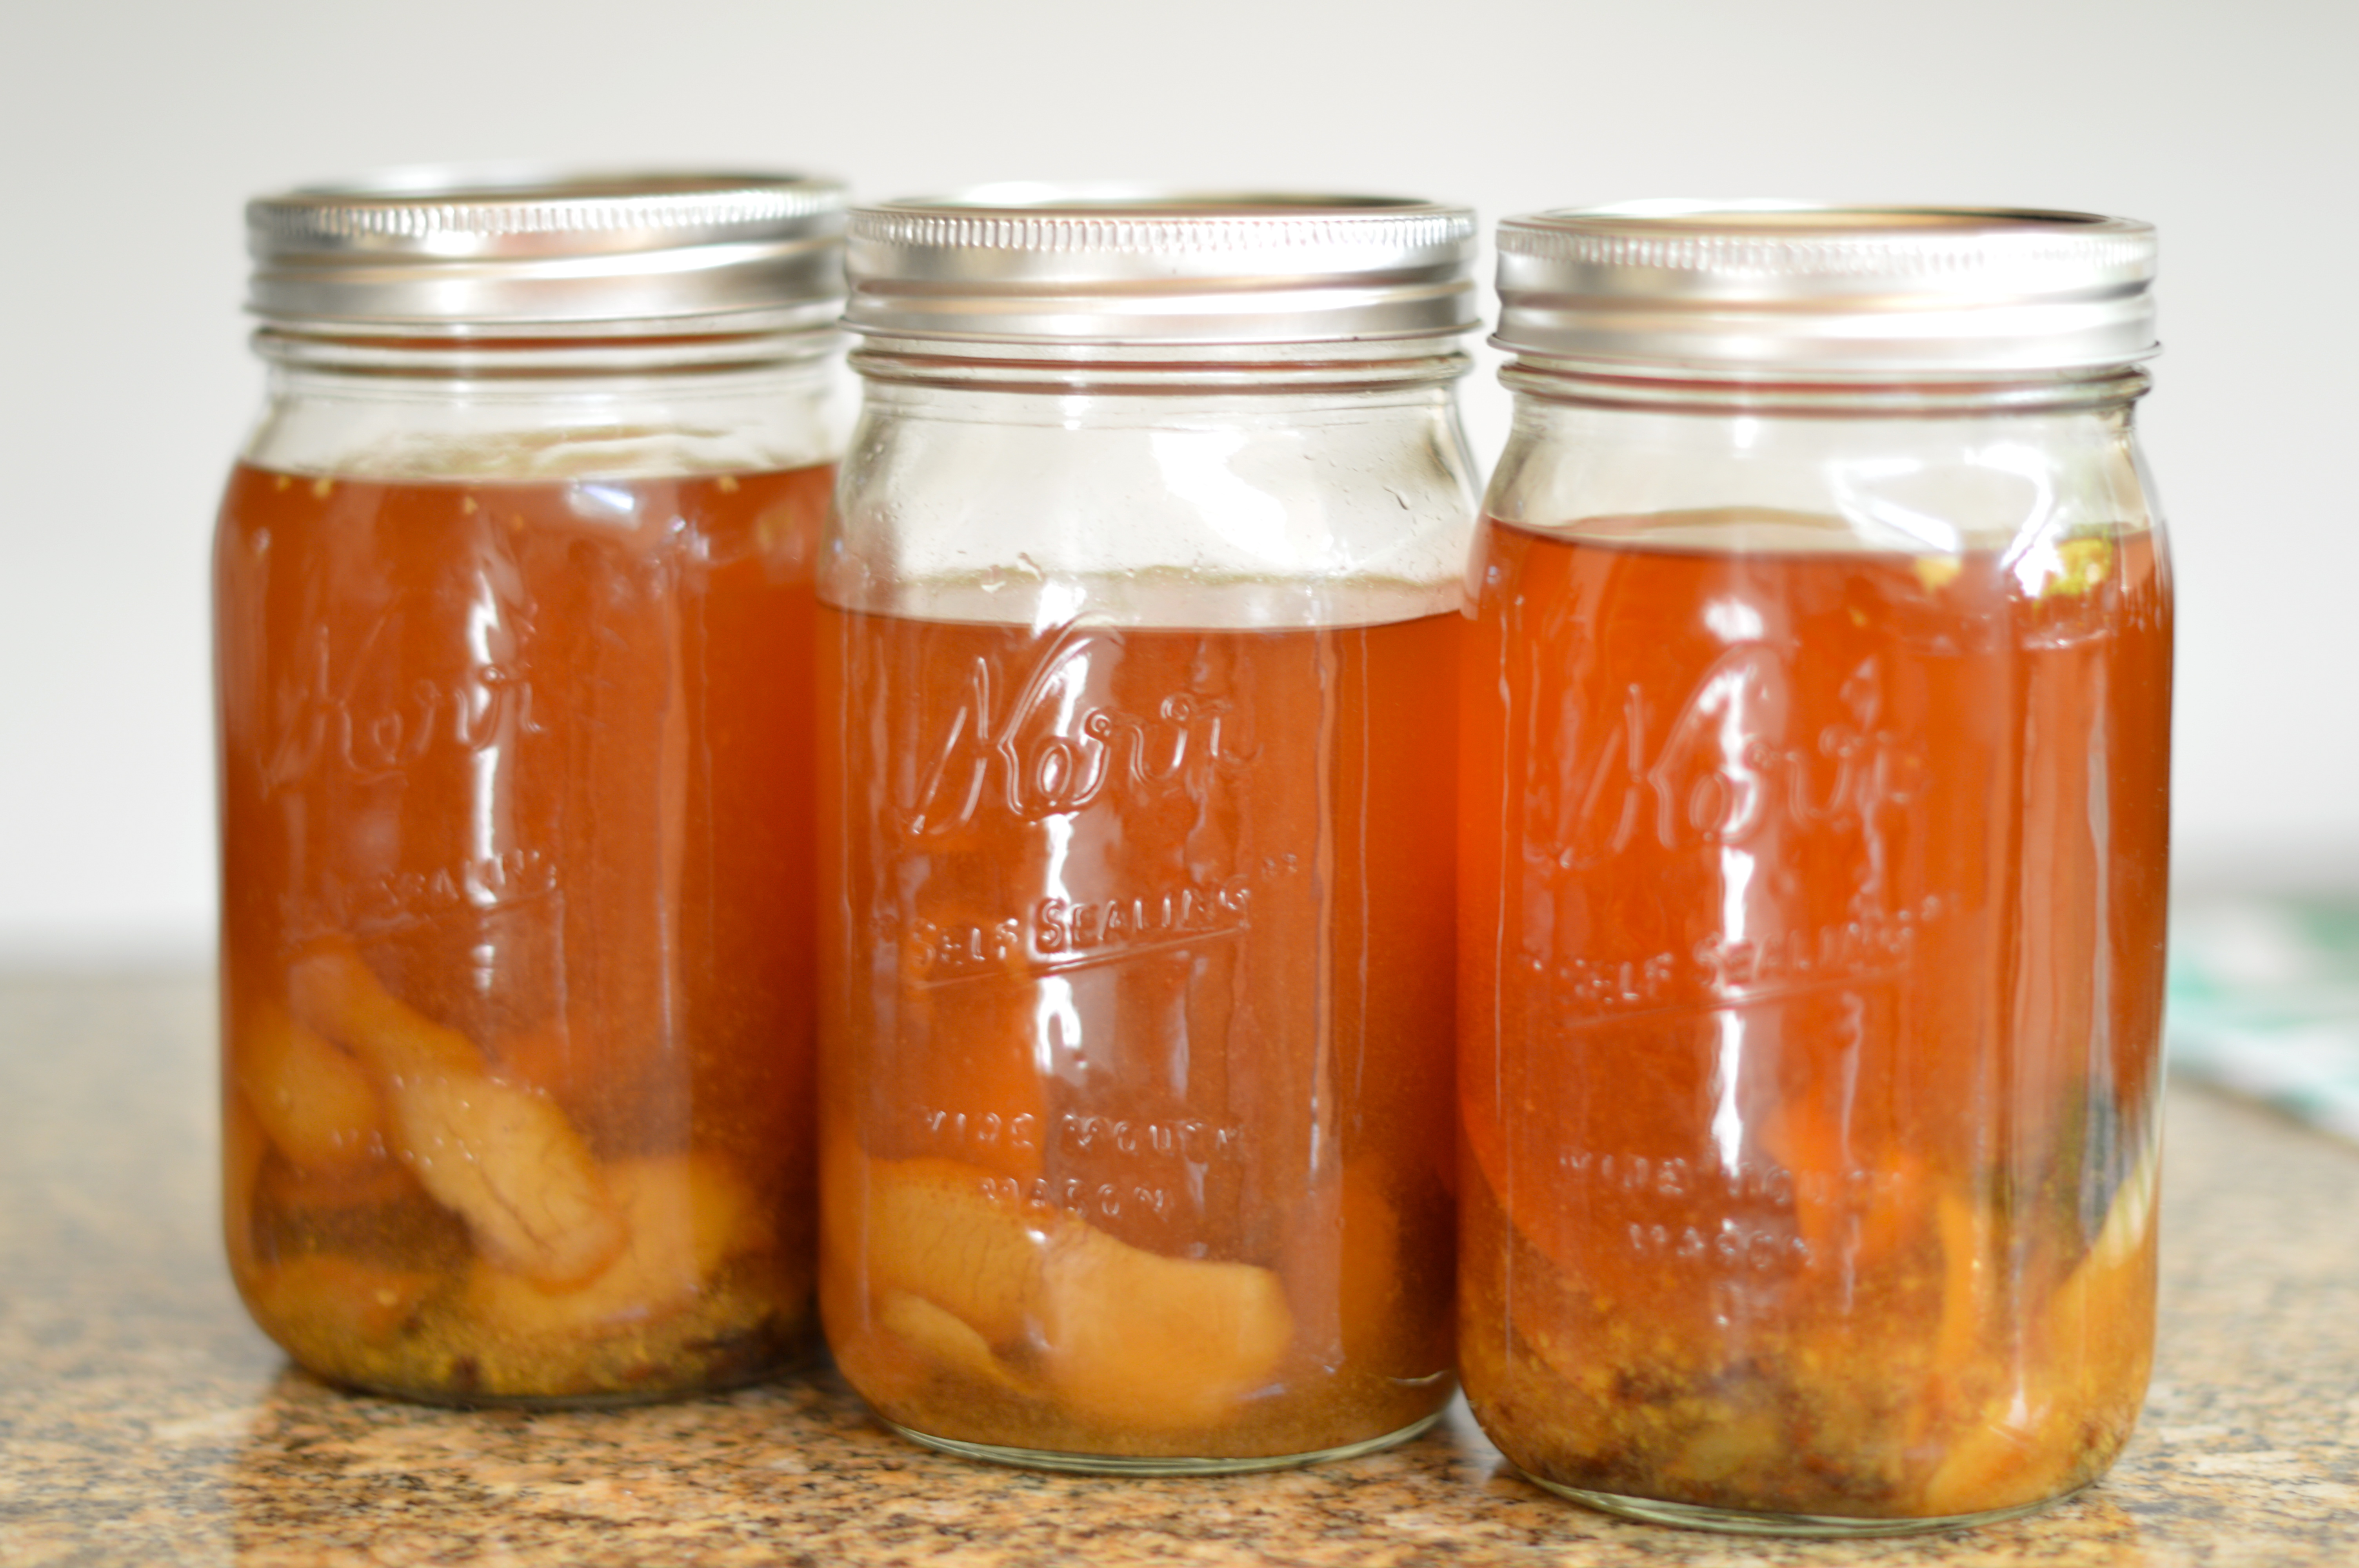
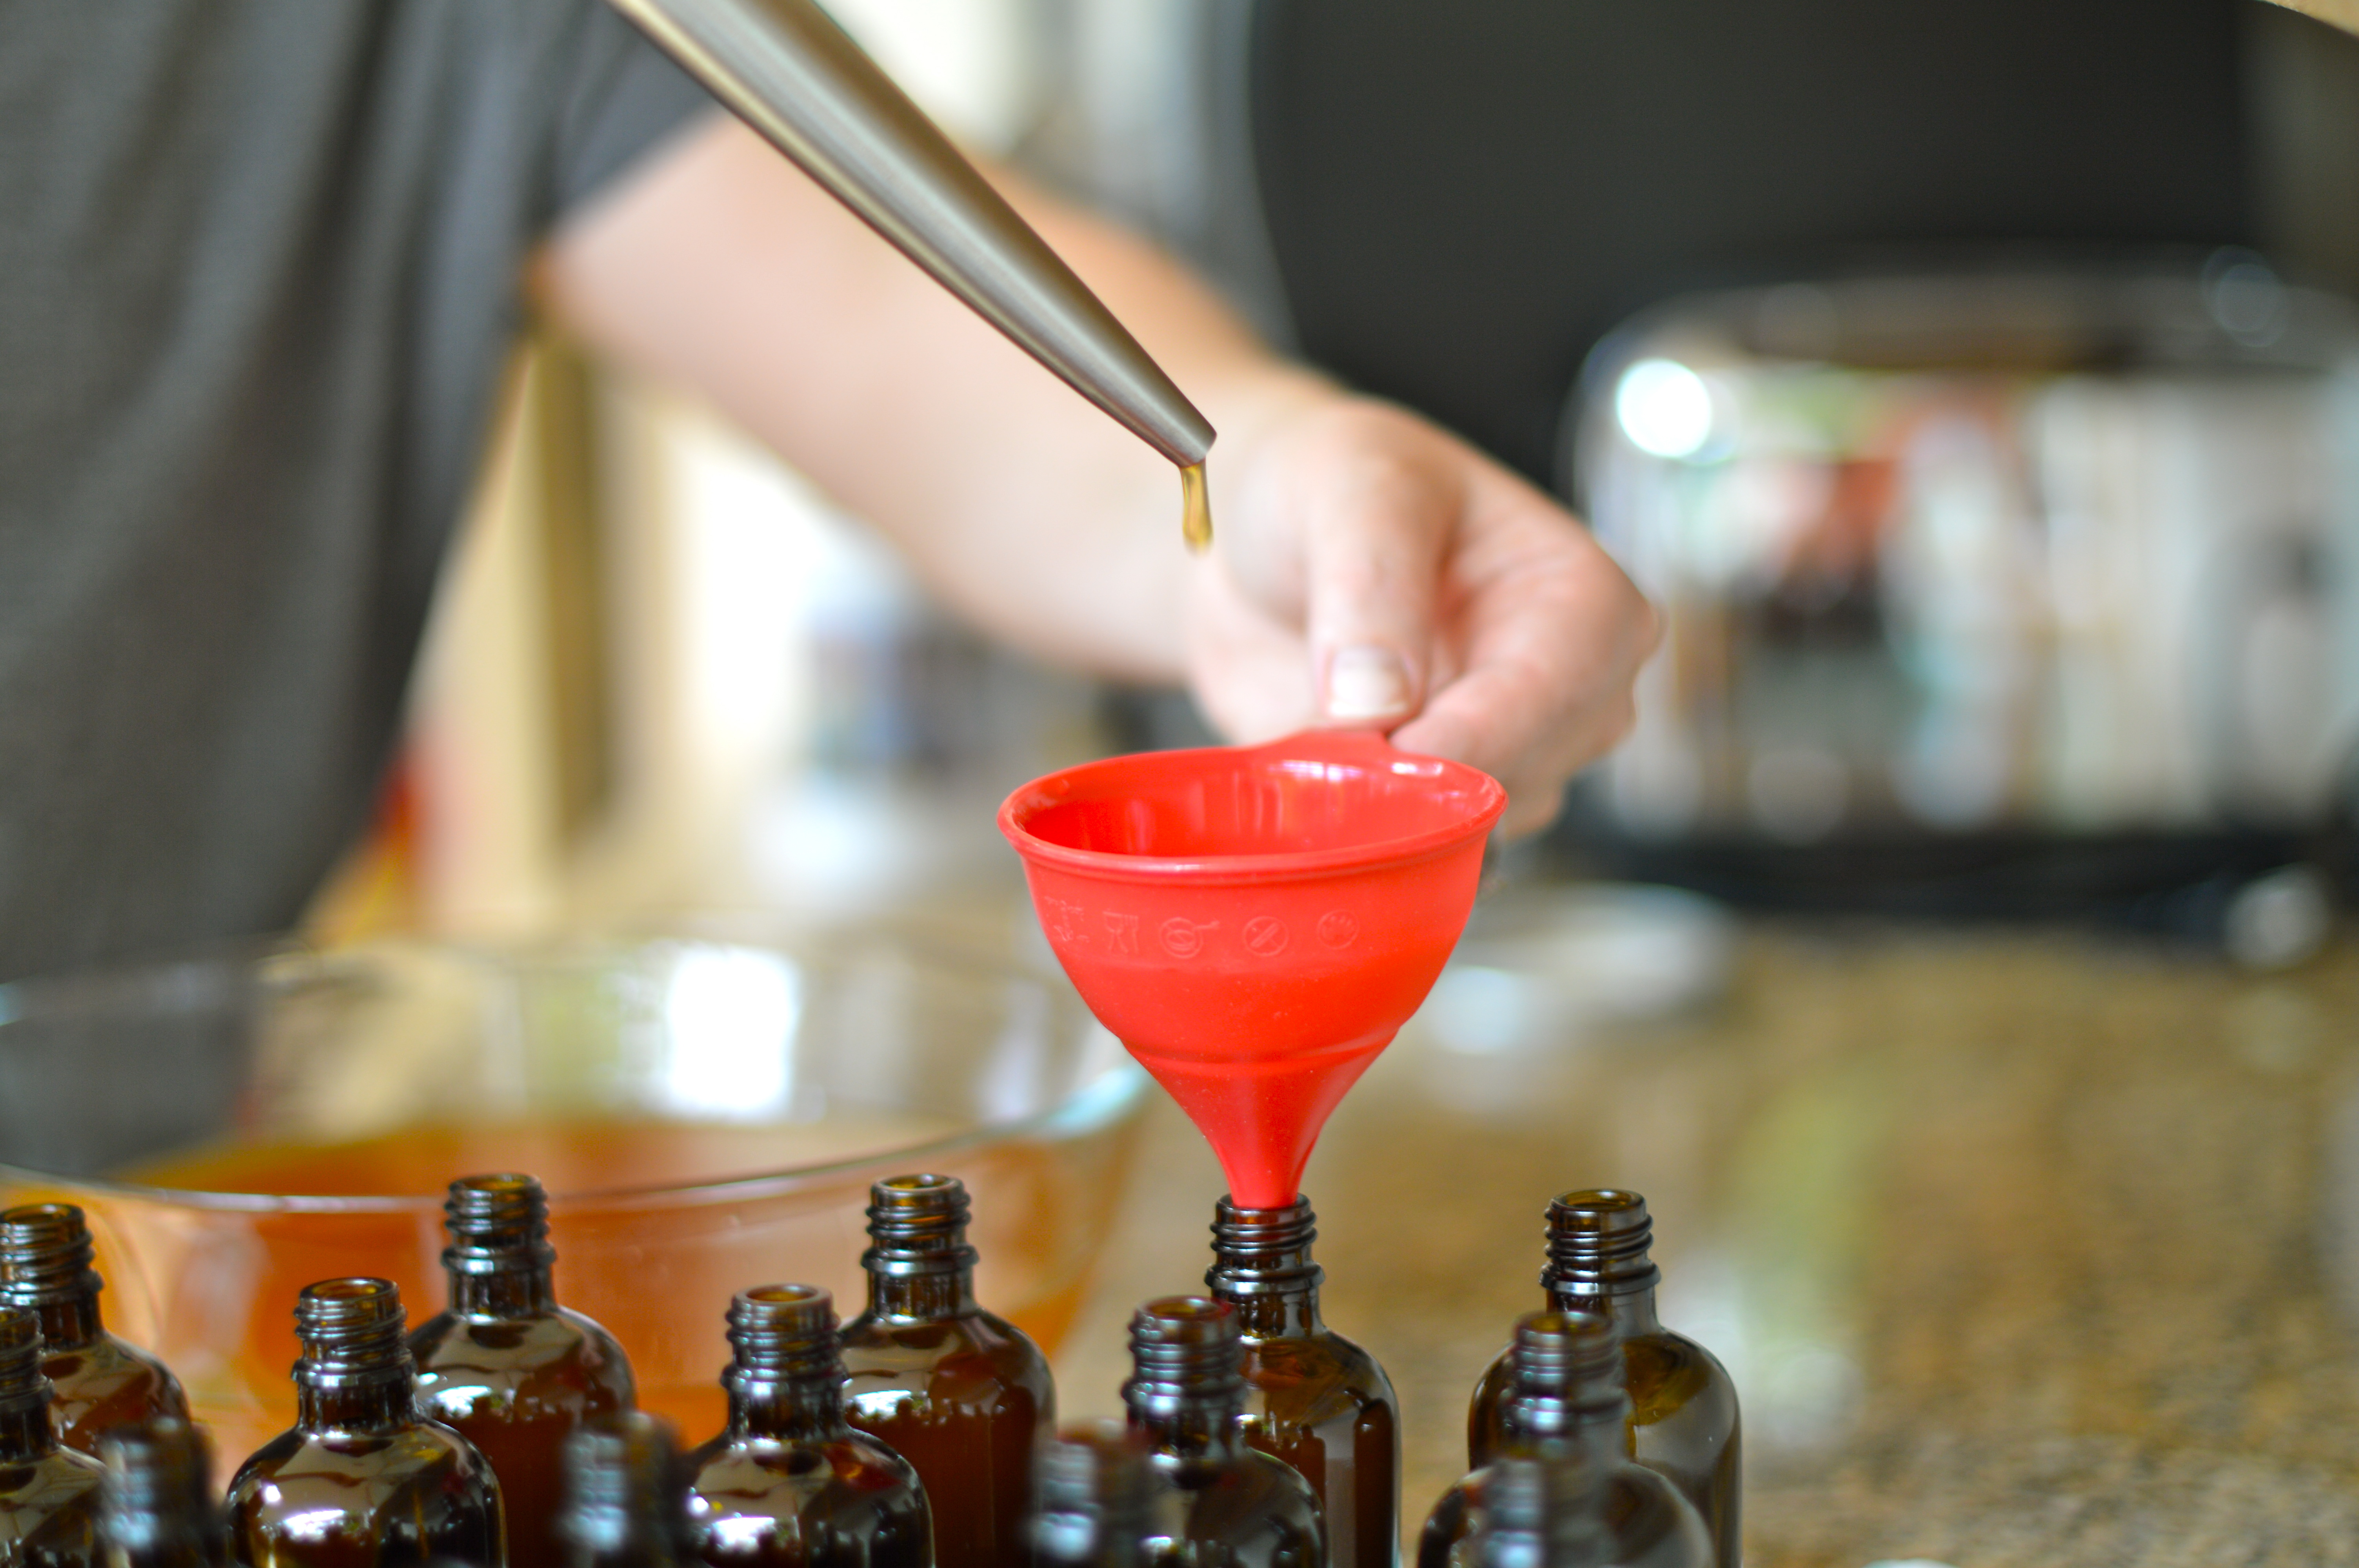
- Strain final mixture through cheesecloth into a glass measuring cup and discard flavorings. Divide bitters into small jars and seal tightly.
- Make ahead: Up to 1 year, chilled.
- Bottle it: 7.5-in. clear glass bottles
I am so excited to have tried this DIY recipe. It turned out beautifully and some of you will be receiving it this winter for Christmas. Now, you will, potentially, know what to do with it!!
Enjoy!
Friday Love
I am thrilled to share that Poole Party of 5 is featured on Assemble Shop & Studio’s website today! Andie Powers interviewed me as their Favorite Friday Friend today!

I used to work with Andie Powers years ago at Paper Source and always respected her talent and vision. We ran into each other at Alt Summit this summer and I got to meet her business partner, Emily Grosse. I had been following these ladies ventures for awhile, but it was so wonderful to get reconnected in real time. I am in awe of all that Andie and Emily are up to on Assemble and beyond. The ladies recently completed a kickstarter campaign and are definitely moving and grooving with lots of cool projects on the horizon. Go check them out!!
Click here to see the Poole Party of 5 interview: Assemble Shop and Studio: Favorite Friend Friday: Lesley Poole of Poole Party of 5
Thanks so much to Andie and Emily for the feature! I can’t think of a more fun and inspiring spot to be featured than Assemble.
