Book Bags and Goldilocks

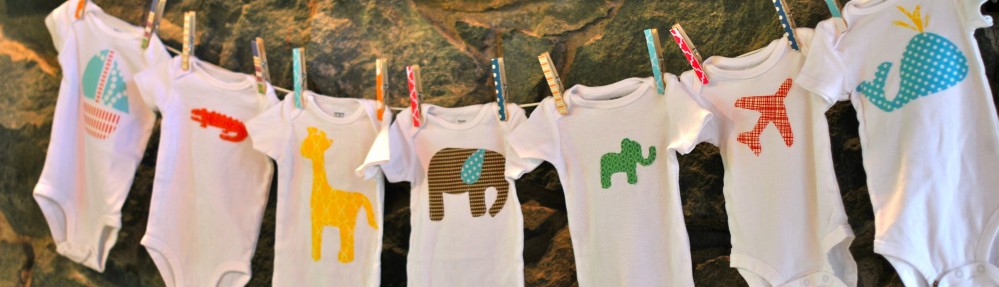
Can you smell the pencils being sharpened?  Yep, it’s that season again.  The start of school is around the corner.  This always brings feelings of excitement and nostalgia for me.  Have you done your back-to-school preparations yet?  We’re part-way there, but I got distracted when a custom request for a preschool book bag came my way.  Then I realized that Duncan could use a little newness to start his year off right!

DSC_0085

My quest for the perfect “preschool book bag” has been a bit like Goldilocks searching for the perfect chair:

too big… too small… just right…

Last year’s bags (Book Bag Fever) got the boys through the year, but improvements were needed.  As time wore on and washings were necessary, the bags required some maintenance and a few of the fabrics didn’t hold up as nicely as I would have liked.

Lessons learned…

  1. I’ve brushed up on my tote-making skills this year with a few amazing classes at make*do*mend, a wonderful sewing studio in Ballard, run by the lovely and talented Keli Faw.  First, Keli is wonderful – she is just someone you want to know.  I guarantee you will want to move in to the comfortable and hip crafting space Keli has created!  If you are in the Seattle area and curious about sewing – take an intro class!  Or, if you already sew, but want a little community – go to their open sewing times!
  2. My favorite bag from last year’s selection was the Kokka Elephants, so I learned that using a little heavier weight fabric works a bit better than quilting cottons for an unlined tote.  It happens that the fabric I am using this year is also a Kokka fabric that I purchased last year without a clear plan in mind, but look for any home decor weight fabric, or canvas.
  3. Handles were another source of frustration.  I didn’t love how my fabric handles became wrinkly over the course of the year.  A much better solution is cotton webbing for a durable and attractive handle.
  4. And lastly, thank goodness for Pinterest, where my friend, Adriane, happened to pin a fantastic simple tote tutorial by Purl Bee.  Purl Bee has a tutorial for The 20-minute Tote that just might be “preschool book bag” perfection (as well as many other uses)!  I love this tutorial.  Although it took me a little longer than 20-minutes, the instructions are clear and all worked according to plan!

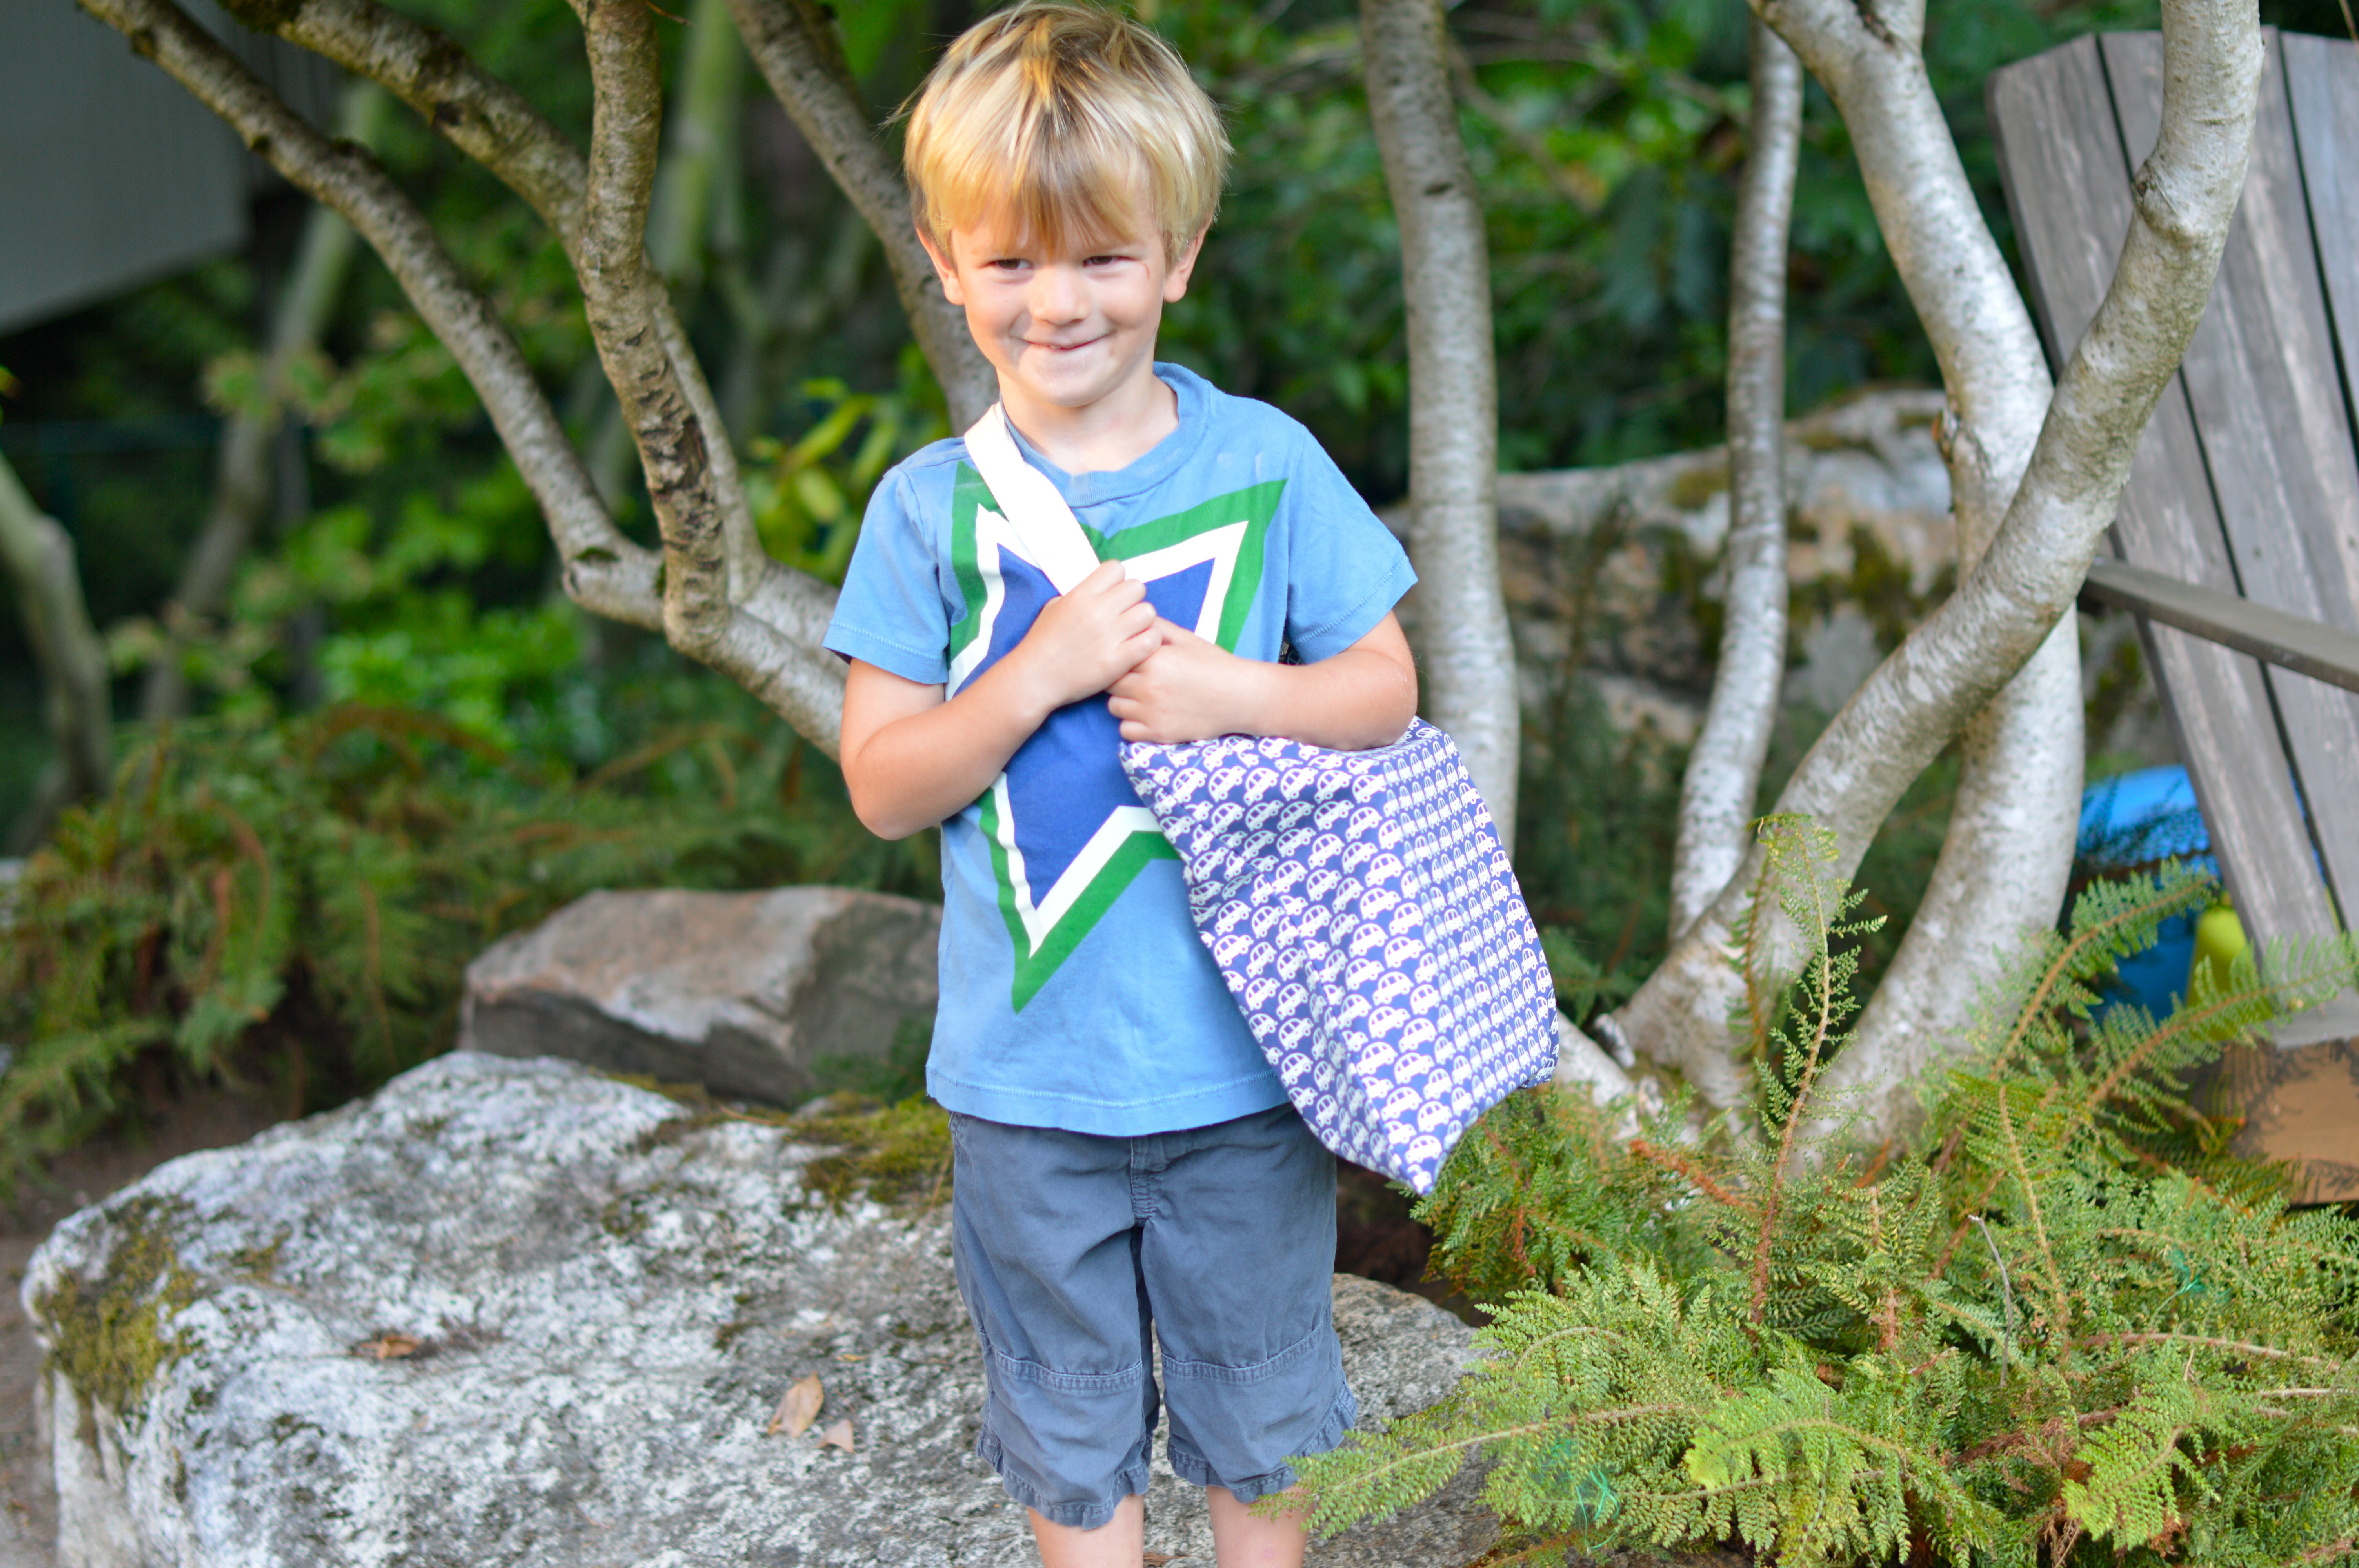
I’m really excited to think we’ve got a winner to start Duncan’s preschool year off just right.  Duncan is excited because his new school bag is blue and has “race cars”.  Thankfully my preschool age audience isn’t too picky (about some things at least)!

DSC_0071   DSC_0075 DSC_0078 DSC_0080 DSC_0081 DSC_0082

Fresh Peach Ice Cream

The kids picked out peaches this week and we decided to make ice cream.  When the weather is warm, who doesn’t like a little ice cream to cool things down?  We have an ice cream maker that we have owned for years, but only recently discovered how easy ice cream can be!  In only a few steps we were ready for a little weeknight ice cream social!

DSC_0002 DSC_0004 DSC_0005 DSC_0008 DSC_0009 DSC_0010 DSC_0011 DSC_0014 DSC_0015

We adapted a recipe from our Cuisinart Ice Cream Maker Recipe Booklet for fresh strawberry ice cream and used peaches instead.  This ice cream is best made when peaches are at their peak of freshness – this ice cream is light, sweet and fruity!

Fresh Peach Ice Cream

Makes about 5 cups  (ten 1/2-cup servings)

Ingredients:

1 1/2  cups fresh peaches, pits removed and cut in half

3/4 cup whole milk

2/3 cup granulated sugar

pinch salt

1 1/2 cup heavy cream

1 1/2 teaspoon pure vanilla extract

1.  Put peach halves into the bowl of a food processor fitted with the chopping blade.  Pulse peaches until rough/finely chopped (depending on preference).  Reserve in bowl.

2.  In a medium bowl, use a hand mixer on low speed or whisk to combine the milk, sugar and salt until the sugar is dissolved.  Stir in the heavy cream and vanilla.  Stir in reserved peaches with all the juices.  Cover and refrigerate 1 to 2 hours, or overnight.

3.  Turn on your ice cream maker and follow instructions for your maker.  For our Cuisinart ice cream maker that means, pouring the mixture into the frozen freezer bowl and let mix until thickened, about 15-20 minutes.  The ice cream will have a soft, creamy texture.  If a firmer consistency is desired, transfer the ice cream to an airtight container and place in freezer for about 2 hours.  Remove from freezer about 15 minutes before serving.

Enjoy!

This slideshow requires JavaScript.

Classic Raspberry Freezer Jam

DSC_0004

We made strawberry jam a few weeks ago and now it is time for raspberry.  Raspberry freezer jam is my absolute favorite.  It captures sunshine and summer for me all in one sweet bite.  Raspberries can be quite maddening, as their shelf life is so very short.  They are wonderful to eat that first day and I always find myself saving them, only to be disappointed that they don’t look quite as plump or luscious the next day.  With this in mind, I love to make loads of raspberry freezer jam in the summer and imagine grey February skies brightened by the spreading of this yummy goodness on my English muffin come winter.

DSC_0018

The process is almost exactly the same as with the strawberry jam.  I like to make no-cook freezer jam, as I feel that the freshness of the berries is maintained better than with cooked jam methods.  And, as I mentioned with the strawberry freezer jam, there is quite a lot of sugar in these recipes.  I guess I am one that tries to enjoy small amounts of the good stuff and not worry too much about it.  If you are interested in low sugar options, you will want to research low or no sugar needed recipes, as changing the amount in this recipe will result in your jam not setting properly.

Another fun thing about freezer jam is that it is a great activity to do with the kids!  There is no heat involved, so there is no risk of burning, as with other types of jams.  The skills involved are measuring, pouring, mashing and stirring.  The boys had a great time running the show and I loved that I could take the backseat on this project!  Taste testing is always the final treat!

DSC_0003 DSC_0005 DSC_0008 DSC_0009 DSC_0012 DSC_0014DSC_0023 DSC_0027 DSC_0030 DSC_0034 DSC_0048DSC_0036 DSC_0038 DSC_0046DSC_0040  DSC_0047

Classic Raspberry Freezer Jam

Ingredients

2 cups crushed raspberries

2 tablespoons fresh lemon juice

4 cups sugar

1 pouch liquid pectin (Certo)

zest of one lemon

Wash and rinse plastic containers with tight fitting lids.  Use 1 to 2 cup size containers.

Crush berries.  Sieve 1/2 of the pulp to remove some seeds, if desired. (I omit this step, as I don’t mind the seeds)

Measure exact amount of prepared fruit into a large bowl.

Measure exact amount of sugar into a separate bowl.  Stir sugar into prepared fruit.  Mix well.  Let stand 10 minutes; stir occasionally.  Stir pectin into lemon juice in a small bowl.  Stir pectin mixture into prepared fruit mixture.  Stir constantly until sugar is completely dissolved and no longer grainy, about 3 minutes.  (A few sugar crystals may remain.)

Mix in lemon zest.

Pour into prepared containers, leaving 1/2 inch space at top of container for expansion during freezing; cover.

Let stand at room temperature 24 hours until set.  Refrigerate up to 3 weeks.  Or store in freezer for up to 1 year.  Thaw in refrigerator.

Enjoy!!

A Look Back

Things are a bit crazy right now!  It is the first week of summer for the kiddos and things are also getting busier with Poole Party Designs!  I have been spending a lot of time at the sewing machine and it makes me think back to what was going on a year ago!

Here is a look back at some of my favorite moments from June 2012:

1.  We were celebrating the upcoming birth of a good friend’s baby:  Inspiration

cropped-dsc_0214.jpg

2.  School was coming to an end and my thoughts were on how to document time:  Holding A Memory

DSC_0001

3.  My baby was still spitting up and the Poole Party Burp Cloths were born:  Product Testing

DSC_0045

Time can feel like it goes by quickly, yet look how much has happened!!

Happy Summer!!

Bean Bag Balls

It is Spring Break and that means lots of time for kid crafts and adventures!

We found a great project on Spoonful.com; bean bag balls!  These are cheap and easy to make, and best of all they turned out just like the picture!  I love that.  Once made, these squishy balls can be used for a game of toss or would be ideal for the novice juggler.  The feel also remind me of those “stress balls” from years ago… It is quite possible that this mama will be using them by the end of this fun, busy week!

What you’ll need:

  • 9 (11-inch) balloons (for 3 balls)
  • Funnel
  • 2 1/4 cups of dried lentils
  • Scissors
  • Skewer or chop stick (not included on the original directions, but we found it helpful to push the lentils down the funnel.)

How to make it:

  1. Stretch the first balloon by inflating it halfway, holding it closed for about 30 seconds, and deflating it.
  2. Place a funnel in the balloon’s neck and gradually pour in 3/4 cup of lentils, pushing them in as you go. The balloon should be firm but squeezable.
  3. Snip off the balloon’s thick rubber lip. Cut the neck off a second balloon and gently stretch the opening.
  4. Ease the second balloon over the filled balloon, tucking in the neck as you go.
  5. Cut the neck off the third balloon, stretch the opening, and ease it over the other two. Repeat this process to make a set of three balls, or however many you’d like.

Tips:  We ended up using about 1/2 cup of lentils instead of the 3/4 cup recommended.  It was extremely helpful to inflate the first balloon all the way before holding it for the thirty seconds.  This helps to make sure the balloon is stretched out before beginning the funnel step.  A nicely stretched out balloon made filling much easier!  We also used a skewer to help push the lentils down the funnel.  The kids had a great time picking out their personal color combinations and helping both to measure and fill.

DSC_0134 DSC_0135 DSC_0137 DSC_0138 DSC_0141 DSC_0143 DSC_0144 DSC_0145 DSC_0146

This was a fun project that I would definitely recommend.  And, since making the balls didn’t use all the balloons we purchased, we had the secondary activity of blowing up the rest of the balloons and playing in the backyard for the afternoon!

Happy Spring Break!

This slideshow requires JavaScript.

Giant Floor Pillows

So I was wandering the intoxicating halls of Pinterest the other day and came upon the neat project of sewing giant floor pillows.  Since my children adore all things associated with forts and pillows, this seemed right up our alley!  I am envisioning using these goodies for cozy movie nights, pig piles and all things requiring a bit of cushioning… The awesomely graphic fabrics make them even better!  The directions and inspiration are found on Mandy Made’s creative blog and I’m sure you will find all sorts of other things you want to make once you take a stroll through her pages!

IMG_1036

I loved the idea of how simple this project looked and couldn’t wait to begin.  I happened to have some home decor weight canvas hanging about, just waiting for the right project!  As I began this project, I felt like Mandy’s directions were very good and nicely simple.  I had a little trouble getting the corners just right, but I still think the pillows turned out well.  I made two giant cushions; one following Mandy’s plan of using scraps to fill the pillow (#1, grey with white sides) and one with a little more structure using a foam rectangle covered in batting (#2, yellow with grey sides).  If I make more (which I will, since I have three children and currently two coveted pillows), I will follow the second strategy.  I like that pillow #2 ended up a lighter in weight and more reliably full.  We’ll see if I end up remaking pillow #1, or leave it as is.

IMG_1054

I also worked on a different closing method on pillow #2, as I realized that it would be nice to to wash the exterior case.  In a house with three kids and a dog who has a penchant for all things soft (and a tendency to shed), these will need to be washed periodically!  I ended up using an iron-on velcro closure, which worked like a charm!

IMG_1053

The best part about these pillows is I had barely finished closing pillow #2 before the cushions were being put to use in a serious play session!  The kids could not keep off of them, as evidenced by these photos (below).  I could barely take a picture before the pig piles began!  A true sign of success!

Happy Pillow Making!!

Custom Gifts

DSC_0008

One of the most fun things I get to do with this mini-business / hobby is hear when people have something exciting going on in their lives.  My girlfriend called the other day because a new baby had been born in her family!  She wanted to celebrate the birth by giving a gift to her nieces when she goes to visit next week.  She asked if I could help and we came up with a plan.  The new sisters share a letter, both of their first names start with “H”.  We decided to make them a coordinating t-shirt and onesie combination with a big “H” for big sister and little “h” for baby.

DSC_0029

I love how they turned out and I hope that the girls enjoy sporting their special letter around town.  Sisters get to share so much – how fun that they also share a letter!  This gift will look fantastic in pictures with the new baby.  I love that it celebrates both the family’s new addition and also big sister’s new role!

DSC_0032

Remember that Poole Party Designs is happy to work with you on special projects and gifts.  If we can help you come up with the perfect gift for a special someone in your life, that makes our day!  Hopefully it makes your life easier too…

DSC_0020

On another note, the blog has a new look!  Spring is around the corner and the blog needed some freshening up!  I am still working out some kinks, so please excuse me while we transition!  I love hearing your comments, so feel free to let me know your thoughts on the new format!

Milestones

toothfairy

My favorite projects start out with a custom request!

My wonderful friend Andie said, “Hey Lesley, I have a god son who has begun losing his teeth.  I would love to be the one to give him a tooth fairy pillow.  Any chance you could make one?”  What a fabulous idea!!  I played around with a design until I was satisfied and now Andie’s god son has a sweet little home to keep those baby teeth safe until pick-up from The Tooth Fairy.

And now, the pillows are available for your little ones as well on Poole Party Designs!

toothfairyaqua1

As I look at what I am creating these days, it has a lot to do with milestones.  Shirts that recognize how many years a child has under his or her belt or a onesie that announces the letter or name that is bestowed at birth.  We celebrate birthdays at our house with quite a lot of hoopla and other milestones seem to be the same.  As time passes in both a whirlwind and quite imperceptibly, it feels like the only thing I can do is notice, document, and celebrate!

toothfairynavy1

toothfairyyellow1

One milestone that we are inching ever closer to, but have yet to hit is the losing of baby teeth.  This rite of passage officially moves a child from baby years into kid years and is one more thing to relish and celebrate.  The Tooth Fairy.  Yikes.  As a parent I look at it this event with a bit of trepidation as well.  Here is yet another imaginary individual who we, as parents, will answer questions about with false confidence in an effort to make this legend appear magical versus creepy.  The fact that we allow a fairy to enter our home undetected time after time is already enough to make me lose a bit of confidence in the telling.  One more legend (like the darn Elf on the Shelf) that I will try desperately to remember and try not to totally screw up.  Then there is the actual execution.  My children are light sleepers.  I do not look forward to entering their room once they are (finally) asleep only to possibly wake them up while rummaging around under their pillow!  And to remember to do this over sixty times?!?!  Wish us luck!!  Maybe a personalized pillow will help?!?!  Here’s hoping.

toothfairyred

Note:  My husband would like all readers to know that our family does not necessarily endorse the giving of paper money if and when The Tooth Fairy visits.  As I said, we have yet to cross this bridge and don’t have a clue what we are doing!  Paper money has been used above for artistic purposes only!

Patience, Not Perfection

In our house, the Valentine Season is more about the valentines kids bring to their friends at school than a declaration of romantic love.  Meaning, a few weeks ago we set out to make our school valentines and have yet to finish…

DSC_0002

The part of me that loves coming up with projects to do with my kids finds this situation completely satisfactory.  We get to work on a project together and have hours of entertainment!  The kids will have an end product that they get to share with their peers!  Fun!  The other part of me that is a bit of a perfectionist with said projects is having a harder time with the process.  In my mind’s eye, the valentines we made together were finished weeks ago and were exceptionally cute (read: professional).

DSC_0011

Then came the realization that I had a choice to make.  Would these by my valentines?  Or, (correct answer) would these be my kids’ valentines?  We all love to show the world what we can do (me included, obviously)…  And yes, I do love me a good craft project.  So, we compromised.  The project did involve Shrinky Dink hearts and it did involve some group stamping, but more importantly, it involved letting my kiddo practice writing names over and over again.  I must admit to feeling a teensy bit proud of myself that I did not take the pen away to write all the valentines myself (in my efficient, adult penmanship), but rather I am allowing my five-year-old the time and space to practice his budding handwriting skills night, after night, after night… This may not seem like a big deal.  In fact, it may sound quite insane.  But each of us has things we do well and areas where we are challenged.  Right?  (Insert head nod here.)  Small victories.

DSC_0013

In the end, these valentines will end up in the recycling bin after a day or two, but my son will feel more confident writing his and his brother’s names going forward.  As we encourage our little people to spread their wings and master new skills, it is a good reminder, that although a project may take longer (most likely), will be messier (guaranteed),  and may turn out differently than imagined (quite probably), there is more to be gained from the process than from doing it all ourselves.  I am hopeful that we will be done by Thursday morning… Fingers crossed.  Clearly, handwriting is not the only lesson being learned from this project!

DSC_0005

Hello, Cupcake

DSC_0004

“Winter White and One” was the theme of the party.  It was important to me that Tatum’s first birthday party feel intimate and differentiated from the Christmas celebrations we had been involved in days before.  I envisioned wiping away the holiday from one room and replacing the red and green with clean, white everything.  I liked the idea of white cupcakes on white cake plates – white, white, white… but also wanted to find some unfussy design element that would help commemorate this milestone for my little girl.

flags3

flags2

There is a company I learned about called Ticings that makes “tattoos” for cupcakes.  I was very intrigued by these when I came across them in a magazine.  If their product was not cool enough, Ticings currently has an artist doing custom silhouette art for them.  Perfect!  Despite my late planning and holiday business, Ticings was able to accommodate all my requests and the customer service was a dream.  I sent in a photo of Tatum and days later received custom cupcake tattoos with my baby girl’s silhouette.  I also asked for the artwork to keep as a momento of the day.

DSC_0033

DSC_0032

Since I had already spent some money on the tattoos, I figured that I better bake the cupcakes versus purchase designer ones.  I am a mediocre baker at best with a very old oven, so I was a little intimidated, but figured it would all work out.  (At this point, it might have benefitted me to read the directions on the Ticings packaging, as my cupcakes were not as flat as they recommended which made application more difficult.)  A few years ago I was given a cookbook called, “Hello, Cupcake! : Irresistably playful creations anyone can make”.  Most of the cupcakes in this cookbook are fun to look at, but not something I would attempt in real life.  My favorite thing about this cookbook is in the back there are some tips and tricks and recipes for semi-homemade cupcakes and frostings.  The authors allow that homemade is usually best, but in a pinch there are ways to improve flavor and texture from store bought mixes, etc… Their “Perfect Cake-Mix Cupcakes” have worked really well for me:

Perfect Cake-Mix Cupcakes from Hello, Cupcake!

1 box (18.25 ounces) cake mix (French vanilla, devil’s food, or yellow)

(Note from PP5: I like Trader Joe’s brand)

1 cup buttermilk (in place of the water called for on the box)

Vegetable oil (the amount on the box)

4 large eggs (in place of the number called for on the box)

Preheat the oven to 350 degrees.  Line 24 muffin cups with paper liners.

Follow the box instructions, putting all the ingredients in a large bowl and using the buttermilk in place of the water specified (the box will call for more water than the amount of buttermilk that you are using), using the amount of vegetable oil that is called for, and adding the eggs.  Beat with an electric mixer until moistened, about 30 seconds.  Increase the speed to high and beat until thick, 2 minutes longer.

Spoon half of the batter into a ziplock bag.  Snip a 1/4 inch corner from the bag and fill the paper liners 2/3 full.  Repeat with the remaining batter.  Bake until golden and a toothpick inserted in the center comes out clean 15-20 minutes.  Remove the cupcakes from the baking pans, place on a wire rack, and allow to cool completely.

Next, I used one of the cookbook’s frostings and was very happy with the result.

Almost-Homemade Vanilla Buttercream

Makes 3 1/2 cups

1 container (16 ounces) Marshmallow Fluff

3 sticks (3/4 pound) unsalted butter, softened and cut into 1-inch pieces

1 teaspoon vanilla extract

1/2 cup confectioners’ sugar, plus additional sugar if necessary

Spoon Marshmallow Fluff into a large bowl.  (Marshmellow Fluff twice in one month?!?!?)  Beat with an electric mixer on low.  Gradually add the butter pieces, well after each addition, until smooth.  Add the vanilla extract and the 1/2 cup confectioners’ sugar.  Scrape the bowl well to incorporate.  Add more confectioners’ sugar, if necessary, to adjust the texture.

DSC_0036

DSC_0035

As we were frosting these cupcakes, my sister and I were unsure about how messy the frosting looked.  My mom had a helpful tip that I will pass on to you.  After frosting your cupcakes, run your knife under hot water and wipe over frosted cupcake for an ultra-smooth look.  (note: The cupcakes were definitely a group effort – thanks, ladies!  The moral support was the best part of all.)

DSC_0047

DSC_0050

DSC_0051

DSC_0054

I will admit that the Ticings cupcake tattoos were a little more difficult to apply than I had hoped.  We used their gold  sprinkles to cover mistakes around the edges.  In the end, I love the modern look of the silhouette on the cupcake.  I was and am really happy with the result!

DSC_0063

DSC_0078

DSC_0061

DSC_0191

DSC_0222DSC_0170DSC_0245

The family enjoyed a beautiful morning.  Cupcakes were a hit and the birthday girl couldn’t have been happier.  Tatum is sporting a Poole Party Designs original and sitting in her custom chair from Auntie.  It is safe to say she enjoyed her day!  Success!